Gas Riser Installation Made Easy (Even If You’re Not a Pro)
By Brian on July 8, 2025
What is a Gas Riser and Why is it Important?
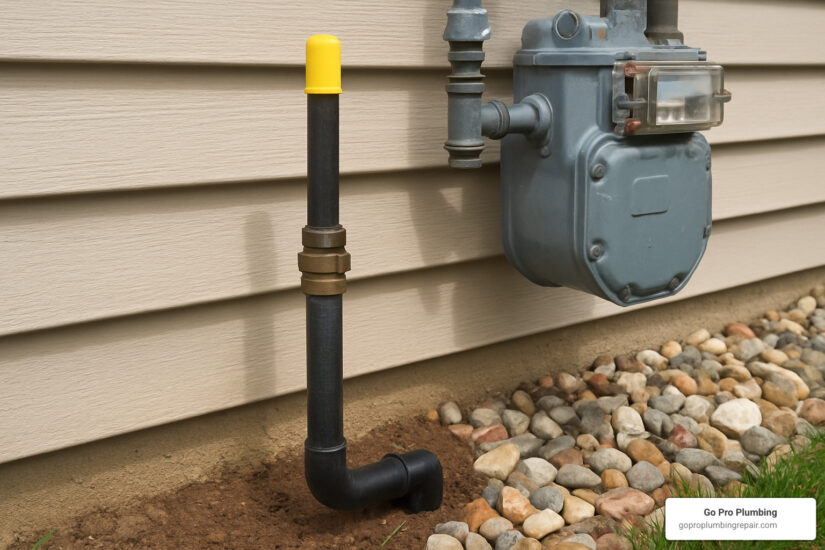
Gas riser installation is the process of connecting underground gas lines to above-ground meters or appliances using specialized pipe assemblies. Here’s what you need to know:
Key Components:
- Underground section: Polyethylene (PE) pipe buried below frost line
- Riser assembly: Transitions from underground PE to above-ground steel
- Above-ground section: Steel pipe connecting to meter or appliances
- Safety features: Shut-off valves, tracer wire, and proper clearances
Common Riser Types:
- Anodeless risers: No cathodic protection needed, epoxy-coated steel casing
- Compression risers: Economical option with compression fittings
- Flex risers: Accommodate ground movement and settling
A gas riser serves as the critical bridge between your buried gas line and the equipment that uses that fuel. As one industry expert notes, “risers play a crucial role in the connection between underground piping systems and above-ground meters or appliances.”
Without a properly installed riser, you can’t safely transition from the flexible underground polyethylene pipe to the rigid steel piping required for meters and appliances. The riser also provides a convenient location for shut-off valves and allows utility workers to access the gas line for maintenance.
Why proper installation matters:
- Prevents dangerous gas leaks
- Ensures regulatory compliance
- Allows for ground movement without pipe stress
- Provides accessible shut-off points for emergencies

Simple guide to gas riser installation terms:
- black pipe gas line installation
- connecting flexible gas line to black pipe
- gas line regulator installation
Before You Begin: Planning, Safety, and Gathering Materials
This section is crucial for a safe and code-compliant project. Handle these items before the first shovel of dirt moves.
Understanding Different Gas Riser Types
Choosing the correct riser is like choosing the right foundation—it has to match your site and last for decades.
Anodeless risers are the residential standard. Their epoxy-coated steel needs no extra cathodic protection—simple and dependable.
Compression risers cost less but require an anode because some steel parts are exposed to soil.
Flex risers shine where soil is unstable or frost heave is common; the fully flexible body bends instead of breaking.
Rigid risers use heavy-duty carbon steel and factory-tested PE tubing for demanding commercial or industrial sites.
Understanding the Different Types of Risers
| Riser Type | Corrosion Protection | Installation Ease | Typical Uses |
|---|---|---|---|
| Anodeless | Epoxy coating | Easy | Most homes |
| Compression | Requires anode | Very easy | Budget jobs |
| Flex | Epoxy coating | Moderate | Frost/heave areas |
| Rigid | Factory coating | Moderate | Commercial |
Sizing Your Gas Pipe Correctly
Undersized pipe starves appliances; oversized pipe wastes money. Determine:
- Total BTU load – add every appliance (e.g., an 80 000 BTU furnace + 40 000 BTU water heater = 120 000 BTU).
- Total run length – longer runs need larger pipe to offset pressure drop.
- Local code charts – use the column for the gas pressure your utility supplies.
Example: A 75 ft run serving a 50 000 BTU heater often works with 3/4-in pipe, but a 250 ft run feeding 160 000 BTU usually needs 1-1/4 in.
When in doubt, go one size up or ask a licensed gas plumber.
More info about gas line installation
Local Regulations and Safety First

- Call 811 at least two business days before digging—free, required, and lifesaving.
- Pull permits & schedule inspections – most jurisdictions check trench depth, materials, and final pressure test.
- Follow utility specifications – approved riser models, minimum clearances, shut-off locations, and test procedures.
- Install tracer wire – 14 AWG copper, continuous the full run, so future crews can locate plastic pipe.
More info about certified gas plumbers
Tools and Materials Checklist
Essential tools
- Pipe wrenches (various sizes)
- Shovel/trencher and tape measure
- Pipe cutter/threader if needed
- 30 PSI gauge and air compressor for testing
Materials
- Gas-rated PE pipe (sized per above)
- Selected riser assembly
- Tracer wire & warning tape
- Gas-rated thread sealant
- Bedding sand or fine soil
Safety gear
- Eye protection, gloves, gas leak detector
- First-aid kit, emergency contacts
Double-check the list now so you’re not scrambling halfway through the job.
Your Step-by-Step Guide to Gas Riser Installation
Follow these core steps, always deferring to local code when it differs.
Step 1: Trenching for the Gas Line

Dig at least 18 in deep or below the local frost line. Clear rocks and roots, then bed the trench with 4 in of sand or fine soil. Lay the PE pipe with a gentle slope toward the riser and run tracer wire 6–12 in above it.
Step 2: Connecting the Riser
Heat-fusion gives the most permanent joint; mechanical fittings are fine if tightened to spec. Maintain at least 12 in clearance from combustibles and leave room for a shut-off valve and meter.
Step 3: Allowing for Ground Movement
Frost heave and settling can crack rigid piping. Use swing joints or utility-approved flexible connectors so the riser can move slightly instead of transferring stress to the buried line. Never hard-anchor the riser to the foundation unless specifically engineered.
Step 4: Backfilling the Trench
First cover the pipe with 6 in of sand/fine soil and lightly compact. Place gas warning tape about 12 in above the pipe. Finish backfill in 6 in lifts, tamping each layer, and install permanent markers at changes of direction and property lines.
Post-Installation: Testing and Final Connections
How to Properly Pressure Test Your New Gas Line

- Cap the line (meter removed).
- Pressurize slowly to 25 PSI with air or nitrogen and record the reading on a 30 PSI gauge.
- Wait one hour for stabilization, then observe for at least another hour.
- Any pressure loss means a leak that must be repaired and retested.
Leak Detection Methods
After the line passes the static test, brush a soap-water solution on every joint or use an electronic sniffer. Bubbles or beeps = leak; shut off gas, fix, and retest.
More info about gas line repair services
Connecting to the Meter and Appliances
Reconnect the meter with approved transition fittings and gas-rated thread sealant. Install the regulator in the proper orientation, add individual shut-off valves for each appliance, and maintain clear working space for utility crews.
Schedule final code and utility inspections—service will not be turned on until both approve.
More info about gas line regulator installation
Frequently Asked Questions about Gas Riser Installation
Should a gas riser be anchored to the foundation?
Here’s something that surprises many homeowners: you generally shouldn’t anchor a gas riser to your foundation. I know it seems counterintuitive – wouldn’t anchoring make it more secure? But the opposite is actually true.
When you anchor a riser rigidly to your foundation, you’re creating what engineers call stress concentration points. Think of it like this: your foundation isn’t going anywhere, but the ground around it is constantly moving. During freeze-thaw cycles, the soil can shift several inches up and down. If your riser is locked to the foundation, all that ground movement gets transferred directly to the pipe connections.
Frost heave is the real culprit here. In cold climates, this ground movement can put tremendous stress on anchored risers, leading to cracks, leaks, or complete failures. Even in milder climates, normal soil settlement can twist or pull an anchored riser over time.
The one exception might be if your horizontal pipe runs through very loose fill dirt that’s likely to settle significantly. But even then, any anchoring system needs to allow for some movement and should be designed by a qualified professional.
Better alternatives include swing joints that allow controlled movement, flexible hose connections in areas with significant ground movement, and proper bedding and backfilling techniques that minimize settlement in the first place.
What is a tracer wire and why is it necessary?
A tracer wire might seem like an unnecessary extra step, but it’s actually a crucial safety feature that could prevent disasters down the road. This conductive wire runs alongside your buried polyethylene gas pipe because plastic pipe cannot be found with a standard metal detector.
Here’s why this matters so much: imagine a contractor digging in your yard five years from now to install a fence or repair a water line. Without tracer wire, they have no way to locate your buried gas line. One wrong shovel strike could rupture the pipe, causing a gas leak or even an explosion.
The tracer wire acts like a breadcrumb trail that future utility workers can follow using specialized detection equipment. When they need to locate your gas line for maintenance, repairs, or to avoid it during other work, they can send a signal through the tracer wire and track its path underground.
Installation requirements are pretty straightforward: use at least 14 AWG insulated copper wire, install it 6-12 inches above your gas pipe, and make sure it’s continuous throughout the entire run. You’ll also need access points at both ends for testing the wire’s continuity.
One important maintenance note: tracer wire systems need periodic testing to ensure they’re still working. The wire can break due to corrosion, physical damage from other excavation work, or simply age-related deterioration.
Can I use black iron pipe underground?
This is one of those questions that comes up surprisingly often, and the answer is a definitive no. Standard black iron pipe will fail quickly when buried directly in soil – we’re talking about serious corrosion that can create dangerous leaks.
Here’s what happens underground: soil moisture and chemicals attack unprotected steel relentlessly. Add in electrolysis from contact with dissimilar metals, and you’ve got a recipe for rapid deterioration. Standard black iron pipe simply doesn’t have the protective coatings needed to survive burial.
For underground gas lines, you need approved materials like polyethylene (PE) pipe, which is the most common choice for gas riser installation projects. PE pipe is specifically rated for gas service and direct burial. Some jurisdictions also allow specially coated steel pipe with cathodic protection, or copper pipe with proper installation and protection.
But here’s the thing: black iron pipe is perfectly fine for above-ground applications. It’s commonly used for gas piping inside buildings and for exposed exterior runs where it can be properly maintained and inspected.
This is exactly why gas risers exist – they provide the transition point between underground PE pipe and above-ground black iron pipe. You get the corrosion resistance of plastic underground and the durability of steel above ground, with each material used in its ideal application.
Conclusion: Ensuring a Safe and Successful Installation
A successful gas riser installation hinges on careful planning, adherence to local codes, and meticulous testing. Throughout this guide, we’ve walked through every step needed to create a durable and safe fuel system that will serve you reliably for decades.
The foundation of any good installation starts with thorough planning. Choosing the right riser type for your specific soil conditions, correctly sizing your pipe based on BTU requirements and run length, and obtaining proper permits aren’t just bureaucratic problems – they’re your safety net. And never forget that call to 811 before any excavation work begins. It’s free, it’s required, and it could save your life.
Quality installation techniques make all the difference between a system that lasts and one that fails prematurely. Proper trenching and bedding protect your investment from ground shifts and settling. Those flexible connections we discussed? They’re far better than rigid anchoring for accommodating the natural movement that happens with frost heave and seasonal changes. The tracer wire installation might seem like an extra step, but it’s essential for future safety when someone needs to locate your buried line.
Testing is absolutely non-negotiable – and we can’t stress this enough. That pressure test at 25 PSI for at least two hours, combined with bubble tests and electronic detection, isn’t just following procedures. It’s the final verification that your family will be safe when gas flows through the system. Document everything for inspection approval, and never skip these safety verification steps, no matter how confident you feel about your work.
While this guide provides comprehensive information, gas work carries inherent risks. The complexity of local codes, utility requirements, and safety considerations means that professional consultation is often the wisest choice. Some installations may require licensed professionals due to local regulations or insurance requirements.
Here in Northern California, we deal with unique challenges like seismic activity, varying soil conditions, and specific utility company requirements that may not apply elsewhere. Local expertise becomes invaluable when navigating these regional considerations.
Consider calling in the professionals when local codes require licensed installation, when you’re uncomfortable with any aspect of the work, or when your installation involves complex routing or multiple appliances. If you encounter unexpected conditions during excavation or pressure testing reveals leaks you cannot locate or repair, it’s time to get help.
For residents in Northern California seeking expert assistance, Go Pro Plumbing offers certified and reliable gas line repair and installation services. Our team understands local codes, utility requirements, and the unique challenges of gas installations in our region.
A properly installed gas riser system will provide decades of safe, reliable service. The time and attention you invest in doing it right the first time pays dividends in safety, compliance, and peace of mind. Whether you tackle this project yourself or work with professionals, the principles we’ve outlined will help ensure a successful outcome that keeps your family safe and your gas flowing reliably for years to come.