Fixing Faucets: Your Guide to Shower and Tub Cartridge Replacement
By Brian on September 18, 2025
Why Your Shower Problems Point to One Common Culprit
Shower cartridge replacement solves most common shower issues like dripping faucets, inconsistent water temperature, and stiff handles. This small component controls water flow and temperature, and when it fails, your daily routine suffers.
Quick Answer for Shower Cartridge Replacement:
- Turn off water supply to your shower
- Remove handle and trim plate to access the cartridge
- Pull out old cartridge using pliers or cartridge puller
- Install new cartridge in same orientation as old one
- Reassemble and test for proper function
Average cost: $200-$400 professionally, $50-$100 DIY
Time needed: 1-3 hours
Difficulty: Intermediate
A malfunctioning shower cartridge is more than an inconvenience. A faulty cartridge can cause water waste, potential scalding, and even rust damage behind your shower wall. As one plumbing expert puts it: “Your shower should make you cool and collected, not cold and neglected!”
The good news? Shower cartridges typically last 10-30 years, so replacement isn’t frequent. When the time comes, you can tackle it yourself or call a professional. Understanding the process helps you make the right decision.
Whether you’re dealing with a dripping showerhead, a handle that won’t turn, or wild temperature swings, the cartridge is likely your problem – and your solution.

Is Your Shower Cartridge Failing? Key Signs and Components
If your morning shower includes a stubborn drip or water that can’t decide between tropical and arctic, your shower cartridge is likely failing. This small component sits inside your shower handle, managing water flow and temperature. When it wears out, your peaceful shower routine can turn into a daily battle.
Dripping showerhead issues are a classic red flag. If water keeps dripping long after you’ve turned off the shower, your cartridge has likely failed. This wastes water, spikes your utility bill, and can leave unsightly stains.
Inconsistent water temperature will test anyone’s patience. One minute you’re comfortable, the next you’re dodging scalding water or shivering under an icy blast. When your cartridge can’t properly mix hot and cold water, these temperature swings become your new normal.
A stiff or hard-to-turn handle often signals trouble. Mineral deposits and corrosion build up over time, turning a smooth handle operation into an arm workout. If you’re wrestling with the handle, it’s time for a shower cartridge replacement.
Low water pressure from your showerhead might also point to cartridge problems. While several issues can cause weak water flow, a clogged or damaged cartridge is a common suspect.
Squealing or water hammer sounds are an unwelcome soundtrack to your shower. These noises when turning your shower on or off could indicate cartridge issues, though they can also signal broader plumbing problems that need professional attention.
Most cartridges last 10 to 30 years. Their lifespan depends on your water’s mineral content, shower usage, and the cartridge material. Brass and ceramic cartridges typically outlast plastic ones by years.
If you’re considering broader bathroom improvements while addressing these plumbing challenges, our bathroom remodeling services can help transform your entire space.

What’s the Difference Between a Shower Cartridge and a Shower Valve?
Many homeowners mix up these terms, but knowing the difference clarifies any shower cartridge replacement project.
The shower valve is the main control center behind your shower wall. This larger component is the primary housing unit and directs water flow to your showerhead, tub spout, or other outlets.
The shower cartridge is the precision instrument inside the valve. This removable part regulates water temperature and controls how much water flows through the system.
When you turn your shower handle, you’re operating the cartridge. The cartridge mixes hot and cold water to create your perfect temperature, while the valve provides the framework and routing system.
So during a shower cartridge replacement, you’re swapping out the smaller internal component, not the entire valve assembly behind your wall.
Common Types of Shower Cartridges
Understanding your cartridge type makes finding the right replacement easier, as they are not one-size-fits-all and are designed for specific faucet brands and models.
Single-handle cartridges dominate modern bathrooms. These control both temperature and water flow through one lever. Push or pull to adjust flow, then turn left or right for temperature. Most homeowners encounter this type during a shower cartridge replacement.
Dual-handle cartridges are in showers with separate hot and cold controls. Each handle has its own cartridge—one for hot water, the other for cold. These systems often use compression or ceramic disc cartridges.
Diverter cartridges handle switching water flow from a tub spout to a showerhead or between different shower outlets.
Pressure-balancing cartridges focus on safety. They detect sudden pressure changes (like a flushing toilet) and automatically adjust to prevent scalding or freezing surprises. Many single-handle cartridges include this technology.
Thermostatic cartridges are a premium option. They let you set a precise temperature and automatically maintain it, regardless of pressure fluctuations. You’ll find these in high-end shower systems.

Your Complete Guide to Shower Cartridge Replacement
Ready to tackle that troublesome shower? A shower cartridge replacement might sound intimidating, but it’s a satisfying home repair that can save you hundreds in plumber fees. Fixing it yourself means you can finally enjoy a shower without a stubborn handle or unpredictable temperature swings.
This guide will walk you through the project step-by-step. Even if you’ve never attempted a plumbing repair, you can feel confident tackling this project. If things get tricky, you’ll at least understand what’s involved when calling a professional.
Shower cartridge replacement is a manageable weekend project for most homeowners. It doesn’t require years of plumbing experience—just patience, the right tools, and a willingness to get a little dirty. For additional guidance, this resource offers another perspective: A Step-By-Step Guide to Replacing Your Shower Cartridge – The Shower Company .

Tools and Materials You’ll Need for the Job
Before diving in, gather everything you’ll need. Pausing a project for a missing tool is frustrating. This is your shower cartridge replacement shopping list.
You’ll need basic screwdrivers (Phillips and flat-head) for the screws on your handle and trim plate. An Allen wrench set is also essential, as many modern handles use small set screws.
For gripping and turning, grab an adjustable wrench or sturdy pliers. These help remove nuts and grip the old cartridge. A cartridge puller tool isn’t required, but it’s your best friend if the old cartridge is stubborn. These tools cost $10-$20 and can save hours of frustration if mineral buildup has fused the cartridge in place.
The star of the show is your replacement cartridge, which must be an exact match. Cartridges aren’t universal, so take your old one to the hardware store for comparison. Don’t forget plumber’s grease for the O-rings, plus rags or towels for cleanup and a bucket to catch small parts.
Step-by-Step: How to Perform a Shower Cartridge Replacement
With tools assembled, let’s get that shower working like new. The key to a successful shower cartridge replacement is taking your time and working methodically. Rushing can create a bigger mess.
Turn off the water supply first—we cannot stress this enough. Find your home’s main water shut-off valve or the bathroom’s individual valves. Turn them completely off, then run a lower faucet to drain the lines. Skipping this step leads to an unwanted indoor water feature.
Cover the drain with a rag. Tiny screws seem magnetically attracted to drains, and fishing them out is no fun.
Remove the handle by finding a screw, often hidden under a decorative cap. Pop the cap off with a flat-head screwdriver and remove the screw. The handle should pull straight off, though a gentle wiggle might be needed.
Next, remove the escutcheon plate—the decorative metal plate behind the handle. A few screws typically hold it in place. Once it’s off, you’ll see the inner workings of your shower valve.
Look for a retaining clip, usually a U-shaped pin that locks the cartridge in place. Use needle-nose pliers to pull it straight out. Some cartridges use a retaining nut instead, which you’ll loosen with an adjustable wrench.
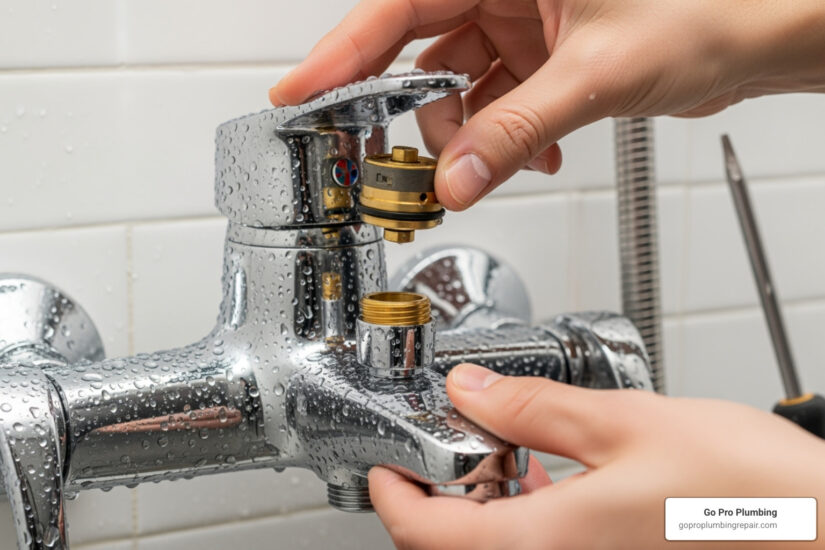
Now, pull out the old cartridge. Before yanking it out, note its position. Some cartridges have specific orientations, with notches indicating up/down or hot/cold.
If the cartridge comes out easily, great! If it’s stuck, patience pays off. Try wiggling it gently while pulling, or use your cartridge puller tool. A little penetrating oil like WD-40 can also help.
Install the new cartridge by applying a thin layer of plumber’s grease to its O-rings. Slide it into the valve body in the exact same orientation as the old one. It should go in smoothly; if you’re forcing it, something isn’t aligned.
Reassemble everything in reverse order: retaining clip, escutcheon plate, and handle.
Test for leaks by slowly turning the water supply back on. Test the handle’s operation. Check for proper flow and temperature control, and most importantly, look for any drips. A dry paper towel is perfect for detecting small leaks.
For additional visual guidance, How to Replace a Shower Valve Cartridge offers helpful supplementary instructions.

The Cost of Replacing a Shower Cartridge
Knowing the cost of a shower cartridge replacement helps you make the best decision. This repair won’t break the bank, especially compared to major plumbing overhauls.
Most homeowners can expect to pay around $300 for a professional shower cartridge replacement, with typical costs ranging from $200 to $400. If you’re handy with tools and tackle it yourself, you’re looking at just $50 to $100 for parts and basic tools – a significant savings that makes DIY appealing.
Several key factors influence what you’ll actually pay. Labor costs make up the biggest chunk when hiring a pro, with plumbers charging anywhere from $25 to $200 per hour depending on their experience and your location. A straightforward replacement usually takes 1-3 hours, but if your cartridge is stuck or in a hard-to-reach spot, expect the time and cost to increase.
The replacement cartridge itself varies dramatically in price based on brand, type, and materials. A basic single-handle cartridge might cost as little as $28, while high-end commercial-grade versions can reach $1,467. Dual-handle cartridges typically range from $33 to $1,276, and diverter cartridges fall between $39 and $885. Brass and ceramic cartridges cost more than plastic ones but are worth the investment for their durability.
Brand specificity also affects pricing. Major manufacturers like Moen, Delta, Kohler, and Pfister each have their own proprietary designs, and their pricing strategies can vary significantly. That’s why bringing your old cartridge to the store for an exact match is so important.
One cost factor nobody wants is emergency service. If your shower fails at 2 AM on a Sunday, emergency plumbing rates will apply, potentially doubling your costs. It’s always better to address issues before they become emergencies.
For more information about our faucet-related services, check out our faucet & sink installation options.
DIY vs. Hiring a Professional for a Shower Cartridge Replacement
Deciding whether to roll up your sleeves or call in the cavalry is one of the biggest choices you’ll face with your shower cartridge replacement. Both paths have their merits, and the right choice depends on your comfort level, available time, and tolerance for potential complications.
| Factor | DIY Approach | Professional Service |
|---|---|---|
| Cost | $50-$100 (parts and tools) | $200-$400 (complete service) |
| Time | 1-4 hours (longer for beginners) | 1-3 hours (efficient and fast) |
| Skill Required | Intermediate mechanical aptitude | Expert training and experience |
| Tools | May need to buy specialized tools | All tools included in service |
| Warranty | None on your installation work | Professional warranty on labor |
| Risk of Problems | Higher chance of complications | Lower risk with expert knowledge |
The DIY route appeals to many homeowners because of the substantial cost savings. You’re essentially paying only for parts and maybe a few tools you don’t already own. There’s also something satisfying about fixing your own plumbing – it’s a skill you can use again and gives you bragging rights.
However, DIY comes with real challenges. Shower cartridge replacement requires patience, attention to detail, and sometimes problem-solving skills. Cartridges can be stubborn, especially in older homes where mineral buildup has essentially glued them in place. You might find yourself making multiple trips to the hardware store or dealing with unexpected complications.
Professional installation costs more upfront but brings valuable benefits. Experienced plumbers have seen every possible complication and know how to handle stuck cartridges, unusual valve configurations, and unexpected issues. They bring specialized tools, offer warranties on their work, and can often spot other potential problems before they become expensive emergencies.
The expertise factor is significant. While online guides are helpful, nothing replaces years of hands-on experience. Plumbers know the subtle differences between similar-looking cartridges, can quickly identify when additional parts might be needed, and work efficiently to minimize disruption to your daily routine.
If you’re dealing with an urgent situation, our emergency plumbing team is ready to help get your shower working again quickly.
How to Save Money on Your Repair
You can reduce costs on your shower cartridge replacement whether you choose DIY or professional installation.
Bundling multiple plumbing jobs is one of the smartest money-saving strategies. Since plumbers typically charge a trip fee, combining your cartridge replacement with other needed repairs – like fixing a running toilet or a slow-draining sink – spreads that cost across multiple fixes.
Before purchasing any replacement parts, check your manufacturer’s warranty. Many reputable faucet brands offer impressive warranties, sometimes even lifetime coverage on cartridges. A quick call to the manufacturer might score you a free replacement part.
Borrowing tools can significantly reduce DIY costs. That cartridge puller tool you need? Ask a neighbor, friend, or family member. Most people are happy to lend tools for a project that only takes a few hours.
The biggest money-saver remains doing the work yourself. While it requires time and patience, successfully completing your own shower cartridge replacement eliminates labor costs entirely. Just be honest about your skill level – a botched DIY job that requires professional repair can cost more than hiring a pro from the start.
When hiring professionals, getting multiple quotes is essential. Contact at least three licensed, insured plumbing companies and request detailed estimates. This comparison shopping often reveals significant price differences. Always verify that plumbers are properly licensed and ask about warranties on their work.
For comprehensive plumbing solutions that might help you bundle services, explore our complete range of plumbing services.
Frequently Asked Questions about Shower Cartridges
Here are the most common questions homeowners ask about shower cartridges and shower cartridge replacement.
How long does a shower cartridge last?
A quality shower cartridge typically lasts 10 to 30 years. The lifespan depends on several daily factors.
Water hardness is the biggest factor affecting cartridge life. If you live in an area with hard water (like many parts of Northern California), mineral deposits build up inside your cartridge. Calcium and magnesium are particularly troublesome, slowly gumming up the works.
How often you use your shower matters too. A guest bathroom shower that’s rarely used might have a cartridge that outlasts you, while the master bathroom shower used by the whole family is working overtime.
Material quality makes a huge difference. Brass and ceramic cartridges are the workhorses of the plumbing world—they cost more but often last for decades. Plastic cartridges are budget-friendly but don’t last as long.
Are shower cartridges universal?
A frequently asked question is if cartridges are universal. The answer is no, shower cartridges are definitely not universal.
Each manufacturer designs cartridges to fit their specific valve bodies. Moen cartridges won’t fit Delta valves, and Kohler cartridges won’t fit Pfister systems. It’s like trying to use a Ford key in a Toyota—they’re not interchangeable.
Even within the same brand, different faucet models often use different cartridges.
Here’s our pro tip: always take your old cartridge to the store with you. The staff at your local home improvement or plumbing supply shop can match it perfectly. It’s more reliable than guessing from photos.
What happens if I install the cartridge upside down?
Installing a cartridge upside down happens more often than you’d think. The most common result is reversed hot and cold water.
Most cartridges have a small notch or orientation mark on the stem that shows you the correct orientation. This little detail determines whether your hot water comes out when you expect it to.
If your hot and cold are backwards after your shower cartridge replacement, the fix is simple. Turn off your water supply, remove the handle and trim plate, and carefully rotate the cartridge stem 180 degrees. Reassemble everything, and your shower should behave normally.
The key is to be careful—you don’t want to force anything or damage the new cartridge. This is a common learning experience, not a major mistake!
Conclusion: Get Your Shower Flowing Perfectly Again
A perfectly working shower has the right temperature, steady pressure, and a smooth handle. If you’re dealing with a dripping showerhead, inconsistent water temperatures, or a stiff handle, the likely culprit is your shower cartridge.
The great news is that shower cartridge replacement is within reach for most homeowners. With the right tools, patience, and our guide, you can tackle this project yourself and save hundreds in labor costs. It’s satisfying to fix a problem with your own hands and know how your shower works.
That said, we understand that not everyone is comfortable with plumbing projects. Maybe you pulled on the old cartridge and it’s stuck tight. Or perhaps you completed the replacement but notice persistent leaks around the handle. Sometimes that stuck cartridge just won’t budge, no matter how much elbow grease you apply.
When you hit those roadblocks, or if you simply prefer the confidence that comes with professional expertise, that’s what we’re here for. At Go Pro Plumbing, we’ve seen every type of cartridge situation imaginable—from simple swaps to stubborn ones that require specialized tools and techniques.
Our team understands that a broken shower disrupts your daily routine. That’s why we’re committed to outstanding customer service and same-day service to get your plumbing issues resolved quickly. We won’t leave you dealing with cold showers or constant dripping any longer than necessary.
For complex issues or if you prefer a professional touch for your Services: Showers & Tubs, our experts are ready to help. We’re here to ensure your shower makes you feel cool and collected, not cold and neglected!
Whether you choose the DIY route or call in the pros, addressing a faulty shower cartridge is an investment in your daily comfort and your home’s value. Your future self will thank you every time you step into that perfectly functioning shower.