Basement Blues? Here’s How to Clean Up After a Sewer Backup
By Brian on July 1, 2025
Cleaning Basement After Sewer Backup: What You Need to Know Right Now
If you’re facing the tough job of cleaning basement after sewer backup, you need to act fast. Sewage in your basement isn’t just smelly—it’s a dangerous health hazard. Here’s a quick summary to help you start safe and strong:
Quick Steps for Cleaning Basement After Sewer Backup:
- Keep everyone out of the basement until you assess safety.
- Shut off power and gas to avoid shocks or leaks.
- Wear protective gear: waterproof boots, heavy gloves, face mask (N95 or better), and full coveralls.
- Open windows for fresh air—but never use fans if outlets are wet.
- Remove standing water with a wet-dry vacuum or sump pump.
- Bag and toss contaminated items (especially carpets and cardboard).
- Scrub and disinfect all hard surfaces thoroughly (use 1 cup bleach per gallon of water).
- Dry the area fast using fans and dehumidifiers to stop mold.
- Watch for odors and mold—address them quickly.
- Call professionals if the problem is bigger than you can handle.
Tip: Immediate cleaning and drying (within 48 hours) greatly lowers the risk of mold and serious property damage.
Don’t wait, because every hour counts when sewage is in your home.

Key terms for cleaning basement after sewer backup:
Why Basement Sewers Back Up & Why It’s Dangerous
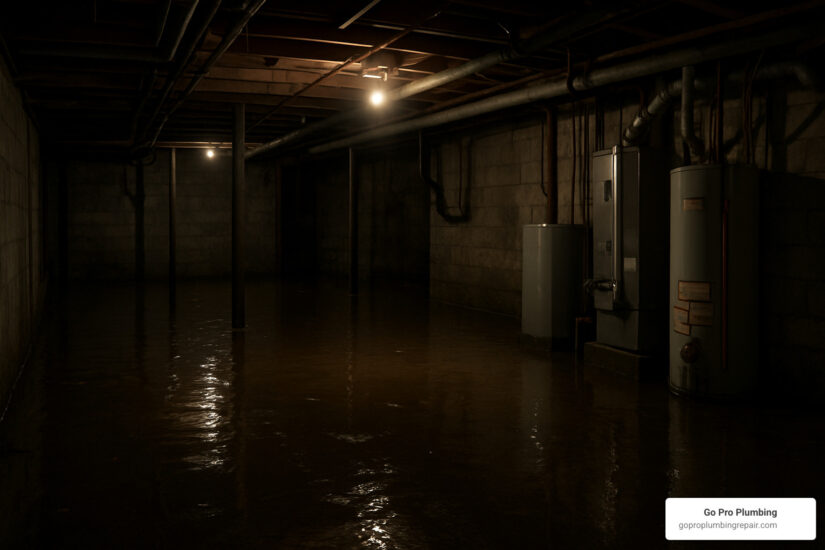
Nobody wants to deal with cleaning basement after sewer backup, but understanding why these disasters happen can help you prevent them. When your sewer system fails, sewage has to go somewhere—unfortunately, that’s often your basement.
Clogged drains are the most common culprit. When people flush “flushable” wipes, feminine products, or pour grease down drains, these items create stubborn blockages that force sewage to find another way out—usually through your basement floor drain.
Aging pipes in older homes often have cast-iron or clay sewer pipes that crack, sag, and deteriorate over time, creating bottlenecks that can’t handle normal water flow.
Tree root intrusion happens when roots seek out moisture and squeeze through tiny cracks in sewer lines. Once inside your pipes, they grow into major blockages.
Storm overflow occurs when heavy rainfall overwhelms the municipal sewer system, forcing excess water back up through residential connections.
Here’s what makes sewage so dangerous: it’s classified as Category 3 “black water”—the most hazardous type of contaminated water. Raw sewage contains dangerous bacteria like E. coli and cholera, along with viruses and parasites that can make you seriously ill.
The dangers don’t stop at germs. Sewage creates structural pressure problems that can damage your foundation and serious electrocution risk if sewage reaches electrical outlets—another reason why shutting off power is your first priority.
Health Risks You Can’t Ignore
Raw sewage exposure can cause over a dozen diseases including E. coli, cholera, typhoid fever, hepatitis A, and West Nile virus.
Pathogens enter your body through cuts, when you touch your face with contaminated hands, or when you breathe contaminated air. Sewer gas itself is toxic and can cause headaches, dizziness, and respiratory problems. Skin infections are common after sewage exposure, and respiratory illness can develop from breathing contaminated air—which is why wearing a proper N95 respirator is essential.
Immediate Safety Steps Before You Start Cleaning
Your basement might look like a disaster zone, but don’t rush in. Cleaning basement after sewer backup safely means taking the right precautions first.
Power comes first, always. Head straight to your electrical panel and shut off power to the flooded area. If your electrical panel is in the flooded basement, call an electrician before doing anything else.
Turn off your main water line to prevent more water from backing up while you work. Keep everyone else out—close doors between the basement and living areas, and make sure kids and pets stay away.
Open windows for fresh air, but don’t plug in fans if there’s any chance electrical outlets got wet.
Have your emergency plan ready—know where your nearest urgent care center is and keep emergency numbers handy.
PPE Checklist for Cleaning Basement After Sewer Backup
Your face mask is non-negotiable. An N95 respirator is the absolute minimum—P100 masks offer better protection. Goggles protect your eyes from splashes and particles. Double up on gloves—disposable nitrile gloves first, then heavy-duty rubber gloves over them. Disposable coveralls keep sewage off your skin. Seal the gaps with duct tape where gloves meet coveralls and coveralls meet boots.
Cleaning Basement After Sewer Backup: 10-Step DIY Procedure
When you’re ready to tackle the actual cleaning basement after sewer backup, this isn’t a race. Each step matters, and skipping ahead will only create more problems down the road. Think of it as a careful dance between safety and thoroughness.
Your first job is removing all standing water. A wet-dry vacuum works great for this, but if you’ve got several inches of water, a sump pump will save your back. Here’s the critical part: make absolutely sure you’re using a grounded outlet that’s well above the water level. And here’s a tip that might surprise you—pump slowly. Going too fast can create pressure differences that could actually crack your foundation walls.
Once the big water is gone, switch back to your wet-dry vacuum to get every last drop from corners and low spots. When you empty that vacuum, here’s something important: dump it into a toilet, never down a drain. Sounds weird, but drains just push the contamination back into your plumbing system.

Next comes the really unpleasant part: shoveling out solid waste and sludge. Use a regular shovel for this—never your hands, even with heavy gloves on. This stuff is absolutely loaded with dangerous pathogens that can make you seriously sick.
Now you’ll bag all the debris in heavy-duty plastic bags. We’re talking contractor-grade bags here, not the flimsy kitchen ones. Seal everything tightly because you don’t want any leaks during transport.
Time to remove contaminated flooring. This is where it gets expensive, but there’s no way around it. Carpet, padding, and any porous flooring materials have to go. They simply can’t be cleaned well enough to be safe, and they’ll become breeding grounds for mold and bacteria.
The scrubbing phase comes next. Use hot water and low-sudsing detergent (regular detergent creates too many bubbles). Work from top to bottom—walls first, then floors. This prevents you from recontaminating areas you’ve already cleaned.
Rinse everything thoroughly with clean water, again working top to bottom. Don’t rush this step—leftover detergent can interfere with your sanitizing solution.
Now for the sanitizing solution: mix 1 cup of bleach per gallon of water and apply it to all surfaces. This isn’t a quick wipe-down—you need to let it sit for at least 10 minutes to kill the tough germs.
If you have a sump pump, test it now. Make sure it’s working properly before you consider the job done. The last thing you want is another backup while you’re still recovering from this one.
Finally, begin the drying process with fans and dehumidifiers. But only do this after you’ve confirmed electrical safety. Wet outlets and moving air don’t mix well.
Step 4-5 Detail: Containment & Sludge Shoveling
Getting the sludge out safely is all about smart containment. You’ll want heavy-duty contractor bags—the kind that won’t tear when you’re carrying them upstairs. Regular trash bags are asking for trouble.
Double-bag everything that’s been contaminated. Put the first bag inside a second one and seal both tightly. It might seem like overkill, but trust me, you don’t want a leak halfway up your basement stairs.
Here’s a rule that might seem obvious but gets forgotten in the stress of cleanup: never dump waste down drains. Not even utility sinks. This just pushes all that contamination back into your plumbing system. The only place liquid waste should go is down a toilet, which connects directly to the sewer system where it belongs.
Work systematically from one corner to another. Don’t track contaminated materials through areas you’ve already cleaned. If possible, have someone outside the contaminated zone help by taking sealed bags directly outside—it keeps the mess contained.
Step 9 Detail: Final Sanitation After Cleaning Basement After Sewer Backup
This final sanitation step is where patience really pays off. Let your bleach solution sit for a full 10 minutes—not 5, not 8, but 10. This contact time is absolutely necessary to kill the resistant bacteria and viruses that regular cleaning can’t touch.
Here’s something that might surprise you: some germs are actually chlorine-resistant. Certain parasites like Cryptosporidium laugh at regular bleach solutions. If you’re dealing with heavy contamination, consider using hydrogen peroxide as a booster. Mix 1 cup of hydrogen peroxide per 10 gallons of water—this combination tackles even the tough stuff.
Don’t get impatient during this step. The difference between a 5-minute contact time and 10 minutes can literally be the difference between a safe, clean basement and one that’s still harboring dangerous pathogens. After everything you’ve been through, those extra few minutes are worth it.
Salvaging, Disposal & Odor Elimination
After cleaning basement after sewer backup, you’ll face tough decisions about what to keep and what to toss. Your family’s health is worth more than any possession.
The golden rule: porous materials that absorbed sewage have to go. Carpets and padding are almost always a complete loss—they absorb contaminated water deep into backing and padding where bacteria will remain.
Furniture assessment depends on material. Solid wood pieces can often be saved with thorough cleaning, but upholstered furniture is usually destined for disposal unless it has completely waterproof coverings.
Any electrical appliance that got wet needs professional evaluation before plugging back in. You can save undamaged canned goods by soaking them in bleach solution (1 cup bleach per gallon of water) for 15 minutes, then rinsing and relabeling.

Double-bag everything contaminated and check with your local waste management company about special disposal requirements.
Activated charcoal beats commercial air fresheners for odor removal. Place open containers around your basement to absorb odors naturally. Refill your floor drain water traps by pouring a gallon of clean water down each drain—these traps are your first defense against sewer gases.
For persistent drain odors, try baking soda and vinegar: pour half a cup of baking soda down the drain, follow with a cup of vinegar, wait 30 minutes, then flush with hot water.
Dealing With Lingering Smells After Cleaning Basement After Sewer Backup
Persistent smells mean contamination is still lurking. Check your floor drain water trap—it should have standing water to block sewer gases. A damaged clean-out plug can also let gases enter directly. Keep that dehumidifier running until humidity drops below 50%. Sometimes you’ll need professional odor-removal services, especially if contamination has soaked into concrete or gotten into your HVAC system.
Drying, Mold Prevention & Future Backup Avoidance
Getting your basement completely dry after cleaning basement after sewer backup prevents a second disaster. Mold can begin growing within 24-48 hours, so there’s no time to wait.
Cross-ventilation is your best friend. Position one fan to blow fresh air in while another exhausts humid air outside. Commercial-grade dehumidifiers are worth renting—they handle massive moisture loads better than home units.
Keep humidity below 50% and maintain that until everything is dry. Start your mold watch within 48 hours—look for black spots and trust your nose for musty odors.

Once the crisis is handled, prevent future backups:
Installing a backwater valve automatically closes when sewage tries to flow backward into your home. Regular drain cleaning every 18-24 months prevents clogs. Avoid putting grease, wipes, or feminine products down drains. Your sump pump needs regular testing and consider a battery backup. Tree root barriers redirect roots away from pipes.
Monitoring & Mold Checks
Use a moisture meter to check walls and floors—moisture often hides behind surfaces. Watch for black spots in corners or low-airflow areas. Trust your nose for musty smells. Consider professional mold testing if you’re unsure or if household members have respiratory issues.
Insurance, Documentation & When to Call Pros
When dealing with cleaning basement after sewer backup, proper documentation protects you financially. Take photos and videos before touching anything, throughout cleanup, and after finishing. Create an itemized loss list with descriptions and replacement costs. Keep every receipt from cleanup efforts.
Most standard homeowners policies don’t cover sewer backup without a supplemental rider. Check with the Insurance Information Institute about coverage options. Report claims within 24-48 hours or risk denial.
Professional restoration becomes necessary when dealing with compromised electrical systems, contaminated areas larger than 100 square feet, or serious health risks. If sewage reached electrical outlets or if anyone has respiratory/immune issues, call professionals.
| Factor | DIY Cleanup | Professional Cleanup |
|---|---|---|
| Cost | $500-2,000 | $2,000-10,000 |
| Time | 2-5 days | 1-3 days |
| Safety | High risk without training | Minimal risk |
| Equipment | Consumer-grade | Industrial-grade |
| Insurance | May not cover mistakes | Usually covered |
The bottom line: if you have doubts about safely handling the cleanup, call the pros. Your family’s safety is worth more than potential savings.
Frequently Asked Questions about Cleaning Basement After Sewer Backup
What should I do if I’m exposed to raw sewage?
Wash your skin immediately with antibacterial soap and hot water for at least 20 seconds. Disinfect any cuts with hydrogen peroxide or rubbing alcohol. Monitor symptoms for fever, nausea, diarrhea, rashes, or breathing problems. Seek medical care immediately if you develop symptoms, especially if you have diabetes, are pregnant, or have immune system issues.
Does homeowners insurance cover sewer backup cleanup?
Standard homeowners insurance excludes sewer backup damage. You need sewer backup coverage through a rider that typically costs $40-80 per year. Keep detailed documentation of everything—photos, receipts, time spent—even if you’re unsure about coverage.
How can I prevent future sewer backups?
Install a backwater valve that acts like a one-way door in your sewer line. Schedule routine drain maintenance every 18-24 months. Make habit changes: never flush wipes, feminine products, or cat litter, and avoid pouring grease down drains. These prevention steps cost far less than another backup cleanup.
Conclusion
Cleaning basement after sewer backup is one of those homeowner challenges that nobody wants to face, but when it happens, you need to handle it right. The difference between a successful cleanup and a long-term nightmare often comes down to how quickly you act and whether you follow proper safety procedures.
This isn’t just about getting rid of the mess—you’re dealing with serious health hazards that can affect your family for years if not handled properly. Every step we’ve covered, from wearing the right protective gear to thorough disinfection and proper drying, plays a crucial role in keeping your home safe.
The 48-hour window is critical. That’s how long you have to get everything cleaned, disinfected, and dried before mold starts becoming a major problem. If you’re looking at extensive damage, compromised electrical systems, or contamination over 100 square feet, don’t try to be a hero—call in the professionals.
At Go Pro Plumbing, we’ve seen what happens when sewer backups aren’t handled properly, and we’ve also seen families get their lives back to normal with the right approach. Our same-day service commitment means you don’t have to wait around while contamination spreads or gets worse.
Prevention is always better than cleanup. Installing a backwater valve, scheduling regular drain maintenance, and being mindful of what goes down your drains can save you from ever having to deal with this mess again.
When sewage backup strikes your Northern California home, you have options. Whether you tackle the cleanup yourself following our safety guidelines or decide that professional help is the smarter choice, the important thing is acting fast and acting safely.
For more info about drain and sewer services, contact Go Pro Plumbing today. Your family’s health and your home’s safety are worth getting the job done right the first time.