Upgrade Your Toilet: Dual Flush Kits That Make a Difference
By Brian on October 7, 2025
Save Water and Money with a Simple Switch
A dual flush conversion kit transforms your standard toilet into a water-saving powerhouse without replacing the entire fixture. These kits typically cost $30-50 and can reduce water usage by up to 45%, making them one of the most cost-effective home upgrades available.
What You Need to Know About Dual Flush Conversion Kits:
- Water Savings: Use up to 45% less water than standard single-flush toilets
- Cost: Range from $30-40 for most kits, with 1-2 hours installation time
- Compatibility: Work with most 2-inch flush valve toilets (1.6 GPF or lower)
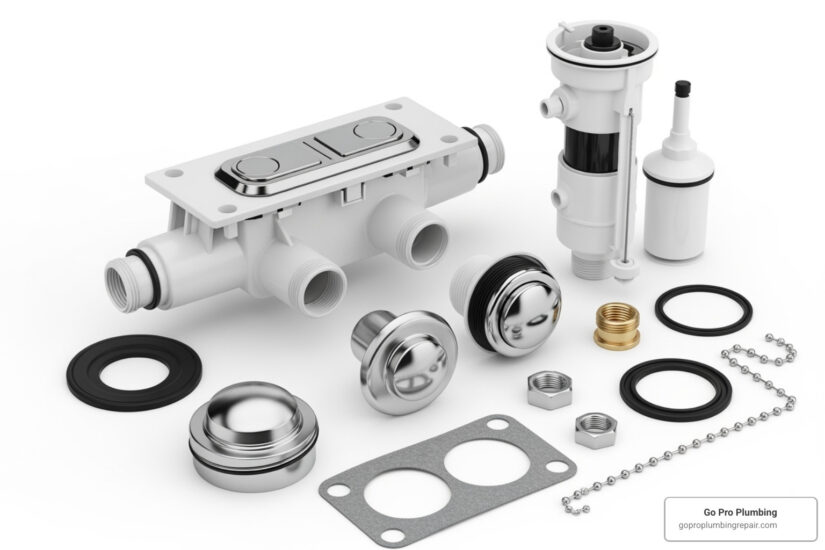
- Components: Include new flush valve, actuator button/handle, and often a fill valve
- Installation: DIY-friendly project requiring basic plumbing skills and simple tools
Here’s the reality: Do you always need a full flush? No! Yet traditional toilets waste the same amount of water whether you’re flushing liquid or solid waste.
Dual flush technology solves this problem with two flush options – a half flush for liquids and full flush for solids. The PerforMAX fill valves included in quality kits also provide 2x faster refill rates while operating ultra-quietly.
For Northern California homeowners facing drought conditions and rising utility costs, these kits offer immediate relief and are a key part of programs like the EPA’s WaterSense, which promotes water efficiency. Installation typically takes just 1-2 hours and requires no tank removal – making it perfect for weekend DIY projects.

How to Choose the Right Dual Flush Conversion Kit
Not all toilets are created equal, and neither are dual flush conversion kits. The good news? With a little know-how, you can easily find the perfect match for your bathroom and start saving water (and money) right away.
Toilet compatibility is your first checkpoint. Most dual flush conversion kits work beautifully with standard 2-inch flush valves – the size found in most modern toilets. Think of it like buying shoes: you need the right fit for comfort and performance. If your toilet has a 3-inch flush valve or unusual internal setup, you’ll need to look for specialized options.
Your toilet’s GPF (gallons per flush) rating matters too. These kits shine brightest on toilets using 1.6 GPF or lower. Got an older toilet that guzzles 3.5 gallons per flush? A conversion kit will still save water, but you might want to consider whether a full toilet replacement makes more sense for your situation.
The button vs lever actuators choice often comes down to personal preference. Button actuators mount sleekly on your tank lid and make the half-flush vs full-flush choice crystal clear. Lever actuators work with your existing side handle – familiar and straightforward. Both get the job done; it’s really about what feels right in your bathroom.
Here’s the beautiful part about cost: quality dual flush conversion kits typically range from $20-$50. For such a small investment, the water-saving potential is remarkable – we’re talking up to 45% reduction in your toilet’s water usage.
| Kit Type | Price Range | Installation Time | Water Savings | Best For |
|---|---|---|---|---|
| Drop-in Converter | $20-$30 | 30-60 minutes | 25-35% | Quick upgrade, minimal changes |
| Full Valve Replacement | $30-$45 | 1-2 hours | 35-45% | Maximum efficiency, comprehensive upgrade |
| Premium Kit with Fill Valve | $40-$50 | 1-2 hours | 40-45% | Complete toilet tank overhaul |
Understanding Different Types of Kits
Walking down the plumbing aisle can feel overwhelming, but there are really just three main types of dual flush conversion kits to consider. Each has its own personality and purpose.

Drop-in converters are the gentle introduction to dual flush technology. These clever devices work with your existing flush valve, typically by controlling how long the flapper stays open. For a half flush, they release it quickly. For a full flush, they hold it down longer. Installation is usually straightforward – perfect if you’re new to DIY plumbing projects.
Full flush valve replacements are the comprehensive solution. Out goes your old overflow tube, flapper, and flush valve assembly. In comes a brand-new system designed specifically for dual flush performance. These kits often include high-efficiency fill valves too, giving your entire toilet tank a modern makeover. They require a bit more work but deliver the most impressive water savings.
Syphon conversion kits are the specialty option, designed for older toilet styles or specific flushing systems. These are less common in typical American homes but can be perfect for certain situations.
At Go Pro Plumbing, we’ve found that full flush valve replacements consistently deliver the best results for our Northern California customers. They transform your toilet into a genuinely water-efficient fixture that performs reliably year after year.
Key Features to Look For in a Dual Flush Conversion Kit
The devil’s in the details when choosing your dual flush conversion kit. Focus on these game-changing features, and you’ll end up with a toilet that saves water without sacrificing performance.
Adjustable flush volumes top our must-have list. The best kits let you fine-tune exactly how much water each flush uses. Look for easy-adjust dials or simple mechanisms that don’t require removing the entire valve. This customization means you can dial in the perfect balance – just enough water to do the job effectively, but not a drop more.
High-performance fill valve inclusion transforms your upgrade from good to great. Quality kits often include advanced fill valves that refill your tank twice as fast while operating whisper-quiet. If your current fill valve is getting on in years, this two-for-one upgrade delivers exceptional value.
Easy installation features make your weekend project actually enjoyable. The best kits boast snap-on designs and clear instructions that don’t require a plumbing degree to understand. Look for descriptions mentioning installation “in minutes” or “without removing the old flush valve” – these are signs of thoughtful design.
Warranty protection shows manufacturer confidence in their product. Quality dual flush conversion kits typically come with 5-year warranties, giving you peace of mind that your water-saving investment is protected.
When we recommend kits to our Go Pro Plumbing customers, these features are non-negotiable. They’re the difference between a quick fix and a long-term solution that keeps delivering savings month after month.
A Step-by-Step Guide to Installing Your Kit
Ready to transform your toilet into a water-saving champion? Installing a dual flush conversion kit is one of those satisfying weekend projects that actually makes a difference in your utility bills. The best part? It’s surprisingly straightforward – we’re talking about a skill level of 1 out of 5 (Easy) that typically takes just 1 to 2 hours from start to finish.
Before we dive in, let’s talk safety first. You’ll be working with water and inside your toilet tank, so take your time and don’t rush. If something doesn’t feel right or you hit a snag, there’s no shame in calling Go Pro Plumbing for same-day professional help. We’ve seen plenty of DIY projects, and sometimes a second pair of experienced hands makes all the difference.

Tools and Materials Needed
The beauty of this project lies in its simplicity – you probably already have most of what you need in your garage or toolbox. Here’s your shopping list: pliers (or an adjustable wrench), a sponge, a bucket, some towels for cleanup, and of course, your shiny new dual flush conversion kit.
That’s it! No fancy plumbing tools, no expensive equipment rentals. Just basic household items and your weekend warrior spirit.
Installing Your Dual Flush Conversion Kit
Now comes the fun part – actually installing your new water-saving system. Don’t worry if you’ve never worked inside a toilet tank before; it’s less intimidating than it looks.
Start with the water supply. Find that little valve behind or beside your toilet and turn it clockwise until it stops. This cuts off the water flow and prevents any unwanted surprises. Next, flush your toilet and hold down the handle to drain as much water as possible from the tank. Use your sponge and bucket to soak up the remaining water – getting the tank nice and dry makes everything easier.
Out with the old hardware. This is where things get interesting. You’ll be removing your old flush valve, flapper, and possibly the fill valve if your kit includes a replacement. The old flapper usually just lifts off, while the flush valve might require some unscrewing or twisting. If you’re replacing the fill valve too (which we highly recommend for older toilets), you’ll need to disconnect the water supply line and unscrew the big nut underneath the tank.
Time for the upgrade. Your new dual flush conversion kit comes with detailed instructions, but here’s the general flow: the new flush valve assembly typically slides over the existing overflow tube and locks into place. Make sure it sits firmly – you don’t want any wobbling. Then comes the actuator, whether it’s a top-mounted button that goes through your tank lid or a side-mounted lever that replaces your old flush handle.
Connect everything together. This is where the magic happens. You’ll connect the cable or mechanism from your flush valve to the actuator button or handle. The key is getting the right tension – enough slack for smooth operation, but not so much that it gets tangled up when you replace the tank lid.
Fire it up and fine-tune. Slowly turn the water back on and watch your tank fill. Once it’s ready, test both flush options – the half flush for liquid waste and the full flush for solids. This is your moment to adjust the water levels using those handy dials that come with quality kits. Getting this calibration right is what maximizes your water savings.
Check for any leaks around the connections and make sure everything operates smoothly. If your toilet is running continuously or the flush seems weak, don’t panic – these are common issues that are easily fixed with minor adjustments to the water level or cable tension.
Every dual flush conversion kit is slightly different, so always follow the manufacturer’s specific instructions. And if you hit any roadblocks or just prefer to have a professional handle it, Go Pro Plumbing is just a phone call away for same-day service throughout Northern California.
Common Issues and Troubleshooting Tips
Even with a straightforward installation, sometimes minor hiccups can occur after installing a dual flush conversion kit. Don’t worry – most common problems are easy to diagnose and fix. We’ve seen it all at Go Pro Plumbing, and we’re here to help you troubleshoot like a pro.

The good news is that most issues fall into just a few categories. You might notice your toilet is leaking water from the tank or bowl area. Sometimes you’ll experience “ghost” flushing – that mysterious phenomenon where your toilet decides to flush itself without any help from you.
A weak flush is another common complaint, where there just isn’t enough water or force to clear the bowl effectively. On the flip side, you might find your button or lever is sticking and doesn’t return to its normal position after flushing. Finally, water level issues can cause your tank to fill too high or too low, affecting performance.
The beauty of these problems is that they’re usually simple fixes once you know what to look for. Most stem from minor adjustments or connections that need a little fine-tuning.
What if the flush is too weak or too strong?
A weak flush that leaves you flushing twice defeats the whole purpose of water conservation. On the other hand, a flush that’s too strong wastes the water you’re trying to save. Both issues usually point to calibration problems that are surprisingly easy to fix.
Adjusting water levels is your first line of defense. Most quality dual flush conversion kits come with adjustable dials or settings that let you fine-tune performance. If your flush feels too weak, try increasing the water level in the tank slightly, or boost the volume for that specific flush setting. Too strong? Simply dial it down a notch.
Calibrating flush volumes is where the magic happens. Your kit likely has separate adjustments for the half-flush (liquids) and full-flush (solids). The half flush should use just enough water to clear liquid waste and toilet paper, while the full flush needs enough power for solids. Think of it like adjusting the volume on your stereo – you want just the right level for each situation.
Don’t forget to check for obstructions in your system. Sometimes debris or a slightly misaligned component can interfere with water flow. Take a quick look at the flush valve and overflow tube to make sure nothing’s blocking the water’s path. A small piece of debris can cause surprisingly big problems.
How to fix a running toilet after installation?
A running toilet is like a leaky faucet – annoying and wasteful. The sound of constantly flowing water can drive you crazy, and it’s definitely not helping your water bill. Fortunately, this issue usually comes down to a few common culprits.
Checking the flapper seal should be your first stop. Even brand-new kits can have problems if the flapper or seal isn’t sitting just right. Make sure your new flush valve’s seal is clean and perfectly aligned with the drain opening at the bottom of the tank. Sometimes a tiny piece of debris or a slight misalignment is all it takes to cause a slow leak.
Setting the fill valve correctly is crucial for proper operation. If the water level climbs too high, it’ll overflow into the overflow tube and cause your toilet to run constantly. Adjust the fill valve so the water level sits just below the top of the overflow tube – typically about an inch below the flush handle opening.
Verifying all connections within the tank is your final checkpoint. Double-check where the flush mechanism connects to your actuator button or lever. If a chain or cable is pulled too tight, it can prevent the flapper from closing completely. You want just a small amount of slack – not too tight, not too loose.
If you’ve tried these troubleshooting steps and your toilet is still giving you grief, don’t hesitate to call us at Go Pro Plumbing. We offer same-day service throughout Northern California and can quickly get to the bottom of any plumbing mystery you’re facing.
Frequently Asked Questions
We get a lot of questions from our Northern California customers about dual flush conversion kits. It makes sense – you want to be sure you’re making the right choice for your home and your wallet. Let’s tackle the most common concerns we hear.
Are dual flush conversion kits compatible with all toilets?
Here’s the honest answer: not quite. While dual flush conversion kits work with most toilets, there are some important compatibility requirements you need to check first.
The biggest factor is your flush valve size. Most conversion kits are designed for the standard 2-inch flush valve that’s common in most homes. If your toilet has a 3-inch flush valve (found in some newer high-efficiency models) or a unique system like certain canister flush valves, a standard kit won’t fit.
Older toilets can be tricky too. If you have one of those vintage toilets with a ballcock-style fill valve and a float ball on a rod, there might not be enough room in the tank for both the old fill valve and the new dual flush mechanism. The good news? Many quality kits include a compact PerforMAX fill valve that replaces your old one entirely, solving the space issue.
These kits work best with toilets that use 1.6 GPF or lower. Some kits specifically won’t work with 1.28 GPF toilets or certain one-piece designs, so always read the fine print before buying.
Not sure about your toilet’s compatibility? Give us a call at Go Pro Plumbing – we can help you figure it out without any guesswork.
How much water can I really save with this upgrade?
This is where dual flush conversion kits really shine. You can save up to 45% on your water usage compared to your current single-flush system. That’s not just a marketing claim – it’s real savings that show up on your utility bill.
Think about how you actually use your toilet. Most of the time, you’re flushing liquid waste and toilet paper, which doesn’t need 1.6 gallons of water to clear effectively. With a dual flush system, you’ll use around 0.8 gallons for these lighter flushes and save the full 1.6 gallons for when you really need the extra power.
The math is pretty compelling. If your family flushes the toilet 20 times a day (typical for a family of four), and about 80% of those are liquid waste, you’re looking at significant daily water savings. Over a year, that adds up to thousands of gallons.
For Northern California homeowners dealing with drought conditions and rising water costs, this translates directly into lower utility bills. You’re paying for both the water coming in and the wastewater going out, so every gallon you save hits your wallet twice.
Is it better to convert or buy a new dual flush toilet?
This is probably the question we get asked most often, and I totally understand why. You want to make the smartest investment for your home.
Let’s talk numbers first. A dual flush conversion kit costs $20-50 and takes a couple hours to install yourself. A new dual flush toilet? You’re looking at $150-500 for the toilet itself, plus $100-300 for professional installation. The math is pretty clear if your current toilet is in decent shape.
Converting makes sense when your toilet bowl and tank are solid, there are no cracks or persistent leaks, and you’re happy with how it looks. You get all the water-saving benefits without the expense and hassle of a full replacement.
From an environmental perspective, converting is usually the greener choice too. Manufacturing a new toilet requires significant resources and energy. By upgrading your existing toilet, you’re keeping it out of the landfill and reducing your carbon footprint.
But sometimes replacement is the better call. If your toilet has cracks, severe staining, or major compatibility issues with conversion kits, a new toilet might be your best bet. Same goes if you’re doing a full bathroom renovation or have one of those really old water-guzzling toilets from before 1994.
The beauty of working with Go Pro Plumbing is that we can help you make this decision. We’ll assess your current toilet, explain your options clearly, and handle either a conversion kit installation or a complete toilet replacement with the same professional service. Our goal is helping you make the most cost-effective, water-wise choice for your specific situation.
A Smart, Water-Saving Upgrade for Your Home
Converting your toilet with a dual flush conversion kit isn’t just about saving a few gallons here and there – it’s about making a real difference in your home, your wallet, and your community. This simple upgrade delivers results that you’ll notice immediately and appreciate for years to come.
Think about it: for less than $50 and a weekend afternoon, you can transform your biggest water-wasting appliance into an efficient, modern system. That’s pretty amazing when you consider that toilets account for nearly 30% of your home’s water usage. With water rates climbing and drought conditions affecting Northern California, this upgrade makes both environmental and financial sense.
The beauty of these kits lies in their simplicity. You don’t need to be a plumbing expert or invest in expensive tools. Most homeowners find the installation surprisingly straightforward – it’s rated as an easy DIY project that takes just 1-2 hours to complete. Plus, there’s no messy demolition or major bathroom disruption.
But here’s what we love most about dual flush conversion kits: they’re truly eco-friendly. By using up to 45% less water than traditional single-flush toilets, you’re actively participating in water conservation efforts. Every time you choose the half-flush option for liquid waste, you’re making a small but meaningful choice that adds up to significant savings over time.
Of course, not everyone wants to tackle DIY projects, and that’s perfectly fine! At Go Pro Plumbing, we understand that some homeowners prefer professional installation for peace of mind. Our experienced technicians can handle the entire process quickly and efficiently, ensuring everything works perfectly from day one. We’re proud to offer same-day service throughout Northern California, so you can start saving water immediately.
Whether you choose to install it yourself or have our team handle it, upgrading to dual flush technology is one of the smartest investments you can make in your home. It’s cost-effective, environmentally responsible, and surprisingly satisfying to know you’re using exactly the right amount of water for each flush.
Ready to join thousands of Northern California homeowners who are already saving water and money?