Valve Out, Valve In: Replacing Your Gas Line Valve
By Brian on August 6, 2025
Why Gas Line Valve Safety Matters Most
Gas line valve replacement is a critical plumbing task. A failing gas valve deals with natural gas, a substance that can cause fires, explosions, or carbon monoxide poisoning if handled incorrectly.
Quick Answer for Gas Line Valve Replacement:
- Shut off the main gas supply at your meter
- Ventilate the work area completely
- Remove the old valve using two pipe wrenches
- Install the new valve with gas-rated thread sealant
- Test all connections with soapy water for leaks
- Call a professional if you’re uncomfortable with any step
The U.S. Department of Transportation reported 113 gas pipeline incidents in 2022, resulting in fatalities and injuries. The National Fire Protection Association also found that gas ranges were involved in 59% of cooking equipment fires in 2021, highlighting the real dangers in your home.
Your furnace’s gas valve is crucial for regulating gas flow to your heating system, and a malfunction can create serious safety concerns. While some homeowners can handle this repair with proper precautions, many situations require professional expertise.
The key question isn’t whether you can replace a gas valve yourself, but whether you should. Gas work demands precision, the right materials, and strict adherence to safety protocols.

Simple Gas line valve replacement word guide:
Before You Begin: Preparation and Safety Essentials

Proper preparation is essential before starting a gas line valve replacement. One mistake with natural gas can turn a simple repair into a dangerous situation.
First, find your home’s main gas shut-off valve, which is usually next to your gas meter. When the lever is parallel to the pipe, gas is flowing. Turn it perpendicular (90 degrees) to cut off the gas supply to the entire house.
Most gas appliances also have their own shut-off valves on the gas line just before the appliance. For gas line valve replacement, you must shut off both the main supply and the specific appliance valve for an extra layer of protection.
The American Gas Association states that residential gas valves can last anywhere from 20 to 50 years. Since the lifespan varies, it’s important to watch for warning signs of failure. The most obvious is the rotten egg smell of a gas leak. Other clues include visible rust or corrosion, hissing sounds, or a valve that is stiff and difficult to turn, which often indicates internal corrosion.
Understanding Gas Valve Types
Residential gas lines primarily use two types of valves: ball valves and gate valves.
Ball valves are the modern standard. A simple quarter-turn of the handle rotates a hollow ball to start or stop the gas flow. They are highly reliable and the recommended choice for replacements.
Gate valves are an older design that uses a wedge-shaped gate that moves up and down. They require multiple turns and are more prone to sticking or failing to close completely over time. If you have a gate valve, it’s a good idea to upgrade to a ball valve during a gas line valve replacement.
Appliance control valves are more complex units that work with your thermostat and safety systems to regulate the precise amount of gas your furnace or water heater receives.
| Feature | Ball Valves | Gate Valves |
|---|---|---|
| Operation | Quarter-turn (90 degrees) | Multi-turn |
| Reliability | Highly reliable, less prone to leaks | Prone to sticking and leaks over time |
| Lifespan | Longer | Shorter, susceptible to internal wear |
| Application | Recommended for new installations and replacements | Older installations, often replaced with ball valves |
| Flow Control | On/Off only (full flow or no flow) | Can be used for throttling (though not recommended) |
Essential Tools and Materials for Gas Line Valve Replacement
Having all your tools and materials ready beforehand is crucial. You will need:
- Two pipe wrenches: This is essential. One wrench holds the pipe steady while the other turns the valve, preventing you from twisting the pipe and creating new leaks.
- New gas-rated valve: Ensure it matches the size (e.g., 1/2″ NPT or 3/4″ NPT) and type of your existing setup. A quarter-turn brass ball valve is typically the best choice.
- Gas-rated thread sealant: Use yellow Teflon tape or pipe dope specifically marked for gas lines. Standard white plumber’s tape is not safe for gas.
- Soapy water solution: A simple mix of dish soap and water in a spray bottle acts as your leak detector.
- Safety gear: Goggles, gloves, a flashlight, and a wire brush or rag for cleaning threads.
Critical Safety Precautions
The U.S. Consumer Product Safety Commission warns about the risks of fire, explosion, or carbon monoxide poisoning from improperly handled gas connections.
- Shut off the gas supply: This is non-negotiable. Turn off the main valve at the meter and the appliance-specific valve. Confirm the gas is off by trying to light a stove burner (nothing should happen).
- Ventilate the area: Open windows and use fans to create a cross-breeze. This helps dissipate any residual gas, which is lighter than air and will rise.
- No-spark rule: Absolutely no smoking, no open flames, and no power tools (drills, saws, etc.) that could create a spark. Even static electricity can be a risk.
If you feel overwhelmed by these safety requirements, it shows you understand the seriousness of the job. For complete peace of mind, consider our Emergency Gas Line Service for professional, safe handling of your gas line needs.
Your Step-by-Step Guide to Gas Line Valve Replacement

This is the hands-on portion of the gas line valve replacement. Take your time and be precise with each step to avoid dangerous mistakes.
Step 1: Shutting Off the Gas and Depressurizing the Line
First, ensure there is zero gas flowing to your work area.
- Turn off the main gas meter valve outside your home. The lever should be perpendicular to the pipe.
- Turn off the appliance-specific shut-off valve on the gas line leading to the appliance you’re working on.
- Depressurize the line by turning on a burner on your gas stove. You’ll hear a brief hiss as the trapped gas burns off. Leave it on for a minute to ensure the line is empty. Pilot lights on other appliances will go out; this is normal.
Step 2: Removing the Old Valve
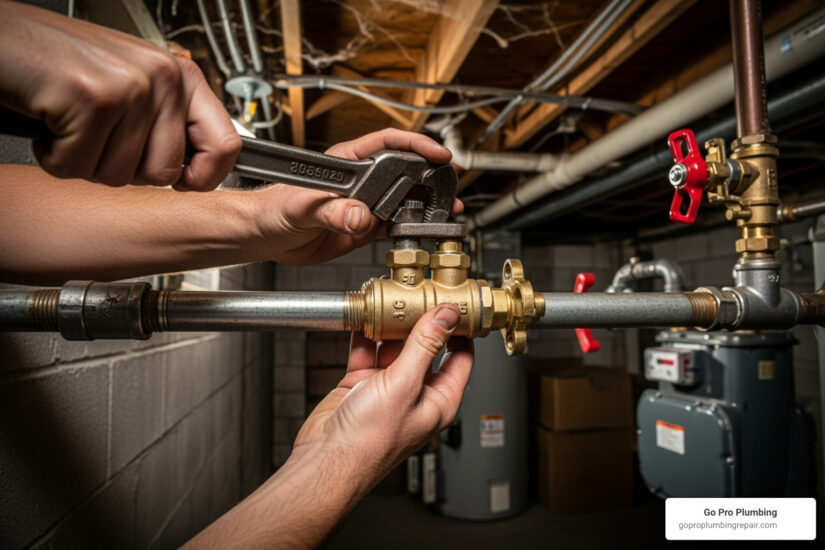
With the gas off, you can begin removing the old valve. Using two pipe wrenches is mandatory.
- Use both wrenches to prevent pipe stress. Attach one wrench to the pipe to hold it steady and the other to the valve itself. Attempting this with one wrench can twist the pipe and cause new leaks.
- Turn the valve counter-clockwise while holding the pipe still. If it’s stuck, apply penetrating oil and wait a few minutes before trying again.
- Clean the pipe threads thoroughly with a wire brush or rag once the valve is off. Remove all old sealant, rust, and debris for a clean connection surface.
- Inspect the threads carefully for damage or corrosion. If the threads are compromised, stop immediately and call a professional. A new valve will not seal properly on damaged threads.
Step 3: Installing the New Valve
Correct installation is critical for a safe, leak-proof connection.
- Apply gas-rated thread sealant correctly. Use only yellow, gas-rated Teflon tape or gas-rated pipe dope. If using tape, wrap it clockwise around the male threads 3-5 times. If using dope, apply an even coat.
- Keep sealant out of the inside of the pipe. Excess sealant can break off and clog appliance orifices.
- Thread the new valve on by hand first to prevent cross-threading. It should turn smoothly. If you feel resistance, back it off and restart.
- Use two pipe wrenches to tighten it securely. Hold the pipe steady with one wrench and turn the valve with the other until it is snug. Do not overtighten, as this can crack the valve or strip the threads.
- Orient the valve properly so the handle is easily accessible and its on/off positions are clear.
For more extensive issues, our team can handle comprehensive Gas Pipe Replacement projects safely and efficiently.
After the Installation: Final Checks and Restoring Service

The Gas line valve replacement is almost done, but the final leak test is the most critical safety check. You must be 100% certain there are no gas leaks before restoring service.
Step 4: Performing a Gas Leak Test
Do not skip this step. It ensures the safety of your home and family.
- Slowly turn the main gas supply back on. Go to your main gas meter and turn the lever so it is parallel with the pipe.
- Apply your soapy water solution to all new joints. Spray the new valve connections thoroughly, covering every part of the new joint.
- Watch closely for bubbles. If you see bubbles forming or growing, it indicates a gas leak.
What to do if you find a leak:
- If bubbles appear, immediately turn off the main gas supply again.
- Do not try to light any appliances.
- Carefully tighten the leaking connection slightly.
- Turn the gas back on and re-test with soapy water. Repeat until you see absolutely no bubbles.
- If the leak persists, turn off the gas and call a professional plumber. For stubborn issues, our team is ready to help with our Gas Leak Repair Service.
Step 5: Relighting Pilot Lights and Testing Appliances
Once you are certain there are no leaks, you can get your appliances running again.
- Relight pilot lights on older furnaces, water heaters, or dryers. These must be relit manually. Always follow the manufacturer’s instructions, which are typically on a label near the pilot assembly.
- Test appliances with electronic ignition. Modern stoves and dryers should light automatically. It may take a moment for air to clear from the lines, so be patient.
- Ensure a stable, blue flame. On your stove, the flame should be mostly blue with a small orange tip. A steady blue flame indicates clean, safe combustion. If you see a flickering, yellow, or mostly orange flame, it could indicate a problem, and you should have a professional take a look.
While on the topic of home plumbing, the guide on replacing a main shutoff valve from This Old House offers good insights, but gas work has its own unique safety rules.
DIY Dangers: When to Call a Professional

While the steps for a gas line valve replacement may seem straightforward, working with gas lines carries significant risks. A small mistake can have serious consequences for your home and family.
Understanding the Risks of DIY Gas Line Valve Replacement
Attempting gas work without proper training and tools can lead to severe dangers.
- Fire and Explosion: Natural gas is highly flammable. The National Fire Protection Association (NFPA) notes that in 2021, gas ranges were involved in nearly 60% of home cooking fires, highlighting how quickly gas can become a hazard.
- Carbon Monoxide (CO) Poisoning: Improper installation can lead to incomplete combustion and the buildup of this colorless, odorless gas. The U.S. Consumer Product Safety Commission (CPSC) warns that improperly installed gas appliances are a major risk for CO poisoning.
Other common DIY mistakes include:
- Cross-threading pipes, which creates a weak point that will leak.
- Overtightening fittings, which can crack the valve or strip threads.
- Using incorrect materials, like standard plumber’s tape instead of gas-rated sealant.
- Creating new leaks by stressing other parts of the gas line.
- Invalidating homeowners insurance, as many policies won’t cover damage from unpermitted or improper DIY gas work.
Legal, Code, and Permit Requirements
Beyond safety, there are legal regulations for gas line work.
Most cities have strict local building codes that dictate the materials and methods for gas line repairs. Here at Go Pro Plumbing, we adhere to all local codes in Northern California, including Sacramento and Rancho Cordova, to ensure every job is done safely and legally.
In many areas, a permit is required for a gas line valve replacement. This ensures the work is inspected by a qualified official. Skipping this step can lead to fines and issues when selling your home.
This is why licensed professionals are so important. Many jurisdictions require that gas line work be performed by a licensed and certified plumber who has the training, insurance, and knowledge of local codes to do the job safely.
Call a professional for gas line valve replacement if:
- You smell a strong gas odor.
- The valve is severely corroded or damaged.
- You are uncomfortable with any step of the process.
- You lack the proper tools or experience.
- The pipe threads are damaged.
- You find a gas leak you cannot stop.
- Your local regulations require a licensed professional.
For certified, safe, and worry-free gas work, we are your trusted experts for Certified Gas Plumber Sacramento CA.
Frequently Asked Questions about Gas Valves
Here are answers to the most common questions we receive from homeowners about their gas valves.
How do I know if my gas valve is bad?
The most obvious sign is the rotten egg smell of a gas leak. Other signs include hissing sounds from the valve, a valve that is stuck or very hard to turn, or visible rust and corrosion. You might also notice an appliance isn’t getting gas even when the valve is open, or you may see weak or flickering flames on your gas appliances.
Can I use Teflon tape on gas line fittings?
Only use Teflon tape specifically rated for gas lines—it’s typically yellow and thicker than standard white tape. However, many professionals, including our team, prefer using gas-rated pipe dope (a paste-like sealant) for gas line valve replacement, as it often creates a more reliable seal. Never use standard white plumber’s tape on gas fittings.
How often should gas line valves be replaced?
Gas valves don’t have a strict replacement schedule and can last 20 to 50 years, according to the American Gas Association. Lifespan depends on the valve type (ball valves last longer than gate valves), usage, and environment. However, you should replace a valve immediately if it shows any signs of trouble, such as leaking, corrosion, or difficulty operating, regardless of its age. Proactively replacing old gate valves with modern ball valves is a good safety upgrade.
Regular professional checks can catch problems early. Our Gas Line Maintenance service helps identify potential issues before they become safety hazards.
Conclusion
Working with natural gas is not a typical DIY project. Gas line valve replacement involves serious risks, and safety must always be the top priority. There is no room for shortcuts when dealing with a substance that can cause fires, explosions, or carbon monoxide poisoning.
We’ve detailed the steps, from shutting off the gas to performing a leak test, to empower homeowners with knowledge. However, we also believe in recognizing when professional help is essential. A corroded valve, damaged pipe threads, or local code requirements are all situations that demand an expert. Sometimes, the peace of mind that comes from a professional installation is reason enough.
A licensed gas plumber brings training, insurance, and the expertise to handle the job safely and correctly, ensuring it passes all inspections.
At Go Pro Plumbing, we are committed to keeping Northern California families safe with outstanding customer service. Whether you’re in Sacramento, Rancho Cordova, or the surrounding areas, we offer same-day service because we know gas problems can’t wait.
If you are at all uncertain about this process or encounter a problem beyond your comfort zone, please call us. Your family’s safety is worth the professional installation.