Don’t Pay a Plumber: Replace Your Toilet Fill Valve Fast!
By Brian on September 29, 2025
Is Your Toilet Running? Here’s Why the Fill Valve is Likely the Culprit
Removing toilet fill valve is an easy DIY project that could save you hundreds of dollars in plumber fees. If your toilet won’t stop running, fills slowly, or makes hissing sounds, the fill valve is the likely culprit.
Quick Answer: How to Remove a Toilet Fill Valve
- Turn off water supply – Turn the shut-off valve clockwise.
- Drain the tank – Flush and hold the handle down, then sponge out remaining water.
- Disconnect supply line – Use pliers to loosen the coupling nut under the tank.
- Remove old valve – Loosen the locknut counterclockwise and lift the valve out.
- Install new valve – Insert the new valve, hand-tighten the locknut, and reconnect the water line.
While professional toilet repairs cost $240 on average, replacing a fill valve yourself costs as little as $50. Fill valves typically last 5-7 years. If yours is older or showing these warning signs, it’s time for a replacement:
- Constantly running water
- Slow tank refill after flushing
- Hissing or gurgling sounds
- Weak or ineffective flush
- Water trickling into the bowl
This is one of the easiest plumbing fixes you can do yourself. Most homeowners can complete the job in under an hour with basic tools.

Before You Begin: Tools, Supplies, and Valve Types
Proper preparation makes any home project go smoothly. Let’s walk through what you need to know before removing toilet fill valve.
Signs Your Fill Valve Needs Replacing
First, let’s confirm we’re fixing the right problem. Your toilet often signals an issue with strange sounds or unusual behavior.
- Constant running water is the biggest red flag. This means your fill valve isn’t shutting off properly, likely due to a worn internal seal or debris.
- Slow tank refill after flushing is another telltale sign. A worn-out or clogged fill valve restricts water flow, making the toilet take too long to prepare for the next flush.
- Hissing or gurgling sounds when the toilet isn’t in use indicate a leaky fill valve that can’t maintain a proper seal.
- A weak or ineffective flush often happens because the tank isn’t filling to the proper level, leaving you without enough water pressure.
- Phantom flushing, where the toilet seems to flush itself, occurs when water slowly leaks from the tank into the bowl, causing the fill valve to kick in periodically.
To confirm a leak, drop a few drops of food coloring into your toilet tank. Wait 20-30 minutes without flushing. If colored water appears in the bowl, you have a leak. If the tank water level drops but no color appears in the bowl, the fill valve itself is the culprit.
Most fill valves last 5-7 years, though hard water can shorten this lifespan due to mineral buildup. Replacing it every 5 years as preventative maintenance prevents water waste. A leaky toilet can waste hundreds of gallons daily. For more helpful tips, check out these tips for fixing toilet leaks from Portland Water Bureau. If you’re dealing with other running toilet issues, you can find more info about running toilet repair on our site.
Identifying Your Toilet Fill Valve Type
Knowing your fill valve type helps you choose the right replacement. While most modern replacement valves are universal, understanding your current setup is helpful.
- Plunger or piston style valves are found in older toilets. They are often metallic with a large float ball and can be noisy and inefficient.
- Diaphragm style valves use a flexible diaphragm to control water flow and are more reliable than piston types.
- Float-cup style valves are the most common modern choice. These tall plastic units have a floating cup that slides up a central tube.
- Floatless fill valves are the newest technology, sensing water levels directly without a float mechanism. They are quiet and water-efficient.
| Fill Valve Type | Appearance | How It Works | Common Issues | Best For |
|---|---|---|---|---|
| Plunger/Piston | Metallic with large float ball | Piston moves up/down to control flow | Worn washers, corrosion, sticking | Older toilets (consider upgrading) |
| Diaphragm | Plastic with diaphragm mechanism | Diaphragm flexes to control flow | Worn diaphragm, debris buildup | Various toilet types |
| Float-Cup | Tall plastic tube with sliding cup | Cup moves with water level | Leaky cup, debris, misalignment | Most modern toilets |
| Floatless | Compact, no visible float | Senses water level directly | Sensor issues, debris | Low-profile or compact toilets |
Universal replacement kits are designed to replace almost any type of fill valve, making your job much easier. These kits typically include adjustable heights and all the necessary parts.
Tools and Supplies You’ll Need
You don’t need a professional’s toolkit for this job. Gather these items before you start:
- New toilet fill valve kit: A universal kit is usually the best choice.
- Adjustable wrench or channel-lock pliers: For loosening the supply line and locknut. Channel-lock pliers provide a better grip.
- Bucket: To catch residual water when you disconnect the supply line.
- Sponge or old towels: To soak up the remaining water in the tank.
- Rubber gloves: To keep hands clean and improve grip.
- Scissors or a utility knife: To trim the refill tube if needed.
- Safety glasses: Always a good idea for any plumbing project.
Step-by-Step Guide to Removing Toilet Fill Valve and Installing a New One
Now it’s time to get to work. Removing toilet fill valve and installing a replacement is a straightforward process that should take less than an hour, saving you a plumber’s bill. Follow these steps carefully for a successful installation.
Step 1: Shut Off Water and Drain the Tank
This first step is crucial to avoid a mess. Find the water supply shut-off valve, usually located on the wall behind or beneath your toilet.

Turn the valve handle clockwise until it stops to shut off the water flow. If the valve is stuck, apply a little penetrating oil and be gentle to avoid breaking it.
Next, flush the toilet to drain most of the water from the tank. Hold the flush handle down to drain as much water as possible.
Lift the tank lid and use a sponge or old towels to soak up the remaining puddle of water at the bottom. A dry tank will prevent a mess during the next steps. If your tank wasn’t filling properly, see our guide on toilet tank not filling for more troubleshooting.
Step 2: How to Disconnect the Old Fill Valve
Now, let’s remove the old fill valve. Place a bucket directly under the water supply line connection to catch any remaining water.
Disconnect the water supply line by loosening the coupling nut where it connects to the fill valve. Use an adjustable wrench or channel-lock pliers, turning it counter-clockwise. You can usually finish unscrewing it by hand.

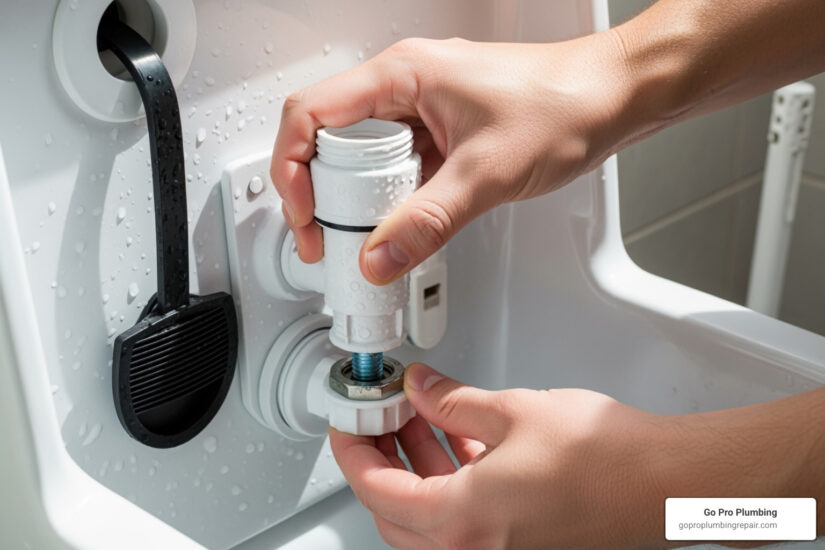
Next, remove the large locknut on the underside of the tank that holds the fill valve in place. Turn this counter-clockwise to loosen it. If the fill valve spins inside the tank, have someone hold it steady or use a second pair of pliers.
Once the locknut is off, lift the old fill valve straight up and out of the tank. Wipe the area around the hole clean before installing the new valve.
Step 3: Prepare and Install the New Fill Valve
Your new fill valve kit includes a rubber washer; slide it onto the threaded shank at the bottom to ensure a watertight seal.
Most new fill valves are adjustable. Adjust the height so the top of the fill valve sits about 1 inch above the overflow tube (the tall pipe in the center of the tank). This ensures the water level can be set correctly. Check your kit’s instructions for the specific adjustment method.
Insert the threaded shank through the hole at the bottom of the tank. Position the water outlet nipple (for the small refill tube) toward the overflow tube for easier connection.
From underneath, thread the new locknut onto the shank. Hand-tighten the nut first, then use pliers for a final half-turn. Do not over-tighten, as this can crack the porcelain tank. The goal is snug, not strained.
Step 4: Reconnect Water and Adjust the Fill Level
We’re almost done. Reconnect the water supply line to the bottom of the new fill valve. Hand-tighten the coupling nut, then give it a final snug turn with your wrench.
Attach the small refill tube from the nipple on the fill valve to the overflow pipe, using the provided clip. Ensure the tube has a smooth curve without kinks. This tube refills the bowl after each flush.

Slowly turn the shut-off valve counter-clockwise to restore water flow. Watch all connections for drips or leaks. If you see any, turn the water off and gently tighten the leaking connection.
Once the tank fills, check the water level. It should be about an inch below the top of the overflow tube or at the tank’s waterline mark. If it’s too high or low, adjust the float mechanism. Most modern valves have an adjustment screw or clip. Move the float up to raise the water level or down to lower it. Flush after each adjustment to check the new level. For more on water conservation, see these water conservation best practices from Energy.gov.
Congratulations! You’ve successfully replaced your toilet fill valve.
Troubleshooting Common Problems
Even a straightforward DIY project can have a hiccup. If you run into trouble while removing toilet fill valve or installing the new one, here’s how to fix the most common issues.
Fixing Leaks After Installation
A post-installation leak is frustrating but usually an easy fix.
- Leak at the base of the tank: This indicates a seal issue. Turn off the water and try gently tightening the locknut a quarter-turn. If that fails, drain the tank and check that the rubber washer inside the tank is lying flat and not twisted.
- Supply line leak: This leak occurs where the water line connects to the fill valve. Turn off the water and tighten the coupling nut slightly. If it still leaks, the washer inside the coupling nut may be old or cracked. Disconnect the line and replace the washer.
If leaks persist, it might be time for professional help. Our guide on when to call a plumber for a leaking toilet can help you decide.
Common Problems When Removing Toilet Fill Valve
Getting the old valve out can sometimes be the trickiest part.
- Stuck or corroded nuts: If the locknut or supply line coupling won’t budge, apply a penetrating oil like WD-40 and let it sit for 10-15 minutes. Use firm, steady pressure to loosen it. As a last resort, you can carefully cut the plastic nut with a small hacksaw, being cautious not to damage the porcelain tank.
- Rusted supply lines: If your supply line is corroded or leaks when you handle it, replace it. They are inexpensive and easy to find at a hardware store.
- Water hammer noise: A loud banging in your pipes when the toilet finishes filling is called water hammer. It’s caused by the valve closing too quickly or high water pressure. Some valves have a flow regulator you can adjust. If not, a water hammer arrestor on the supply line may be needed.
Adjusting the New Fill Valve and Water Level
Getting the water level right is key to an efficient, powerful flush.
- Water level too high: This causes water to constantly run into the overflow tube. Lower the float on your fill valve using its adjustment screw or clip.
- Water level too low: This results in a weak flush. Raise the float using the adjustment mechanism.
- Kinked refill tube: The small tube running to the overflow pipe must have a smooth path. If it’s kinked or twisted, it can cause a weak flush. Trim it to the correct length and ensure it clips securely without any bends.
Frequently Asked Questions about Fill Valve Replacement
Here are answers to the most common questions homeowners have about removing toilet fill valve and installing a new one.
How often should a toilet fill valve be replaced?
Most fill valves should be replaced every 5-7 years. However, this lifespan can vary. Hard water with high mineral content can cause buildup and wear out a valve in as little as 3-4 years. A toilet in a busy family bathroom will also wear out faster than one in a guest bathroom.
The best indicators are the signs of wear: constant running, slow fills, or phantom flushing. As a rule of thumb for preventative maintenance, replacing the valve every 5-7 years is a smart investment to prevent future problems and improve water efficiency.
Are all toilet fill valves universal?
Mostly, yes. Most universal kits from a hardware store are designed with adjustable heights and adapters to fit the vast majority of residential toilets. Their compatibility is excellent for most models.
However, some older toilets (pre-1970s) or modern low-flow toilets may have unique designs that require a specific replacement. When in doubt, take a photo of your current fill valve to the hardware store. An employee can help you confirm if a universal kit will work. The common types of universal kits handle about 90% of toilets without issue.
Can you just fix a fill valve instead of replacing it?
Sometimes a repair is possible, but replacement is often the better choice.
- Repairing: For a newer valve, replacing seals is a cheap fix for a minor leak. You can also try flushing debris out of the valve by removing the top cap and briefly turning on the water to clear any blockages.
- Replacing: Considering the cost-effectiveness of replacement, a new valve is usually the best option. A new kit costs around $20-30 and provides peace of mind. If your valve is over 5 years old or has persistent issues, a full replacement is more reliable than a temporary fix. It saves you from dealing with the same problem again in a few months.
When to Call a Professional for Your Toilet Repair
While removing toilet fill valve is a manageable DIY project, some situations are best left to a professional. Knowing when to call for help is as important as knowing how to do the job yourself.
It’s time to call a plumber if you encounter any of these issues:
- A cracked toilet tank: Applying pressure to a cracked tank can cause a flood. Stop immediately and call a professional.
- A broken or stuck shut-off valve: If you can’t turn the water off, or if the valve breaks when you try, you need a plumber to shut off the water to your home and make the repair.
- Persistent leaks: If you’ve followed all the steps and still have a leak, there may be a more complex underlying problem that a professional can diagnose.
If you feel uncomfortable or unsure at any point, it’s always safer to call a professional. A botched plumbing job can lead to expensive water damage. Plumbers have the experience to spot potential problems and ensure the repair is done correctly.
For reliable and fast toilet repair services, the experts at Go Pro Plumbing can ensure the job is done right the first time. We serve homeowners throughout Northern California, including Rancho Cordova and Sacramento, with same-day service. When a DIY project takes an unexpected turn, we’re here to help.