Flush Valve Fix: No Tank Removal Needed!
By Brian on October 13, 2025
Why Replacing Toilet Flush Valve Without Removing Tank Saves Time and Money
Replacing toilet flush valve without removing tank is possible with the right technique and can save you hours of work. Here’s the quick version:
Quick Answer:
- Turn off water and drain the tank.
- Disconnect the flapper chain and refill tube.
- Twist the valve body counter-clockwise to unthread it from inside the tank.
- Install the new valve by threading it clockwise.
- Reconnect components and test for leaks.
This method works because most modern flush valves thread into the tank bottom, so you don’t have to unbolt the tank from the bowl.
If you hear running water or your water bill is climbing, your flush valve might be the culprit. According to the EPA, the average household can lose 10,000 gallons of water yearly through leaks, and a failing flush valve is often to blame.
Traditional replacement is messy and risky. But the pro secret is that most flush valves can be replaced from inside the tank without removing a single bolt. This approach cuts repair time in half and eliminates the risk of cracking your toilet.

Is Your Flush Valve Failing? Key Signs and How to Test
The flush valve is the gatekeeper of your toilet tank, controlling the rush of water into the bowl. When it fails, you’ll hear annoying phantom flushing or constant running water. These aren’t just minor annoyances; a failing flush valve can waste thousands of gallons of water, making a simple replacing toilet flush valve without removing tank job an urgent and expensive problem.
Signs Your Flush Valve Needs Replacing
Wondering if your flush valve is the culprit? Here are the most common signs we see:
Constant running noise: If you hear water trickling long after you flush, the valve isn’t sealing properly.
Phantom flushing: The toilet suddenly refills its tank on its own. This happens when a slow leak from the tank into the bowl triggers the fill valve.
A weak or incomplete flush: The valve can’t hold or release enough water, forcing you to flush multiple times.
Water trickling into the bowl: A visible stream of water from the rim into the bowl confirms the valve seal has failed.
Worn or cracked parts: A visual inspection may reveal a warped flapper, cracked valve body, or mineral buildup.
Hissing sounds: A hissing sound when the tank is at rest often indicates a compromised seal.
The Food Coloring Test: Confirming a Leak
Not sure if you have a leak? This foolproof test provides a definitive answer.
Remove the tank lid and add a few drops of dark food coloring to the tank water. Do not flush.
Wait at least 30 minutes.
After waiting, check the toilet bowl. If you see any colored water, you have a leak. This test confirms that water is sneaking past your flapper or valve seal, telling you it’s time for a repair. It eliminates guesswork and gives you the confidence to proceed.
Gearing Up: Tools and Parts for a No-Tank-Removal Fix
When replacing toilet flush valve without removing tank, you’re choosing a smarter, easier path. Modern flush valves thread into the tank bottom, allowing you to work entirely from inside the tank. This saves your back and eliminates the risk of cracking the porcelain.

Essential Tools and Materials
Gathering the right tools beforehand ensures a smooth repair. You’ll need:
- Adjustable wrench: For the water supply line.
- Channel-lock pliers: For stubborn parts.
- Phillips head screwdriver: For set screws on some valves.
- Sponge and bucket: To remove leftover water from the tank.
- Old towels: To protect your floor.
- Penetrating oil (optional): For older, stuck parts.
- Plumber’s tape: To seal threaded connections.
- Replacement flush valve kit: Choose a universal kit designed for easy, no-tank-removal installation.
You can find these at a local hardware store, or contact Go Pro Plumbing for supplier recommendations.
Choosing the Right Replacement Flush Valve
Getting the right valve is crucial. Here’s how to choose:
- Go with a universal repair kit: These fit most toilets and often include adjustable overflow tubes, so no cutting is needed.
- Determine the size: 2-inch or 3-inch? Toilets made before 2000 usually have 2-inch openings, while newer models often have 3-inch openings. Measure your current valve’s opening to be sure.
- Take a photo: A picture of your tank’s interior is a huge help at the hardware store.
- Check the brand: While universal kits are great, some brands have unique designs. If you know your toilet’s brand and model (stamped inside the tank), check for a specific replacement.
- Look for adjustable overflow tubes: This feature makes it easy to set the height correctly.
Choosing the right toilet repair kit from the start saves time and frustration.
The Step-by-Step Guide to Replacing Toilet Flush Valve Without Removing Tank
Replacing toilet flush valve without removing tank is manageable when broken down into steps. Modern flush valves are designed to be serviced from inside the tank, eliminating heavy lifting and the risk of damage. The process is similar to changing a lightbulb—you simply unscrew the old valve from inside the tank and screw in the new one.

Step 1: Preparation and Draining the Tank
First, turn off your water supply valve (usually behind the toilet) by twisting it clockwise. Next, flush to empty the tank, holding the handle down to drain as much water as possible. Sponge out the remaining water into a bucket for a bone-dry tank. Finally, place towels around the base of the toilet to protect your floor.
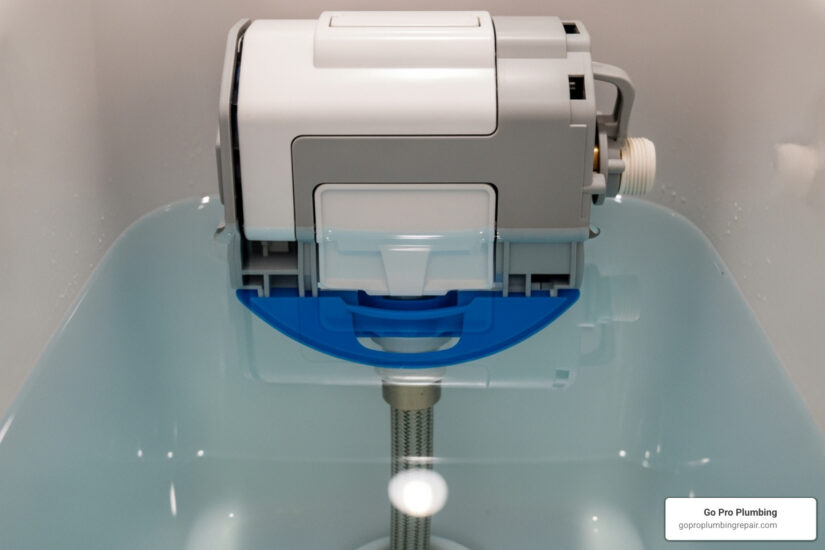
Step 2: Removing the Old Valve: The Key to Replacing Toilet Flush Valve Without Removing Tank
Start by disconnecting the refill tube (the thin tube running to the overflow tube) and unclipping the flapper chain from the flush lever. Now, twist the old valve body counter-clockwise. Some valves have a large locking ring at the base you can twist by hand; others use internal claws or set screws that require a screwdriver. Once open uped, the entire assembly should twist and lift out. With the old valve removed, clean the valve seat area thoroughly to remove any debris or mineral buildup that could prevent a good seal.
Step 3: Installing the New Valve and Reconnecting

Position your new valve base into the tank opening, ensuring the overflow tube faces the fill valve and the gasket is seated properly. Twist clockwise to lock the valve snugly in place (less than 144 inch-pounds of torque). Attach the new flapper or seal from your kit. If your valve has an adjustable overflow tube, set its height to about half an inch above the water line and an inch below the flush lever nut. Finally, reconnect the refill tube and flapper chain. The chain should have about 1-2 links of slack to ensure a proper seal and full flush.
Step 4: Final Checks and Testing
Turn your water supply back on slowly, watching for immediate leaks around the new valve base and connections. Allow the tank to fill completely, then test your flush. If the flush is weak or incomplete, adjust the chain slack. Finally, verify your water level is correct; if not, you may need to adjust the fill valve.
Congratulations! You’ve just mastered replacing toilet flush valve without removing tank. Your toilet should now flush like new, and your water bill should thank you.
Common Problems and Quick Fixes
Even the best-planned repair can have hiccups. Most issues that occur after replacing toilet flush valve without removing tank are easily fixable.
Leaks after installation are the most common frustration. The cause is usually a loose connection or an improperly seated gasket. Check and gently tighten the large nut securing the valve and the water supply line connection. Ensure the rubber gasket isn’t pinched or twisted. If you used plumber’s tape, confirm it was wrapped clockwise.
Weak flush power is often caused by a flapper chain that is too long (it should have only 1-2 links of slack) or a low water level. Adjust the chain or adjust your fill valve to raise the water to the marked line in the tank.
If your toilet is still running continuously, check that the flapper is sealing properly without debris underneath. Also, verify the overflow tube height is correct (about 1/2 inch above the water line).
Water level problems, like the tank not filling enough or overflowing, usually point to an issue with the fill valve. Adjust the float mechanism on your fill valve to set the water level correctly. If the fill valve seems faulty, it might need replacement. For more guidance, see our page on Toilet Repair Tank Not Filling.
If the stubborn old valve won’t budge, mineral buildup may be the cause. Apply penetrating oil to the valve base and let it sit. Use channel-lock pliers for extra leverage, but be gentle to avoid cracking the porcelain.
If these fixes don’t work or the project feels overwhelming, it’s time to call a professional. An expert can quickly spot the issue. For comprehensive Toilet Repair Services in Northern California, Go Pro Plumbing is ready to help.
| Problem | Likely Cause(s) | Solution(s) |
|---|---|---|
| Leaks After Installation | Loose connections, improperly seated gasket/seal | Tighten connections, re-seat gasket, apply plumber’s tape |
| Weak Flush Power | Flapper chain too long, low water level | Shorten flapper chain (1-2 links slack), adjust fill valve to increase water level |
| Toilet Runs Continuously | Flapper not sealing, incorrect overflow tube height | Check flapper for debris, adjust overflow tube height (1/2″ above water line, 1″ below lever) |
| Tank Not Filling Properly | Fill valve issue | Adjust fill valve float, replace fill valve if faulty |
| Difficulty Removing Old Valve | Mineral buildup, overtightening | Apply penetrating oil, use pliers for leverage (carefully) |
Frequently Asked Questions about Flush Valve Replacement
We hear from homeowners every day about toilet repairs, and replacing toilet flush valve without removing tank is a frequent topic. Here are answers to the most common questions:
Can I replace the flush valve on a one-piece toilet without removing the tank?
Yes. In fact, this method is essential for one-piece toilets since the tank and bowl are a single unit. The process is the same: work from inside the tank through the top opening. The main difference may be a unique locking mechanism, such as a central screw that controls internal claws. If you’re uncertain about your model, the Go Pro Plumbing team can offer specific guidance.
Are there special considerations for different toilet brands?
Mostly, no. The method for replacing toilet flush valve without removing tank works for most brands using standard 2-inch or 3-inch valves, so universal kits are usually fine. However, some high-efficiency or designer toilets may have proprietary parts. To be safe, identify your toilet’s model number (stamped inside the tank) and take a photo of the valve before buying a replacement. If you’re confused about compatibility, give us a call. We can help identify the right parts for nearly any brand.
What are the benefits of replacing a flush valve myself versus hiring a professional?
DIY: The main benefits are cost savings (you only pay for parts) and the convenience of working on your own schedule. It’s also satisfying to fix something yourself.
Hiring a professional: A pro from Go Pro Plumbing offers a quick, efficient repair with a guarantee. We can also spot underlying issues that a DIYer might miss, preventing future problems. The choice depends on your comfort level, time, and the complexity of the job. For straightforward repairs, DIY is great. For complications or peace of mind, our same-day service in Northern California is here for you.
A Functioning Flush and a Lower Water Bill
Congratulations on mastering replacing toilet flush valve without removing tank! You’ve stopped a common source of water waste, saving money on your utility bill and conserving a precious resource. A single leaky toilet can waste over 10,000 gallons annually, so this repair makes a real difference.
This project shows that with the right technique, a seemingly daunting plumbing task can become a manageable DIY job.
Of course, DIY isn’t for everyone. If you ran into a stubborn part, have a unique toilet model, or simply prefer a professional touch, there’s no shame in calling for help. That’s why we’re here.
At Go Pro Plumbing, we celebrate DIY wins but are always ready to step in when things get tricky. Whether you need guidance or want the peace of mind of professional service, we’ve got your back. We offer same-day service throughout Northern California, including Sacramento and Rancho Cordova, because toilet problems can’t wait.
Contact us for expert toilet repair services in Northern California
