The Ultimate Guide to Shower Remodeling
By Brian on July 3, 2024
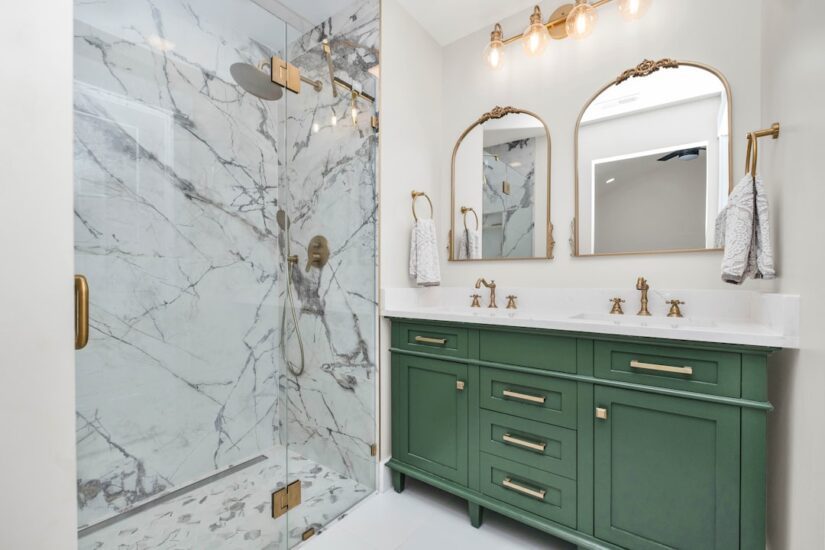
Transform Your Bathroom With A Shower Remodel
Looking to upgrade your bathroom? A shower remodel can bring a fresh, modern look to your space without the high cost of a full renovation.
Here’s a quick overview to help you get started:
- Cost-Effective: Remodeling your shower can be done at a fraction of the price of a full bathroom overhaul.
- Quick Turnaround: Projects can be completed in as little as a day with professional help.
- Customization: Choose from barrier-free designs, neo-angled showers, and various materials.
- Accessibility: Add built-in seating, grab bars, and more for improved safety and comfort.
A shower remodel is crucial for both style and functionality. Whether you want to get rid of unsightly tile grout or you need to fix a leaking shower base, a remodel can do wonders. By updating the shower, you also boost your home’s value and make your daily routine more enjoyable.
Our experts at Go Pro Plumbing can guide you through every step of the process, ensuring that your new shower is both beautiful and durable. Leveraging high-quality materials, we promise a low-maintenance shower that’s built to last.

Planning Your Shower Remodel
Planning is crucial for a successful shower remodel. Let’s break it down into four key areas: setting a budget, creating a timeline, design considerations, and choosing materials.
Setting a Budget
Cost Range:
A shower remodel can vary greatly in cost. On average, a basic remodel might cost around $3,500, while a high-end remodel can go up to $25,000 or more. The price depends on the size of the shower, the materials used, and the complexity of the design.
Factors Affecting Cost:
1. Materials: Tiles, fixtures, and finishes can range from budget-friendly to luxury.
2. Labor: Hiring professionals increases costs but ensures quality.
3. Plumbing: Upgrading old pipes or moving plumbing lines adds to the expense.
4. Permits: Some remodels require permits, which can add to the cost.
Cost-Saving Tips:
– Do your own demolition: Save on labor costs by removing the old shower yourself.
– Shop sales: Look for discounts on tiles and fixtures.
– Reuse fixtures: If they’re in good condition, keep existing fixtures to save money.
– Opt for acrylic panels: These can be more affordable and easier to install than tiles.
Creating a Timeline
Project Duration:
A typical shower remodel can take anywhere from a few days to a few weeks, depending on the scope of the project.
Phases:
1. Planning and Design: 1-2 weeks
2. Demolition: 1-2 days
3. Plumbing and Electrical Work: 2-4 days
4. Waterproofing and Tiling: 3-7 days
5. Finishing Touches: 1-2 days
Potential Delays:
– Permits: Waiting for approvals can slow things down.
– Material Availability: Special order items can take longer to arrive.
– Unexpected Issues: Hidden problems like mold or outdated plumbing can add time.
Design Considerations
Style:
Your shower should reflect your personal taste. Popular styles include modern, traditional, and minimalist. Consider the overall aesthetic of your bathroom when choosing your design.
Functionality:
Think about how you use your shower. Do you need built-in seating, shelving units, or grab bars? These features can enhance both convenience and safety.
Accessibility:
Barrier-free showers are great for those with mobility issues. Features like low thresholds and grab bars can make a shower more accessible.
Trends:
– Neo-angled showers: Perfect for small spaces.
– Walk-in showers: Offer a sleek, modern look.
– Multiple shower heads: For a spa-like experience.
Choosing Materials
Tiles:
Tiles come in various materials, shapes, and sizes. Ceramic and porcelain tiles are popular for their durability and water resistance. For a luxury look, consider marble or glass tiles.
Acrylic:
Acrylic panels are a cost-effective and low-maintenance option. They resist mold and mildew, making them a practical choice.
Fiberglass:
Fiberglass is another affordable option. It’s easy to install and maintain but may not be as durable as other materials.
Waterproofing:
Proper waterproofing is crucial to prevent leaks and water damage. Use waterproof membranes and backer boards to ensure a watertight shower.
Planning a shower remodel involves careful budgeting, timeline management, thoughtful design, and the right choice of materials. With these steps, you can create a beautiful, functional, and long-lasting shower space.
DIY vs. Professional Shower Remodel
When it comes to a shower remodel, you have two main options: DIY or hiring a professional. Each has its own set of pros and cons, skill requirements, and costs.
DIY Shower Remodel
Pros:
– Cost Savings: Doing it yourself can save a lot of money on labor.
– Control: You have complete control over every detail.
– Satisfaction: Completing a project yourself can be very rewarding.
Cons:
– Time-Consuming: DIY projects often take longer.
– Skill Level: Requires a good understanding of plumbing, tiling, and waterproofing.
– Risk of Mistakes: Errors can lead to costly repairs down the line.
Skill Requirements:
– Basic plumbing knowledge
– Tiling skills
– Understanding of waterproofing techniques
– Basic carpentry
Tools Needed:
– Tile saw
– Drill
– Screwdrivers
– Plumbing tools
– Waterproofing membrane
– Grout and tile spacers
Step-by-Step Guide:
1. Demolition: Remove old fixtures and tiles carefully. Use safety gear to protect yourself.
2. Plumbing: Upgrade pipes if needed and install new fixtures.
3. Waterproofing: Apply waterproof membranes and backer boards.
4. Tiling: Cut and lay tiles, then grout them.
5. Finishing Touches: Install shower doors, add accessories, and perform a final inspection.
Common Mistakes:
– Poor Waterproofing: This can lead to leaks and water damage.
– Uneven Tiles: This affects both the look and function of the shower.
– Improper Plumbing: Can lead to leaks and inefficient water flow.
Hiring a Professional
Benefits:
– Expertise: Professionals have the skills and experience to do the job right.
– Time-Saving: A pro can complete the job faster.
– Quality: Higher quality workmanship and materials.
What to Expect:
– Initial Consultation: Discuss your needs and get a quote.
– Project Timeline: A clear schedule of when each phase will be completed.
– Quality Assurance: Professionals often provide warranties on their work.
Finding a Contractor:
– Get Multiple Quotes: Compare costs and services.
– Check Reviews: Look for testimonials and past project images.
– Verify Credentials: Ensure they are licensed and insured.
Cost Comparison:
– DIY: Generally cheaper but can be risky if mistakes are made.
– Professional: More expensive upfront but can save money in the long run by preventing costly errors.
Choosing between a DIY or professional shower remodel depends on your budget, skill level, and how much time you can dedicate to the project. Both options have their merits, so weigh them carefully before making a decision.
Next, we’ll guide you through the step-by-step process of a shower remodel, whether you do it yourself or hire a pro.
Step-by-Step Shower Remodel Process
Demolition
Removing Old Fixtures
The first step in a shower remodel is demolition. This means removing old fixtures like the showerhead, faucet, and tiles. Use a utility knife to cut through caulk and grout. Pry off tiles with a chisel and hammer. Be gentle to avoid damaging underlying structures.
Safety Precautions
Safety is crucial during demolition. Wear safety goggles, gloves, and a mask. Turn off the water supply to avoid leaks. Cover the bathroom floor with a drop cloth to protect it from debris.
Plumbing
Upgrading Pipes
Once the old fixtures are out, it’s time to upgrade the plumbing. Older homes might have outdated pipes that need replacement. Use PEX or copper pipes for durability.
Installing New Fixtures
Install the new showerhead, faucet, and any other fixtures. This step requires precise work. If you’re not confident in your plumbing skills, hiring a professional like Go Pro Plumbing is a smart move. They ensure everything is installed correctly to avoid future leaks.
Waterproofing
Membranes
Waterproofing is essential to prevent mold and water damage. Use a waterproof membrane on the shower walls and floor. This barrier keeps water from seeping into the structure.
Backer Boards
Install cement backer boards over the membrane. These boards provide a sturdy base for your tiles. Make sure to tape and mud the seams for a smooth surface.
Sealing
Seal all edges and corners with waterproof sealant. This step is vital for keeping water out of cracks and crevices.
Tiling
Choosing Tiles
Select tiles that match your design and budget. Ceramic and porcelain tiles are popular choices for their durability and style.
Cutting and Laying Tiles
Use a tile cutter or wet saw to cut tiles to size. Start laying tiles from the bottom up, using spacers to keep them evenly spaced. Apply thin-set mortar to the back of each tile before placing it on the wall.
Grouting
Once the tiles are set, apply grout between them. Use a rubber float to spread the grout and push it into the gaps. Wipe off excess grout with a damp sponge before it dries.
Finishing Touches
Installing Doors
If your shower design includes a door, now is the time to install it. Frameless glass doors add a modern touch but require precise installation to prevent leaks.
Adding Accessories
Add built-in seating, shelving units, and grab bars for functionality and style. These features make your shower more convenient and accessible.
Final Inspection
Lastly, conduct a final inspection. Check for leaks, loose tiles, and any other issues. Fix any problems before considering the job complete.
Following these steps ensures a successful shower remodel. Whether you do it yourself or hire pros like Go Pro Plumbing, attention to detail and quality materials make all the difference.
Next, let’s explore the best shower remodel ideas to inspire your project.
10 Best Shower Remodel Ideas
Walk-In Showers
Walk-in showers are a popular choice for modern bathrooms. They offer a sleek, open look and are easy to access. A walk-in shower typically features a tiled or waterproofed area on the bathroom floor where water can be contained and drained efficiently. This design is perfect for creating a luxurious and spacious feel in your bathroom.
Barrier-Free Designs
Barrier-free showers are ideal for those who need easy access without stepping over high thresholds. These designs are perfect for people with mobility issues or anyone who prefers a seamless entry. Barrier-free showers often feature a curbless entry and can be customized with slip-resistant flooring and handheld showerheads for added safety.
Built-In Seating
Adding built-in seating to your shower can transform it into a spa-like retreat. Whether it’s a bench or a corner ledge, built-in seating provides a place to relax and pamper yourself. It’s also practical for those who need to sit while showering. Choose materials that match your shower design for a cohesive look.
Shelving Units
Shelving units are essential for keeping your shower organized. Built-in shelves or niches provide space for storing shampoo, soap, and other toiletries. They can be designed to blend seamlessly with your shower walls, giving a clean and uncluttered appearance. Opt for materials that are easy to clean and resistant to mold and mildew.
Grab Bars
Grab bars are a must for safety and accessibility. They provide support and stability, especially for the elderly or those with mobility issues. Modern grab bars come in various styles and finishes, so they can be both functional and stylish. Install them near the shower entry, by the seating area, and around the shower walls for maximum safety.
Incorporating these ideas into your shower remodel can enhance both the functionality and aesthetics of your bathroom. Whether you want a luxurious walk-in shower or a practical barrier-free design, these features can help you create the perfect shower space.
Next, we’ll dive into frequently asked questions about shower remodels to help you make informed decisions.
Frequently Asked Questions about Shower Remodel
What is the cheapest way to redo a shower?
Redoing a shower on a budget doesn’t mean sacrificing quality or style. Here are some cost-effective options:
- Acrylic Panels: These are durable, easy to install, and come in various colors and styles. They can mimic the look of tile without the grout maintenance.
- Fiberglass: This is another affordable choice. It’s lightweight, easy to install, and can last for years with proper care.
- Refinishing: Instead of replacing, consider refinishing your existing shower. This can be much cheaper and still give your shower a fresh look.
Pro Tip: Do your own demolition to save on labor costs. Just make sure to follow safety precautions.
Are 1-day bathroom remodels worth it?
1-day bathroom remodels can be very appealing due to their convenience and time-saving aspects. Here are some pros and cons:
Pros:
– Time-Saving: Get a brand new shower in just one day.
– Less Disruption: Minimal downtime means you can use your bathroom sooner.
– Cost-Effective: Often, these services are cheaper because they focus on quick, efficient work.
Cons:
– Limited Customization: Quick remodels may not offer as many customization options.
– Quality Concerns: Some worry that speed may compromise quality, although many companies use high-quality materials and skilled labor.
Pro Tip: Research and read reviews to ensure you choose a reputable company for your 1-day remodel.
How long should a shower remodel take?
The duration of a shower remodel can vary based on several factors. Here’s an average timeline and what can affect it:
Average Duration:
– DIY Projects: 2-4 weeks, depending on your skill level and time commitment.
– Professional Remodels: 1-2 weeks, including planning and execution phases.
Factors Affecting Timeline:
– Scope of Work: Simple updates (like replacing fixtures) can be done quickly, while full remodels (like changing the layout) take longer.
– Materials: Custom or special-order materials can delay the project.
– Unexpected Issues: Older homes might have hidden problems like mold or outdated plumbing that need to be addressed.
Pro Tip: Always add a buffer to your timeline to account for unexpected delays.
By understanding these common questions, you can better plan and execute your shower remodel, ensuring a smooth and efficient process.
Conclusion
In summary, a shower remodel can transform your bathroom into a more functional and stylish space. Whether you choose to DIY or hire professionals, careful planning and budgeting are essential. Remember to consider factors like the cost of materials, potential delays, and unexpected issues that might arise, especially in older homes.
Final Tips:
- Set a Realistic Budget: Understand the cost ranges and plan accordingly. Use cost-saving tips like doing your own demolition or choosing more affordable materials.
- Plan Your Timeline: Be prepared for potential delays and always add a buffer to your schedule.
- Prioritize Functionality and Style: Ensure your design meets your needs and reflects your style. Consider trends and accessibility features for a future-proof bathroom.
- Choose Quality Materials: Invest in durable, high-quality materials that will last and prevent issues like mold and water damage.
- Hire the Right Professionals: If you opt for professional help, ensure you hire experienced and reliable contractors.
At Go Pro Plumbing, we specialize in bathroom remodeling, offering expert services to help you achieve the bathroom of your dreams. Our team of professionals is dedicated to providing high-quality service, ensuring your project is completed efficiently and to your satisfaction.
For more information or to schedule a free estimate, visit our bathroom remodeling services page. We look forward to helping you create the perfect bathroom!
By following this guide, you’ll be well-equipped to tackle your shower remodel with confidence. Happy remodeling!