Don’t Get Flustered: Find the Perfect Toilet Flush Kit
By Brian on September 17, 2025
Why a Quality Toilet Flush Kit Matters
A toilet flush kit is your solution to common bathroom problems like running water, weak flushes, and sky-high water bills. These all-in-one repair kits contain the essential parts needed to fix or upgrade your toilet’s flushing mechanism.
Quick Answer: What’s in a Toilet Flush Kit?
- Fill valve – Controls water refilling the tank
- Flush valve/flapper – Releases water from tank to bowl
- Gaskets and seals – Prevent leaks between tank and bowl
- Hardware – Bolts, washers, and chains for assembly
- Handle or button – Activates the flush mechanism
Most homeowners face toilet troubles at some point. Maybe your toilet runs constantly after flushing. Perhaps the flush is so weak it barely moves anything. Or you’ve noticed your water bill creeping higher each month.
These problems often stem from worn-out parts inside your toilet tank. The average toilet uses 1.6 gallons per flush, but older models can waste up to 3.5 gallons. Even worse, a leaky flapper can waste up to 200 gallons per day – that’s money literally going down the drain.
The good news? A quality toilet flush kit can solve these issues for under $50 in most cases. Modern kits offer features like dual-flush technology, which uses different water amounts for liquids versus solids. Since you need the smaller flush 4 out of 5 times, the water savings add up quickly.
Whether you’re dealing with a constantly running toilet or want to upgrade to a more efficient system, the right flush kit can restore your toilet’s performance and cut your water usage significantly.
, comparison of old vs new toilet water usage (3.5 GPF vs 1.6 GPF), and dual-flush water savings with 4 out of 5 flushes using less water - toilet flush kit infographic")
Decoding Your Toilet: How to Choose the Right Toilet Flush Kit
Choosing the right toilet flush kit doesn’t have to feel like cracking a secret code. Toilets come in different shapes and sizes, but with a few simple measurements and some basic knowledge, you’ll find the perfect match for your bathroom buddy.

The first thing to understand is toilet compatibility. Most toilets fall into two camps: one-piece toilets have the tank and bowl molded together as one sleek unit, while two-piece toilets have separate tanks and bowls bolted together. Two-piece toilets are more common, and most universal toilet flush kits are designed with them in mind. One-piece toilets sometimes need specific parts due to their unique design.
Here’s where it gets important: flush valve sizes. The opening at the bottom of your toilet tank comes in two main sizes – 2-inch or 3-inch diameter. This measurement is crucial because your kit needs to match perfectly. For 2-inch systems, the tank hole typically measures between 2.56″ and 2.95″. Don’t guess on this one – grab a ruler and measure!
You’ll also want to know about Gallons Per Flush (GPF). This tells you how much water your toilet uses each time you flush. Older toilets can be real water hogs, using up to 3.5 GPF. Modern high-efficiency toilets use much less – typically 1.6 GPF or even 1.28 GPF. Understanding your toilet’s GPF helps you choose a kit that repairs and upgrades your water efficiency.
| Feature | Description | Why it Matters |
|---|---|---|
| Material | Components made from durable plastics (like ABS) or specialized rubber (e.g., Chlorazone). | Affects longevity and resistance to chemicals. High-quality materials mean fewer repairs down the line. |
| Flush Type | Single-flush (standard) vs. Dual-flush (two flush options). | Dual-flush offers significant water savings by allowing a lighter flush for liquids and a full flush for solids. |
| Valve Size | Designed for 2-inch or 3-inch flush valve openings. | Critical for compatibility. An ill-fitting valve will lead to leaks or improper flushing. |
| Warranty | The manufacturer’s guarantee on the kit’s components. | Indicates product confidence and provides peace of mind. Warranties can range from 1 year to 10 years or more. |
| Included Parts | What components are in the kit (e.g., fill valve, flush valve, flapper, gaskets, bolts, handle). | Ensures you have everything needed for your repair or upgrade, saving extra trips to the hardware store. |
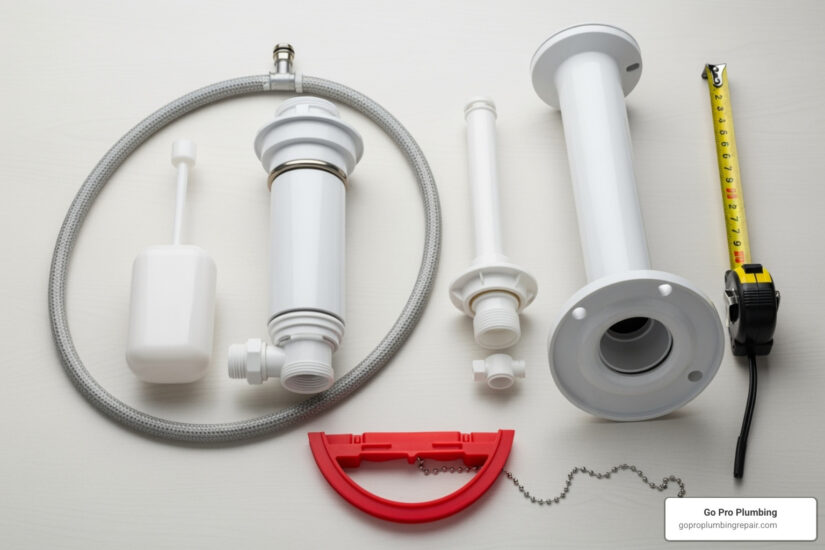
Key Components Inside a Toilet Flush Kit
Think of a toilet flush kit as a complete makeover for your toilet’s inner workings. Each component plays a specific role in creating that perfect flush you’re after.
The fill valve is your toilet’s water manager. It controls how water refills your tank after each flush, automatically stopping when the water reaches the right level. When this part fails, you’ll either have a tank that never stops filling or one that barely fills at all.
Your flush valve sits at the bottom of the tank and holds all that water until you’re ready to flush. It’s the gateway that opens to send water rushing into the bowl. The flapper or canister seal works hand-in-hand with the flush valve, creating a watertight seal at the tank’s bottom. When you flush, it lifts up to release water, then settles back down to stop the flow. A worn-out flapper is usually the troublemaker behind a constantly running toilet.
The tank-to-bowl gasket might be small, but it’s mighty important. This rubber ring prevents leaks between your tank and bowl. When it cracks or gets old, you’ll see water pooling where the two parts meet.
Don’t forget about the bolts and washers that keep everything secure. Over time, these can rust or loosen, making your toilet wobbly or leaky. Finally, the flush handle or button assembly is your direct connection to all this flushing power. Some kits include a traditional handle, while dual-flush systems often feature modern push-button controls.
Signs Your Flush Valve Needs Replacing
Your toilet is pretty good at telling you when something’s wrong – you just need to know what to listen for. These warning signs mean it’s time to consider a new toilet flush kit.
Phantom flushing is when your toilet decides to flush itself, usually at the most inconvenient times (like 3 AM). This ghostly behavior happens when your flush valve’s seal isn’t holding water properly, causing the tank to slowly drain and trigger automatic refills.
Constant running water is another dead giveaway. If you hear water trickling or running long after you’ve flushed, your flush valve’s seal has given up the ghost. This seemingly small problem can waste up to 200 gallons of water per day – that’s money literally going down the drain.
A weak or incomplete flush that requires multiple attempts to clear the bowl often points to a flush valve that isn’t sealing properly. Without a tight seal, your toilet can’t build up enough water pressure for a strong flush.
Even a tiny water trickle into the bowl signals trouble. Try this simple test: add a few drops of food coloring to your tank (don’t flush), then wait 15-20 minutes. If you see color in the bowl, you’ve got a leak.
Visible cracks or warping on any parts inside your tank are obvious red flags. If your rubber flapper looks stiff, cracked, warped, or feels slimy, it’s definitely time for a replacement.
For more detailed information about diagnosing these problems, check out our guide on toilet flush valve problems.
Finding the Perfect Fit for Your Toilet
Getting the right toilet flush kit is all about precision. You can’t just grab any kit and hope for the best – measurements matter.
Measuring your flush valve diameter is the most critical step. Use a ruler or tape measure to determine if you have a 2-inch or 3-inch opening. For 2-inch systems, the tank hole should measure between 2.56″ and 2.95″. Get this wrong, and your new kit won’t fit properly.
If measurements seem tricky, try checking your toilet model number. Look for it stamped on the inside back wall of the tank, under the tank lid, or on the bowl’s underside rim. With this number, you can find manufacturer-specific parts or verify compatibility with universal options.
Universal kits are designed to fit many different toilets, but they still have limits. Always double-check their compatibility with your flush valve size and tank height. These kits often include adjustable components to work with different tank depths.
Sometimes brand-specific kits are your best bet, especially with high-efficiency or designer toilets that have unique specifications.
You can find plenty of options at major retailers like Home Depot’s toilet repair kits or browse Lowe’s comprehensive toilet repair kits for easy fixes. These retailers provide detailed product descriptions and compatibility charts to help guide your decision.
The Ultimate Upgrade: Installing a Water-Saving Flush Kit
Think of upgrading to a modern toilet flush kit as giving your bathroom a makeover without the hefty price tag. You’re not just fixing problems – you’re changing your toilet into a water-saving powerhouse that works harder while costing you less to operate.

The beauty of installing a water-saving toilet flush kit lies in its immediate impact on your daily life. Your water conservation efforts start paying off from day one, with lower utility bills that put money back in your pocket each month. It’s like finding a hidden treasure in your own bathroom!
But the benefits go beyond just savings. Modernizing an old toilet with a quality flush kit often means saying goodbye to weak, disappointing flushes. Instead, you’ll enjoy increased flushing power that gets the job done right the first time, eliminating those frustrating moments when you have to flush twice or three times.
The Power of Dual-Flush: Save Water and Money
Here’s where things get really exciting. A dual-flush explained is simple: you get two flush options instead of one. There’s a lighter flush for liquid waste and a full-power flush for solid waste. This isn’t just a fancy feature – it’s a game-changer for your water bill.
The magic happens because we don’t actually need a full flush most of the time. Think about your daily bathroom habits: 4 out of 5 flushes use less water with a dual-flush system. That’s 80% of your flushes using significantly less water than before.
Let’s talk numbers that matter to your wallet. Water usage statistics show that older toilets gulp down 3.5 GPF like they’re drinking from a fire hose. Compare that to modern systems using just 1.6 GPF, and you’re already looking at more than half the water usage. Dual-flush systems take this even further by using as little as 0.8 gallons for liquid waste flushes.
The long-term savings calculation is impressive. A family of four can save thousands of gallons per year, translating to hundreds of dollars in reduced water bills. Many homeowners find their toilet flush kit pays for itself within the first year through water savings alone.
Beyond your personal savings, the environmental benefits are substantial. Every gallon you save helps preserve our precious water resources for future generations. It’s a win-win situation where doing good for the planet also does good for your budget.
Step-by-Step Toilet Flush Kit Installation
Ready to dive into this rewarding DIY project? Installing a toilet flush kit is more straightforward than you might think, and there’s something deeply satisfying about fixing your own plumbing problems.
Before you start, gather your essential tools: an adjustable wrench for the various nuts and bolts, rubber gloves to keep your hands clean, a bucket to catch any water spillage, and a sponge for cleanup. Having everything ready makes the job flow smoothly.
Let’s walk through this together. First, turn off the water supply by locating that little valve behind your toilet and turning it clockwise until it stops. This crucial step prevents any unwanted water surprises during your work.
Next, drain the tank by giving your toilet one final flush. The tank should empty most of its water, but you’ll need to soak up any remaining puddles with your sponge. Don’t worry about getting every last drop – just get most of it out.
Now comes the interesting part: remove the old hardware. Disconnect the water supply line from the fill valve (keep that bucket handy for any drips). Then tackle the large nut securing the fill valve at the bottom of the tank. If you’re replacing the flush valve too, you’ll need to unbolt the tank from the bowl and carefully lift it off.
Install the new valve and gasket by following your kit’s specific instructions. The flush valve goes in first, making sure it sits perfectly in place. Then position the new tank-to-bowl gasket over the flush valve’s base like a rubber crown.
Re-attach the tank by carefully lowering it back onto the bowl, lining up those bolt holes like puzzle pieces. Insert the new tank bolts and tighten them evenly, alternating sides. Think “snug but gentle” – you want it secure without cracking the porcelain.
Connect the water line by installing your new fill valve and reconnecting the supply line. Hand-tighten first, then give it a quarter turn with your wrench. Finally, test and adjust water levels by slowly turning the water back on and letting the tank fill. Most modern fill valves let you fine-tune the water level for optimal performance.
Troubleshooting Common Issues
Even the best DIY projects can have a hiccup or two, and that’s perfectly normal. Don’t let minor issues discourage you – most problems have simple solutions.
Running toilet after installation is the most common concern new installers face. Usually, this happens when the flapper isn’t sealing properly. Check that the chain connecting your flush handle to the flapper has just the right amount of slack – not too tight that it holds the flapper open, and not so loose that it gets tangled underneath. For detailed solutions, our guide on How to Fix a Running Toilet walks you through every possible fix.
Weak or no flush typically means the chain length needs adjustment or the water level isn’t quite right. If there’s not enough water in the tank, you won’t get that satisfying, powerful flush you’re after. Our comprehensive article on Toilet Not Flushing covers all the potential causes and solutions.
Leaks from bolts or gasket usually just need a gentle tightening of the tank bolts. Remember to alternate sides and don’t overtighten – porcelain can crack if you’re too aggressive.
When to call a professional becomes the smart choice when you’ve tried troubleshooting but problems persist, or when you encounter unexpected issues like cracked tanks or bolts that absolutely won’t budge. At Go Pro Plumbing, we handle toilet repairs throughout Northern California with the same-day service that sets us apart. Sometimes calling a Plumber for Toilet Repair saves you time, stress, and potential costly mistakes.
Frequently Asked Questions about Toilet Flush Kits
We get plenty of questions about toilet flush kits from homeowners, and honestly, we love answering them! It shows people are thinking smart about their plumbing investments. Let’s explore the most common questions we hear, so you can make the best choice for your bathroom.
What are the differences between various brands of flush kits?
Here’s the thing about toilet flush kit brands – the name on the box isn’t nearly as important as what’s inside it. We’ve seen fancy packaging hide mediocre parts, and simple boxes contain excellent components. The real differences come down to features and quality, not marketing.
Material quality makes the biggest difference in how long your kit will last. Basic kits use standard ABS plastic and regular rubber components that do the job but might need replacing sooner. Higher-quality options use specialized materials like Chlorazone rubber, which resists breakdown from chlorine and other water treatments. These premium materials can last twice as long as standard rubber, saving you future headaches and repair costs.
Performance claims vary widely between manufacturers. Some boast features like 2X refill rate for fill valves, meaning your tank fills much faster after each flush. Others focus on quieter operation or truly universal fit designs that eliminate guesswork when choosing the right flapper size.
Warranty length tells you a lot about a manufacturer’s confidence in their product. You’ll find warranties ranging from 7-year to 10-year coverage on components. A longer warranty usually indicates better materials and construction – plus it protects your investment.
Included components can make or break the value of a kit. Some packages are bare-bones, offering just a flapper and fill valve. Complete kits provide everything from the fill valve and flush valve to gaskets, bolts, washers, and even a new handle. If you’re doing a full overhaul, a complete kit often offers the best value.
What is the typical price range for toilet flush kits?
The cost of a toilet flush kit depends on what you’re trying to accomplish and how comprehensive you want to go. The good news? There’s something for every budget.
Basic flapper/fill valve kits run about $10-$25 and work perfectly when you just need to replace one failing component. These simple fixes can solve running toilet problems without breaking the bank.
Complete single-flush kits typically cost $20-$40 and include everything needed for a full internal overhaul. You’ll get a new fill valve, flush valve or flapper, tank-to-bowl gasket, and all necessary hardware. These kits are ideal when multiple components show wear or when you want to refresh everything at once.
Dual-flush conversion kits range from $30-$65 and represent the premium option for water savings. These systems include specialized dual-flush mechanisms – either push-button tops or modified handle systems – along with high-efficiency fill valves.
While you might see toilet flush kits advertised up to $700, those extreme prices usually apply to commercial-grade systems or specialty installations. For typical home repairs and upgrades, expect to spend between $10-$65. Investing a bit more upfront in quality materials and a solid warranty often saves money long-term by avoiding repeat repairs.
How much water can I really save with a modern kit?
The water-saving potential of modern toilet flush kits is genuinely impressive – and the savings show up fast on your utility bills.
Leaky flapper savings alone can be dramatic. A faulty flapper that doesn’t seal properly can waste up to 200 gallons per day. That’s not a typo! Even minor leaks add up to 20+ gallons daily. Fixing this single problem with a new flapper can save hundreds of dollars annually.
Upgrading from 3.5 GPF to 1.6 GPF cuts your water usage by more than half with every flush. If your family flushes 20 times daily, that old toilet uses 70 gallons compared to just 32 gallons with a modern kit. Over a year, you’re looking at massive water savings.
Dual-flush savings take efficiency to the next level. Since 4 out of 5 flushes only need the lighter setting, your average water usage drops significantly. A dual-flush system might use 1.6 GPF for solids but only 0.8 GPF for liquids. With 80% of flushes using the lower volume, your effective GPF becomes much lower than traditional single-flush toilets.
The payback period through water savings makes these upgrades essentially free. Many dual-flush toilet flush kits pay for themselves within just a few months through reduced water bills. It’s rare to find a home improvement that offers such quick returns while also helping the environment.
These aren’t just feel-good numbers – they translate directly into real money staying in your pocket each month while reducing your household’s environmental impact.
Conclusion

What started as a frustrating toilet problem has now become an opportunity for real improvement in your home. A quality toilet flush kit truly is one of those rare home improvements that delivers on multiple fronts – it’s affordable, highly effective, and gives you that satisfying sense of accomplishment that comes with fixing something yourself.
Think about what we’ve covered together. You now know how to identify the signs that your toilet needs attention, from that annoying phantom flushing to the constant water trickling that’s been driving up your utility bills. You understand how to measure your flush valve and choose the right components for your specific toilet. Most importantly, you’ve seen how a simple upgrade can transform your old water-wasting toilet into an efficient, money-saving fixture.
The project summary is straightforward: whether you’re dealing with a leaky flapper that’s wasting 200 gallons per day or upgrading from an old 3.5 GPF toilet to a modern dual-flush system, the right toilet flush kit can solve your problems and put money back in your pocket every month. The water savings alone often pay for the kit within just a few months.
For DIY enthusiasts, this project offers the perfect balance of challenge and reward. It’s complex enough to feel meaningful but simple enough that most homeowners can tackle it successfully with basic tools and a little patience. There’s something deeply satisfying about turning off that constantly running water and knowing you fixed it yourself.
But we also understand that plumbing isn’t everyone’s cup of tea. Sometimes the problem turns out to be more complex than expected, or you simply prefer the peace of mind that comes with professional installation. That’s where expert help makes all the difference. For a flawless installation and the confidence that everything is done right the first time, our team at Go Pro Plumbing brings years of experience to every job.
We’ve helped countless homeowners across Sacramento, Rancho Cordova, and Northern California transform their bathrooms with modern, efficient toilet systems. Our same-day service means you don’t have to live with a misbehaving toilet any longer than necessary.
Whether you choose the DIY route or prefer professional installation, the important thing is taking action. Your toilet problems won’t fix themselves, but with the right toilet flush kit and approach, they can become a thing of the past.
Find the perfect toilet repair kit or get expert installation today