Your Guide to Delta Faucet Cartridge Replacement and Finding the Right Parts
By Brian on October 20, 2025
Why Delta Faucets Cartridge Replacement is Essential for Your Home
Delta faucets cartridge replacement is one of the most common plumbing repairs homeowners face, and learning to do it yourself can save you both money and frustration. That annoying drip from your kitchen or bathroom faucet isn’t just a minor inconvenience – it’s your faucet telling you that the cartridge inside needs attention.
Quick Answer: Delta Faucets Cartridge Replacement Steps
- Turn off water supply at shut-off valves
- Remove faucet handle using appropriate allen wrench
- Unscrew bonnet nut with adjustable wrench
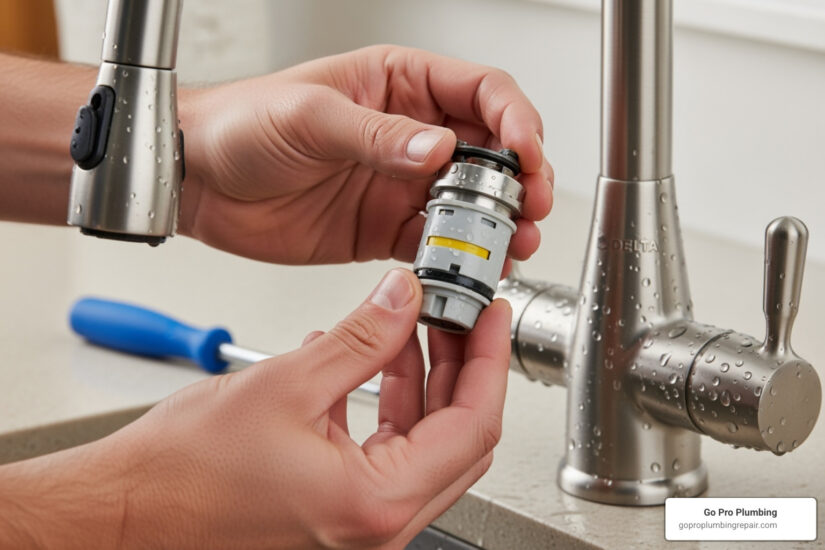
- Pull out old cartridge and note its orientation
- Install new cartridge in same position
- Reassemble faucet and test for leaks
Based on customer reviews and manufacturer data, Delta cartridges typically last 2-5 years depending on water quality and usage. The most common signs you need replacement include persistent dripping, stiff handles, and inconsistent water temperature.
Whether you have a single-handle kitchen faucet with DIAMOND™ Seal Technology or a traditional two-handle bathroom faucet, the replacement process follows similar steps. The key is identifying the correct cartridge model for your specific Delta faucet – something we’ll walk you through completely.
As one reviewer noted about their RP50587 cartridge replacement: “The part was easy to fix” and restored their faucet to perfect working condition. With the right guidance and tools, you can achieve the same results.

When to Replace: Common Signs Your Delta Cartridge is Failing
That persistent drip, drip, drip from your kitchen faucet isn’t just annoying – it’s your Delta faucet’s way of telling you something’s wrong. Most of the time, these frustrating symptoms point to one culprit: a failing cartridge that needs replacement.
The good news? Recognizing these warning signs early can save you from bigger headaches (and water bills) down the road. Let’s walk through what to watch for so you’ll know exactly when it’s time for a delta faucets cartridge replacement.
Dripping from the spout is the classic red flag. When your faucet keeps dripping even after you’ve cranked the handle shut, the internal seals in your cartridge have given up the fight against water pressure. What starts as an occasional drop often becomes a steady stream if left ignored.
Water leaking around the handle base tells a similar story. You’ll notice moisture creeping out from where the handle meets the faucet body. This happens when the cartridge’s O-rings or internal seals start deteriorating, and unfortunately, this type of leak usually gets worse over time.
Does your faucet handle feel like you’re wrestling with it? A stiff or hard-to-move handle that used to glide smoothly is often struggling against mineral buildup or worn internal components. Your handle should never require serious muscle to operate.
Inconsistent water temperature can turn your morning routine into a guessing game. One moment you’re getting lukewarm water, the next it’s scalding hot – all without touching the handle. This happens when the cartridge can no longer properly mix hot and cold water, especially common in single-handle Delta faucets.
Reduced water flow from just one faucet (while others work fine) might indicate cartridge problems too. If cleaning the aerator doesn’t restore your water pressure, the cartridge could be restricting flow internally.
Finally, squeaking or grinding noises when you operate the handle are never a good sign. These sounds typically mean the cartridge’s internal parts are creating friction where they should move smoothly.
Don’t let these warning signs turn into bigger problems like water damage or the need for complete faucet replacement. A timely delta faucets cartridge replacement is usually the simple, cost-effective fix that gets everything back to normal. If you’re dealing with persistent leaks in the Sacramento area, our expert team can help you Stop the Drip: Expert Sacramento Leaky Faucet Repair Guide.
Finding the Right Part: Identifying Your Delta Faucet and Cartridge

For a successful Delta faucets cartridge replacement, getting the right part is the most critical step. Using the wrong cartridge will lead to frustration and a faucet that still leaks. Thankfully, finding the correct part is straightforward once you know how to identify your faucet.
At Go Pro Plumbing, we’ve helped countless Northern California homeowners with this exact challenge. While some enjoy the detective work, we understand it can be overwhelming. That’s why we offer comprehensive Services: Faucets & Sinks when you’d rather leave it to the professionals.
How to Identify the Right Part for Your delta faucets cartridge replacement
Your first mission is to find the faucet’s model number. For kitchen and bathroom sinks, check for a tag on the water supply lines under the sink. For showers, the number may be behind the handle or on the decorative escutcheon plate. If you have the original packaging, the model number will be on it.
If you can’t find the number, use Delta’s online Product Identifier Tool. By answering questions about your faucet’s appearance, it helps you narrow down the model. Once you have the model number, use Delta’s website to find the corresponding parts diagram. These diagrams provide an exploded view of your faucet with every component labeled, including the exact cartridge part number you need. Here’s an example Delta Parts Diagram. As a backup, taking a photo of your faucet and the old cartridge is always a good idea.
Understanding Delta Cartridge Types
Delta has developed different cartridges for different faucets. Understanding the types helps clarify why the exact match is so important for your Delta faucets cartridge replacement.
| Cartridge Type | Faucet Compatibility | Key Features |
|---|---|---|
| Single-Handle Cartridges | Kitchen, lavatory, tub/shower faucets (newer models) | Control both water flow and temperature with one lever. Often ceramic disc. |
| Two-Handle Cartridges | Older kitchen, lavatory, tub/shower faucets (two separate handles) | Control hot and cold water independently. Can be ceramic or stem units. |
| DIAMOND™ Seal Technology | Specific single-handle Delta faucets | Features a diamond-coated ceramic disc. Designed for durability and leak-free performance. |
| Tub/Shower Cartridges | Single or two-handle tub/shower valves | Often pressure-balanced to prevent sudden temperature changes. |
Single-handle cartridges control both water flow and temperature with one lever, and many feature durable ceramic disc technology.
Two-handle cartridges are for classic faucets with separate hot and cold handles. These cartridges work independently, and Delta offers both ceramic and traditional stem versions.
DIAMOND™ Seal Technology is Delta’s premium design. These cartridges have a diamond-coated ceramic disc that reduces leak points and offers incredible durability. The RP50587 is a popular example, with some lasting over 14 years.
Tub and shower cartridges often include pressure-balancing features to prevent scalding from sudden water pressure changes elsewhere in the house.
Where to Purchase Genuine Delta Parts
Once you have the part number, it’s time to buy. We strongly recommend using only genuine Delta parts to ensure a proper fit and long-lasting repair.
- Delta’s official website is the most reliable source, often with free shipping and easy returns.
- Authorized dealers and plumbing supply stores offer expert advice and let you verify the part in person.
- Major home improvement retailers carry common Delta cartridges for convenient pickup or delivery.
Avoiding non-genuine parts is crucial. While cheaper, “compatible” cartridges may not fit correctly, can wear out quickly, and could even void your faucet’s warranty. Stick with genuine Delta parts for your Delta faucets cartridge replacement.
For more information about quality plumbing materials, check out our guide on Plumbing Materials Brands. We believe in using the best materials for lasting repairs.
Your Step-by-Step Guide to Delta Faucets Cartridge Replacement

Ready to tackle that delta faucets cartridge replacement? This is a satisfying DIY project that most homeowners can handle. The key to success is preparation, so gather your tools before you begin.
Safety comes first: Water can make surfaces slippery, so work carefully.
Tools and Materials You’ll Need
Having the right tools makes the job much smoother. Here’s what you’ll need:
- New Delta cartridge (the correct model for your faucet)
- Allen wrench set (1/8″ or 3/32″ are common for handle set screws)
- Adjustable wrench or channel-lock pliers
- Phillips head screwdriver
- Bucket and rags or towels
- Silicone-based plumber’s grease
- Utility knife (optional, for prying caps)
- Flashlight
Replacing the Cartridge: A Detailed Walkthrough
Follow these steps carefully for a successful delta faucets cartridge replacement.
-
Shut off the water supply. This is the most important step. For sinks, turn the hot and cold shutoff valves under the sink clockwise until snug. For a tub or shower, you may need to use your home’s main water shutoff. Once the water is off, open the faucet to drain any remaining water and relieve pressure.
-
Remove the handle. Most single-handle faucets have a decorative cap covering a set screw. Gently pry off the cap and use an Allen wrench to loosen the screw. The handle should then lift straight off. For two-handle faucets, the caps are usually on top. A quick photo of the handle’s orientation before removal can be a helpful reference.
-
Unscrew the bonnet nut. This large nut sits over the cartridge, holding it in place. Use an adjustable wrench or channel-lock pliers to turn it counter-clockwise. It may be tight due to mineral buildup, so apply steady pressure.
-
Pull out the old cartridge. Once the bonnet nut is off, grab the cartridge and pull it straight up. If it’s stuck, wiggle it gently. Pay close attention to its orientation—note any tabs or notches, as the new cartridge must be installed in the exact same position.
-
Install the new cartridge. Apply a thin layer of plumber’s grease to the O-rings on the new cartridge to ensure a good seal. Align the new cartridge exactly as the old one was, ensuring any tabs fit into their slots, and push it down firmly until it is fully seated. If you have a DIAMOND™ Seal Technology cartridge, you may need to position the temperature limit stop.
-
Reassemble the faucet. Work in reverse: thread the bonnet nut back on and tighten it snugly (firm but not overtight). Place the handle back on, tighten the set screw, and snap the decorative cap back into place.
-
Test for leaks. Slowly turn the water supply valves back on. Watch carefully for any drips around the handle or spout. Operate the handle through its full range of motion (hot, cold, mixed). If a leak persists, try tightening the bonnet nut a little more.
Pro Tips, Troubleshooting, and Cost
Even with careful preparation, you might encounter a hiccup during a Delta faucets cartridge replacement. Here’s how to handle common problems, along with maintenance tips to make your repair last.
Common Problems During a delta faucets cartridge replacement
-
Stuck Bonnet Nut: Mineral buildup can seize the nut. Apply a penetrating oil (like WD-40), wait 15-30 minutes, and use firm, steady pressure with your wrench. Be gentle with plastic nuts to avoid stripping them.
-
Stuck Old Cartridge: If the cartridge won’t budge, it’s likely due to mineral deposits. Wiggle it back and forth with pliers while pulling upward. Many new Delta cartridges include a plastic tool to help with removal.
-
Incorrectly Seated Cartridge: If the faucet still leaks or the handle feels stiff, the cartridge’s alignment tabs are likely not seated properly. Pull it out, check the alignment with the valve body, and reinstall it carefully.
-
Persistent Leaks After Replacement: First, double-check that you have the correct cartridge model. Next, inspect the new O-rings for any damage and ensure they are well-lubricated with plumber’s grease. In rare cases, the issue could be a damaged supply line or a crack in the faucet body.
-
Damaged O-Rings: O-rings can get pinched or twisted during installation. Always inspect them before and after, and use plumber’s grease to protect them and ensure a good seal.
-
Adjusting the Temperature Limit Stop: On many single-handle faucets, a red or black tab on the cartridge controls the maximum hot water temperature. You may need to adjust this stop for safety or to get hotter water, following your faucet’s instructions.
Maintenance and Cost-Effectiveness
Proper maintenance can significantly extend your new cartridge’s life.
-
Flush Your Lines: If you have hard water, periodically remove the faucet’s aerator and run the water for a minute to flush out sediment and debris.
-
Consider a Water Filter: If mineral buildup is a recurring problem, a whole-house water filter can protect your cartridges and other plumbing fixtures.
-
DIY vs. Professional Cost: The cost of a new Delta cartridge typically ranges from $30 to $70. By doing the Delta faucets cartridge replacement yourself, you save on professional labor costs, which can run from $100 to $300 or more. A DIY repair is highly cost-effective and also stops the financial drain of a dripping faucet, which can waste hundreds of gallons of water per year.
At Go Pro Plumbing, we empower homeowners to tackle these repairs. But when you need professional help in Northern California, we’re here with same-day service. For insights on quality materials, see our guide on Best Plumbing Material. If you decide it’s time for an upgrade, we’re also experts in Faucet & Sink Installation.
Frequently Asked Questions about Delta Cartridge Replacement
When it comes to delta faucets cartridge replacement, a few questions come up frequently. Here are the answers to the most common ones.
How long should a Delta faucet cartridge last?
Most Delta faucet cartridges provide 2 to 5 years of service. However, this lifespan depends heavily on two factors:
- Water Quality: Hard water with high mineral content (calcium, magnesium) or sediment will cause a cartridge to wear out faster.
- Usage: A high-traffic kitchen faucet will naturally wear out sooner than a rarely used guest bathroom faucet.
Cartridges with Delta’s DIAMOND™ Seal Technology are an exception. Their durable, diamond-coated ceramic discs reduce wear and can often last for 10 years or more.
Can I upgrade my old Delta cartridge to a DIAMOND™ Seal Technology one?
Unfortunately, no. You generally cannot upgrade an older faucet that was not originally designed for a DIAMOND™ Seal Technology (DST) cartridge. The faucet’s internal valve body is shaped differently and will not accept a DST cartridge like the RP50587. You must use the specific part number designed for your faucet model. To confirm which cartridges are compatible, find your faucet’s model number and check its parts diagram on the Delta website or in resources like this Maintenance & Installation Sheet.
Why is my faucet handle stiff after replacing the cartridge?
A stiff handle after a delta faucets cartridge replacement is almost always an easy-to-fix installation issue. Here are the most common causes:
- Improper Installation: The cartridge is likely not seated perfectly. The small tabs or notches on the cartridge must align exactly with the slots in the faucet body to prevent friction.
- Lack of Plumber’s Grease: The O-rings on the new cartridge require lubrication. If you skipped this step, the rubber can create resistance. Apply a thin layer of silicone-based plumber’s grease to all O-rings.
- Pinched O-Ring: An O-ring may have been pinched or twisted during installation. Remove the cartridge and inspect the O-rings to ensure they are seated properly and undamaged.
- Debris in the Valve Body: Tiny mineral deposits or debris left inside the faucet body can interfere with the new cartridge. Always clean the inside of the valve body before installation.
- Overtightened Bonnet Nut: The bonnet nut should be snug, but overtightening it can compress the cartridge and cause stiffness. Try loosening it slightly.
Conclusion
There’s something deeply satisfying about turning off that annoying drip and knowing you fixed it yourself. Successfully completing a Delta faucets cartridge replacement isn’t just about restoring your faucet’s functionality – it’s about taking control of your home’s maintenance and keeping more money in your pocket.
Throughout this guide, we’ve walked you through everything from recognizing the warning signs of a failing cartridge to identifying the correct replacement part for your specific Delta faucet model. We’ve covered the step-by-step installation process, shared troubleshooting tips for common hiccups, and answered the questions we hear most often from homeowners.
The beauty of this repair lies in its simplicity once you know what you’re doing. With the right cartridge, basic tools, and a bit of patience, most homeowners can tackle this project in under an hour. Remember the golden rules: turn off that water supply first, take your time with identification, and don’t forget the plumber’s grease on those O-rings.
Of course, not every plumbing project is meant to be a DIY adventure. If you run into stubborn parts, persistent leaks after replacement, or simply prefer to have a professional handle it, that’s perfectly okay. Sometimes the smartest move is knowing when to call in the experts.
Our team at Go Pro Plumbing has been helping Northern California homeowners with these exact repairs for years. We understand that plumbing problems don’t wait for convenient times, which is why we’re committed to same-day service and outstanding customer service throughout Rancho Cordova, Sacramento, and the surrounding areas.
Whether your issue is with a kitchen sink, bathroom faucet, or something more complex in your shower or tub, we’re here to help. Don’t let a leaky faucet turn into a bigger headache – For expert help with your tub or shower faucet, contact us today!
Your faucet should work for you, not against you. Now you have the knowledge to make that happen.