No Pedestal Problem: Swapping Your Sink Faucet Made Easy
By Brian on August 22, 2025
Your Quick Guide to a New Pedestal Sink Faucet
Changing a faucet on a pedestal sink might seem like a simple swap, but it comes with unique challenges that can turn a quick DIY project into a frustrating ordeal. The tight space behind the pedestal makes accessing connections difficult, and many homeowners find what one DIY blogger called their “big rookie mistake” – trying to work around the sink instead of removing it.
Here’s what you need to know about changing a faucet on a pedestal sink:
- Turn off water supply at the shutoff valves under the sink
- Remove the sink basin from the wall for easier access (highly recommended)
- Disconnect old faucet supply lines and mounting nuts
- Remove drain assembly if replacing it too
- Install new faucet with proper gaskets and plumber’s putty
- Reconnect everything and test for leaks
The key difference between pedestal sinks and regular vanity sinks? Access. That decorative pedestal creates a cramped workspace that makes using standard wrenches nearly impossible. A basin wrench becomes essential, and even then, you’ll likely find yourself agreeing with the service plumber who commented that pedestal sink work is “one of my least favorite jobs.”
Time expectation: Plan for 2-4 hours, especially if this is your first pedestal sink faucet replacement. While changing a regular bathroom faucet might take an hour, pedestal sinks require extra patience and often sink removal for proper access.
Cost: Around $150 for parts, plus the cost of a basin wrench (about $10-11) if you don’t own one.
The good news? Once you understand the process and have the right tools, this becomes a manageable weekend project that can dramatically update your bathroom’s look.

Changing a faucet on a pedestal sink word roundup:
Gearing Up: Tools, Materials, and Pre-Installation Checks
Getting ready for changing a faucet on a pedestal sink requires having the right tools and knowing what you’re up against. There’s nothing more frustrating than realizing mid-project that you’re missing a crucial tool. Let’s make sure that doesn’t happen.
Essential Tools and Materials for the Job
Pedestal sinks are beautiful, but the decorative base makes accessing plumbing connections difficult.
A basin wrench is the star of the show. This tool is your best friend when changing a faucet on a pedestal sink, as it’s designed to reach the impossibly tight spots behind the basin where regular wrenches can’t go. At around $10-11, it’s a worthwhile investment – A basin wrench is a big help.
You’ll also need adjustable wrenches, pliers (channel locks are great), and a utility knife for scoring old caulk lines where the sink is sealed to the wall.
Plumber’s putty is essential for creating watertight seals around the new faucet and drain. Pro tip: grey putty often matches hardware better than beige – Plumber’s putty. Silicone sealant is a good alternative.
Don’t forget the basics: safety glasses, a bucket and rags for spills, and penetrating oil for stubborn old nuts.
If you remove the sink basin (highly recommended), you’ll need a putty knife to scrape old caulk and a caulk gun with fresh caulk for resealing.

Understanding Your Faucet and Sink
Before shopping for a new faucet, you need to understand your current setup to ensure compatibility.
Single-hole faucets require one hole. Centerset faucets use three holes spaced four inches apart on a single base plate. Widespread faucets also use three holes, but they are spaced six or more inches apart with separate components.
Measure your existing sink holes before you shop to ensure the new faucet will fit.
Also, consider the spout reach and height to ensure it fits your basin and doesn’t cause excessive splashing.
Preparing for a Safe and Clean Workspace
Proper preparation is key to preventing a plumbing disaster.
First, turn off the water supply. Use the hot and cold shut-off valves under the sink (turn clockwise). If they are stuck or missing, shut off your home’s main water supply.
Test the shut-off by turning on the faucet. The water flow should stop. If it doesn’t, the valves aren’t working, and you must use the main shut-off.
Clear everything from under and around the sink. The space is already cramped, so remove all obstacles.
Protect your floor with old towels or a tarp to catch spills and prevent scratches if you move the sink basin.
With your workspace prepped, you’re ready to begin. Patience is key when changing a faucet on a pedestal sink; rushing leads to mistakes!
The Ultimate Guide to Changing a Faucet on a Pedestal Sink
Changing a faucet on a pedestal sink can be tricky, but this step-by-step guide will walk you through the process and help you avoid common frustrations.
Step 1: Removing the Old Faucet and Drain

Removing the old faucet is often the most challenging part of the project due to tight access and potential corrosion.
Start by disconnecting the supply lines. Place a bucket underneath to catch water, then use an adjustable wrench to loosen the nuts connecting the lines to the faucet. A small amount of residual water is normal.
If your faucet has a pop-up drain with a lift rod, you’ll need to disconnect the mechanism. Find where the lift rod connects to the drain assembly underneath and loosen the retaining nut or clip. Newer push-activated drains don’t have this step.
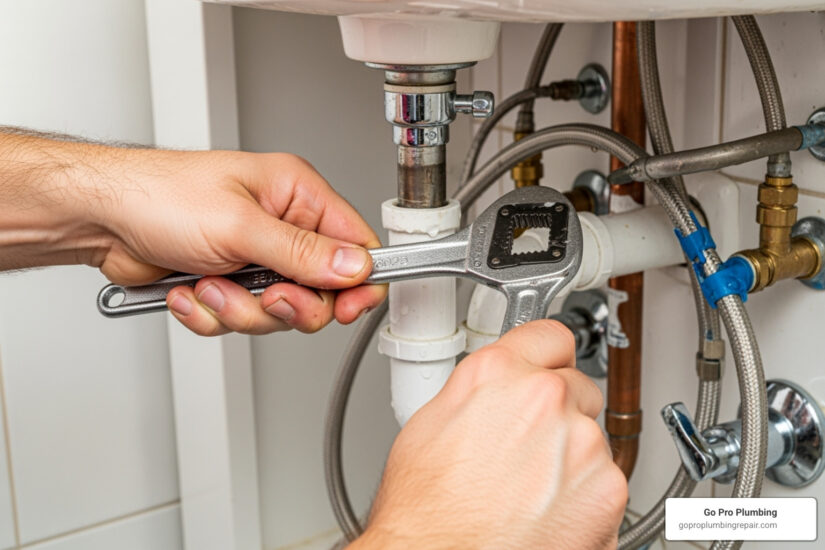
Next, loosen the mounting nuts holding the faucet to the sink. This is where a basin wrench is essential. These nuts can be tight and corroded; apply penetrating oil if they are stubborn and let it sit for a few minutes.
Once the mounting nuts are loose, lift the old faucet assembly straight up and out of the sink.
If you’re also replacing the drain assembly (recommended), disconnect the P-trap. Keep a bucket underneath and unscrew the slip nuts connecting the P-trap to the drain tailpiece and the wall drain.
To remove the drain assembly, unscrew the flange from the top of the sink and the large nut holding the drain body from underneath. The assembly will then come apart.
Finally, clean the sink surface thoroughly. Use a putty knife to scrape off old plumber’s putty, caulk, and mineral deposits. A clean surface is crucial for a good seal. Mineral spirits can help dissolve stubborn silicone.
The Pedestal Sink Challenge: To Remove or Not to Remove?
The biggest question when changing a faucet on a pedestal sink is whether to remove the sink basin. The cramped space behind the pedestal is extremely difficult to work in with standard tools.
Many DIYers make the “rookie mistake” of trying to work in that tight space without moving the sink. This often leads to extreme frustration.
The truth is, removing the sink basin is almost always the easier option. While it adds a few steps, it provides full, unobstructed access and makes the project manageable.
To remove the sink basin, start by scoring the caulk seal where the basin meets the wall with a utility knife. Be patient, as some sinks are sealed aggressively. If the sink is grouted to tile, consider calling a professional to avoid damage.
Next, locate and loosen the wall bolts securing the sink, which are usually just below the rim. Once loose, carefully lift the basin away from the wall. These sinks can be heavy, so a helper is recommended.
Alternatively, you can cut the caulk around the pedestal and slide it forward to gain access without fully removing the basin. The goal is to create enough room to work comfortably.
Step 2: Installing Your New Faucet and Drain

With the old parts gone and your workspace clear, installing the new faucet is much more straightforward.
If installing a new drain assembly, start by applying a bead of plumber’s putty or the provided gasket to the underside of the new drain flange. Insert the drain from the top and secure it from underneath with the gasket and lock nut. Hand-tighten, then give it a final snug turn with a wrench, being careful not to overtighten.
To prepare your new faucet, use either the included rubber gasket or apply a thin rope of plumber’s putty to the base to create a seal against the sink.
To install the faucet, carefully lower it into the sink holes, ensuring it’s aligned correctly. From underneath, slide on the washers and hand-tighten the mounting nuts. Use your basin wrench to secure them, but be careful not to overtighten and crack the porcelain.
Connect the supply lines to the new faucet. Many faucets come with lines attached. If not, screw the new lines onto the faucet’s hot and cold shanks until snug.
If your faucet has a lift rod for the pop-up drain, connect it according to the manufacturer’s instructions. This usually involves connecting the lift rod to a strap and then to the drain’s ball rod.
Reassembly, Testing, and Troubleshooting
You’re in the home stretch. After changing a faucet on a pedestal sink, it’s time for reassembly and testing. A systematic approach here ensures you won’t find any leaks later.
Step 1: Putting the Pedestal Sink Back Together
Since you carefully disassembled everything, putting it back together should be straightforward.
Position the Basin back against the wall. If you removed it, get help lifting it into place. Align it with the wall bolts and tighten them until snug, being careful not to crack the porcelain.
Reposition the Pedestal under the basin, ensuring it provides stable and level support. You may need to adjust it slightly for a perfect fit.
Apply New Caulk where the sink meets the wall, the pedestal meets the floor, and the basin rests on the pedestal. This prevents rocking and seals out moisture.
Connect Supply Lines to Shutoff Valves. Attach the free ends of the supply lines to the wall’s shutoff valves and tighten the connections with an adjustable wrench, but don’t overtighten.
Finally, Reconnect the P-trap to the new drain tailpiece and the wall drain. Tighten the slip nuts by hand, then give them a final quarter-turn with pliers.

Step 2: The Final Test and Leak Check
This is the moment of truth. It’s time to test your work.
Turn On Water Slowly. Gradually open the shutoff valves, listening for any drips or hisses that indicate a problem.
Check All Connections with a dry paper towel. Wipe down the faucet shanks, supply line connections, and P-trap connections to check for even the smallest leak. The Portland Water Bureau offers a great guide for this: Check for leaks.
Test Hot and Cold Water. Open both handles and let the water run for a few minutes to flush the lines. Pro tip: remove the aerator before this first flush to clear debris, then screw it back on.
Test Drain Function. Fill the sink and then let it drain. Watch the P-trap connections for any leaks as the water flows through.
Troubleshooting Common Issues When Changing a Faucet on a Pedestal Sink
Even with careful planning, issues can arise. Here’s how to handle common problems.
Stubborn Nuts and Bolts: For corroded nuts that won’t budge, apply penetrating oil and let it sit for 15-30 minutes before trying again. Patience is key.
Leaks at Connections: This is a common issue. Supply line leaks may just need gentle tightening. Ensure the rubber washers inside the nuts are seated correctly.
A leak from the faucet base means the gasket or plumber’s putty isn’t sealed correctly. You’ll need to remove the faucet, fix the seal, and reinstall it.
Drain connection leaks often mean a slip nut needs tightening or a washer is misaligned. An old, cracked P-trap may need to be replaced.
Low Water Pressure: This is often caused by debris clogging the aerator. Unscrew the aerator, clean it, and screw it back on.
Wobbly Sink: This usually means the wall bolts need to be tightened or the caulk needs to be redone. Tighten the bolts and reapply caulk as needed.
Improper Drainage: Check that the pop-up stopper isn’t blocking the drain and that the P-trap is aligned and clear. If problems persist, our team offers professional Drain Cleaning Services in Northern California.
If you hit a snag beyond a DIY fix, our Emergency Plumbing Repair Service team is ready to help in Sacramento, Rancho Cordova, and throughout Northern California.
Frequently Asked Questions About Pedestal Sink Faucet Replacement
Do I really have to remove the sink to change the faucet?
Removing the sink basin isn’t mandatory, but it is highly recommended. Working on a pedestal sink with the basin in place means dealing with an extremely cramped space, making it difficult to use tools and reach connections. Removing the basin provides clear access, changing a frustrating job into a manageable one. It saves time, effort, and scraped knuckles.
What is the hardest part of this project?
The hardest part is the cramped workspace behind the pedestal, which makes accessing the faucet’s mounting nuts and supply lines extremely difficult. Loosening old, corroded nuts in this tight area is a major challenge. This is precisely why removing the sink basin is the recommended approach, as it eliminates this primary obstacle.
How long does it take to replace a faucet on a pedestal sink?
For most DIYers, this is a 2 to 4-hour project. The extra time compared to a standard sink is due to the added steps of dealing with the pedestal and potentially removing the sink basin. First-timers should budget for the higher end of this range. Rushing a plumbing project is never a good idea, so set aside a half-day to do it right.
Your Project is Done, Now What?
Congratulations! If you’ve successfully completed changing a faucet on a pedestal sink, you’ve tackled one of the more challenging DIY plumbing projects. You’ve updated your bathroom’s look, saved money on a service call, and gained valuable experience.
However, we understand that projects don’t always go as planned. You might encounter seized nuts, corroded pipes, or other issues that require professional attention. There’s no shame in calling for backup when a DIY job becomes too much.
If you hit a roadblock or simply decide to leave it to the experts, our team at Go Pro Plumbing is here to help. We understand the unique challenges of pedestal sinks and offer same-day service throughout Northern California, including Sacramento and Rancho Cordova. Our commitment to outstanding customer service means we’ll get your project done right. For any Faucet and Sink Services, from simple repairs to full installations, we’ve got you covered.