Don’t Let a Drip Get You Down: How to Repair a Galvanized Pipe Leak
By Brian on March 5, 2026
Why Galvanized Pipe Leaks Are a Common Problem in Older Homes
If you need to fix galvanized pipe leak issues in your home, here’s what you need to know right away:
Quick Fix Options:
- Pipe Repair Clamp – Best for pinhole leaks and small splits; covers the leak with a rubber gasket and tightens around the pipe
- Epoxy Putty – Works for minor drips and thread leaks; knead and apply directly over the damaged area
- Pipe Repair Tape – Temporary solution for small cracks; wrap tightly around the leak with overlapping layers
- Replace the Section – Most permanent DIY option; cut out damaged pipe and install new PEX or CPVC with fittings
Important: These are temporary fixes only. Galvanized pipes corrode from the inside out, so if you’re seeing a leak, there’s likely more damage you can’t see yet.
Galvanized steel pipes were the go-to plumbing material for most of the 20th century. That zinc coating made them seem indestructible. But time and water chemistry tell a different story.
If your Northern California home was built before the 1970s, chances are you have galvanized pipes somewhere in your plumbing system. And after 40-50 years, that protective zinc coating wears away, exposing the steel underneath to rust and corrosion.
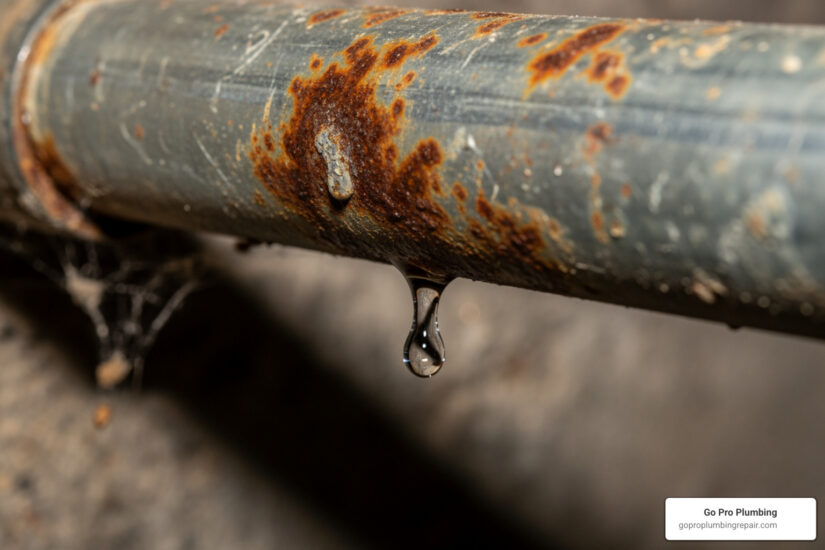
The tricky part? Galvanized pipes corrode from the inside out. By the time you see a drip, the damage is often more extensive than it appears. You might notice low water pressure, reddish-brown water, or damp spots on your walls before you ever see the actual leak.
This guide will walk you through temporary DIY repairs to stop a leak fast, help you understand when it’s time to call a professional, and explain why replacement is often the smartest long-term move for your home’s plumbing.

Fix galvanized pipe leak terms simplified:
Understanding Galvanized Pipe Leaks: Causes, Signs, and Risks
Galvanized pipes are steel pipes coated in zinc to prevent rust. This protection, however, doesn’t last forever. Homes in Northern California built before the 1970s often have this type of piping, making leaks a common issue for homeowners.
The main cause of leaks is internal corrosion. Water flow and minerals wear away the inner zinc coating, exposing the steel to rust. This leads to pinhole leaks, cracks, or complete pipe failure. Leaks also occur at worn-out threads at the joints, where connections have become loose, damaged, or corroded. Mineral buildup is another problem, especially with hard water. As rust forms, it creates rough surfaces where minerals accumulate, restricting water flow and speeding up corrosion.
Here are the common signs of a galvanized pipe leak:
- Low Water Pressure: As rust and scale build up, the pipe’s internal diameter shrinks, reducing water flow.
- Discolored Water: Reddish-brown or yellowish water indicates rust is leaching into your water supply. You may also notice a metallic taste.
- Visible Rust Stains: Flaking, peeling, or rust stains on exposed pipes indicate significant internal corrosion.
- Damp Spots or Water Stains: Unexplained damp spots on walls, ceilings, or floors suggest a hidden leak.
- Increased Water Bills: A sudden spike in your water bill without a change in usage can point to a hidden leak.
Delaying a fix galvanized pipe leak can lead to serious risks:
- Structural Water Damage: Slow drips can rot wood, damage drywall, and compromise your home’s structure.
- Mold Growth: Constant moisture encourages mold, which can cause health problems.
- Contaminated Drinking Water: Rust and other contaminants can leach into your drinking water.
- Unexpected Plumbing Emergencies: A small leak can become a burst pipe, causing major water damage.
- Decreased Home Value: Ongoing plumbing issues and water damage can lower your home’s value.
Understanding what galvanization is and how it fails is crucial. For more information, you can read about what is galvanization?. Old galvanized pipe is often rotted and fragile, and it’s no longer approved for water lines in most areas. This is why addressing leaks promptly is so important for homeowners in Sacramento and Rancho Cordova.
How to Identify Galvanized Pipes
Before you fix galvanized pipe leak, you must confirm you have galvanized pipes. Identification is usually straightforward.
Galvanized pipes are dull gray and made of steel. This is key to identifying them:

- The Magnet Test: A magnet will stick firmly to a galvanized pipe’s steel core. Copper and plastic pipes are not magnetic.
- The Scratch Test: Gently scratch the pipe’s surface. Silver-gray metal indicates galvanized steel. Copper is reddish-brown, and plastic pipes will show their original color.
- Age of Your Home: If your Northern California home was built before the 1970s, it very likely has galvanized pipes.
Once you’ve confirmed you have galvanized pipes, you can proceed with confidence, knowing the specific challenges and repair methods associated with this material.
Temporary DIY Methods to Fix a Galvanized Pipe Leak
Finding a leaking pipe is never fun, but a temporary DIY fix galvanized pipe leak can be a lifesaver in an emergency. These methods are designed to be stopgap measures, buying you time to plan and execute a more permanent solution or to call in the professionals. We always emphasize that these are not permanent repairs, but they can avert immediate crises and prevent further water damage.
Safety Precautions and Essential Tools
Before you even think about touching that leaky pipe, safety is paramount. Working with plumbing, especially older galvanized pipes, requires careful preparation.
Here are our essential safety precautions:
- Turn Off the Main Water Supply: This is the absolute first step. Locate your home’s main water shut-off valve and turn it off completely. Never attempt to repair an active, in-use pipe.
- Drain the Pipes: Once the main water is off, open the lowest faucet in your house (like an outdoor spigot or a basement utility sink) to drain any remaining water from the system. This relieves pressure and prevents additional water from leaking during your repair.
- Wear Personal Protective Equipment: We recommend wearing eye protection to shield your eyes from drips, debris, or rust particles, and gloves to protect your hands from sharp edges, rust, and chemicals.
- Prepare for Water: Have buckets, towels, and rags ready to catch any residual water and clean up the area.
Now, let’s gather your arsenal of tools and materials for a temporary fix galvanized pipe leak:
- Pipe Wrenches: Useful for tightening connections or, if needed, for removal (though be cautious with old, fragile pipes).
- Wire Brush/Sandpaper: Essential for cleaning the pipe surface around the leak, removing rust, corrosion, and paint.
- Pipe Repair Clamps: These are specifically designed for pipe leaks and are often the most reliable temporary fix. They consist of a rubber gasket and a metal clamp that tightens around the pipe.
- Epoxy Putty (Plumber’s Epoxy): A two-part putty that you mix and apply directly to the leak. Look for types that can cure in wet conditions if you can’t get the pipe completely dry.
- Pipe Repair Tape (Self-Fusing Silicone Tape): This tape fuses to itself, creating a watertight seal. It’s often used in conjunction with epoxy or as a standalone temporary fix for small cracks.
- Bucket and Rags: For catching drips and cleaning up.
- Flashlight/Headlamp: Good lighting is crucial, especially in dark basements or crawlspaces.
How to Fix a Galvanized Pipe Leak with a Clamp
For pinhole leaks or small splits in the body of a galvanized pipe, a pipe repair clamp is often our go-to temporary solution. It’s relatively easy to install and can provide a surprisingly robust seal.

Here’s how we recommend using one:
- Shut Off and Drain: As always, turn off the main water supply and drain the pipes thoroughly.
- Clean the Pipe: Use a wire brush or sandpaper to vigorously clean the area around the leak. Remove all rust, corrosion, paint, and grime. The clamp needs a clean surface to seal effectively. For galvanized pipes, thorough cleaning is especially important due to their tendency to corrode.
- Position the Rubber Gasket: Take the pipe repair clamp and open it up. Position the rubber gasket directly over the leak, ensuring it extends a few inches on either side of the damaged area. The gasket is what creates the watertight seal.
- Secure the Clamp: Wrap the metal clamp around the pipe, making sure the gasket stays centered over the leak. Bring the two halves of the clamp together and insert the bolts.
- Tighten Evenly: Using a wrench, tighten the nuts on the clamp. It’s crucial to tighten them evenly, alternating between the nuts, to apply uniform pressure around the pipe. This prevents pinching the gasket and ensures a good seal. Don’t overtighten, as old galvanized pipes can be fragile and might snap.
- Test: Once tightened, slowly turn your main water supply back on and check for any drips. If you see a small leak, try tightening the clamp a little more.
This method can effectively stop a leak and buy you precious time. This is a temporary fix galvanized pipe leak and should be monitored closely until a permanent repair or replacement can be made.
Using Epoxy Putty or Repair Tape for Minor Drips
For smaller leaks, such as those at threaded connections, tiny cracks, or very slow drips, epoxy putty or pipe repair tape can be effective temporary solutions. These are particularly useful when a clamp might not fit well, like on an elbow or a T-joint.
Here’s our step-by-step guide:
- Shut Off and Drain: You know the drill! Turn off the main water supply and drain the pipes. For epoxy to work best, the area should be as dry as possible.
- Prepare the Surface: Use a wire brush or sandpaper to clean and score the pipe surface around the leak. Remove all rust, corrosion, paint, and scale. A clean, slightly rough surface allows the epoxy or tape to adhere better. If fixing a leak at the threads, clean the entire joint thoroughly.
- For Epoxy Putty:
- Knead the Putty: Epoxy putty typically comes in two parts (often different colors) that you knead together until they form a uniform color. This activates the chemical reaction. Follow the manufacturer’s instructions for mixing ratios and kneading time.
- Apply Firmly: Once mixed, immediately press the putty firmly over the leak. Work it into any cracks or gaps and shape it around the pipe or joint. Ensure it covers the entire leaky area and extends slightly beyond it. For thread leaks, mold it around the entire circumference of the joint.
- Allow to Cure: The putty will harden over a specified time, usually within minutes to an hour. Consult the product instructions for the exact curing time before turning the water back on.
- For Pipe Repair Tape:
- Wrap Tightly: Starting a few inches before the leak, begin wrapping the self-fusing silicone tape tightly around the pipe, overlapping each layer by at least 50%. Stretch the tape as you wrap to ensure it fuses to itself.
- Extend Beyond the Leak: Continue wrapping several inches past the leak on the other side. The more layers, the stronger the seal.
- Press Firmly: Once wrapped, press the layers together firmly to ensure maximum fusion.
- Allow to Cure: While some tapes are immediate, others may need a short time to fully fuse. Check the product instructions.
- Combine Methods (Optional): For added security, you can first apply epoxy putty to the leak and once it’s cured, wrap the area with pipe repair tape.
These methods can effectively stop minor drips and buy you valuable time. However, these are temporary fixes to fix galvanized pipe leak issues. The underlying corrosion will continue, and a permanent solution is always recommended.
Galvanized vs. Modern Piping: A Quick Comparison
When we talk about galvanized pipes, understand how they stack up against modern plumbing materials. This comparison highlights why galvanized pipes are no longer the standard and why permanent replacement is often the best long-term strategy for your Northern California home.
Here’s a quick comparison of common piping materials:
| Feature | Galvanized Steel Pipe | Copper Pipe | PVC Pipe | PEX Pipe |
|---|---|---|---|---|
| Lifespan | 40-50 years (often less in hard water areas) | 50+ years, often 70-80+ | 25-40 years (for water lines, longer for drains) | 50+ years |
| Corrosion Resistance | Poor (zinc coating wears, corrodes from inside out) | Excellent (highly corrosion-resistant) | Excellent (plastic, doesn’t corrode) | Excellent (plastic, doesn’t corrode, chemical buildup resistant) |
| Cost (Material) | Lower (but high labor for replacement) | High (material cost) | Low | Moderate |
| Installation | Difficult (heavy, threaded connections, requires specialized tools) | Moderate (soldering, specialized tools) | Easy (solvent cement, mechanical fittings) | Easy/Fast (flexible, fewer fittings, crimping tools) |
| Flexibility | Rigid | Rigid (can be bent with tools) | Rigid | Highly Flexible (can snake through walls, fewer joints) |
| Leak Susceptibility | High (corrosion, worn threads, fragility) | Low (can get pinholes from water chemistry/erosion) | Low (can crack from impacts or improper installation) | Very Low (strong connections, freeze-resistant, no corrosion) |
| Water Quality Impact | Can cause discolored water, metallic taste, reduced flow | Minimal | Minimal | Minimal |
Pros and Cons of Galvanized Pipes:
Pros:
- Initial Strength and Cost: When new, galvanized pipes were strong and relatively inexpensive for their time.
- Outdoor Use: Their initial corrosion resistance makes them suitable for some outdoor applications like chain link fences or handrails.
Cons:
- Internal Corrosion: This is the biggest drawback. The zinc coating wears out, leading to rust, reduced water pressure, and discolored water.
- Fragility: Old galvanized pipe is frequently rotted, corroded, and fragile. Trying to tighten a rusted joint can often cause it to snap in half.
- Health Concerns: Rust and lead (from older galvanized pipes) can leach into your drinking water.
- No Longer Approved: Galvanized pipes are no longer approved as a material for water lines in most jurisdictions, including here in Northern California.
- Difficult to Repair: Due to their age and corrosion, repairing them is challenging and often leads to more issues.
Why Galvanized Pipes Are No Longer Standard:
The primary reason galvanized pipes are obsolete for modern plumbing is their inherent tendency to corrode internally and fail. While they were once the “gold standard,” advances in materials have provided far superior alternatives. The zinc coating on galvanized pipes can wear out, leading to corrosion along the threads and subsequent leaks, and ultimately, widespread pipe deterioration.
Benefits of PEX and Copper:
- PEX (Cross-Linked Polyethylene): PEX has become incredibly popular for repiping projects. It’s flexible, highly resistant to corrosion and mineral buildup, and can withstand freezing temperatures better than rigid pipes. Installation is faster and requires fewer fittings, meaning fewer potential leak points. For example, Zurn PEX B is highlighted for its superior flexibility, resistance to chemical buildup, scale, and corrosion, and high burst pressure ratings.
- Copper: A time-tested material known for its excellent corrosion resistance and longevity. While more expensive and requiring soldering for connections, it provides a very durable and reliable plumbing system.
Understanding these differences helps us see that while a temporary fix galvanized pipe leak can help in a pinch, investing in modern materials like PEX or copper for a permanent solution is a smart move for the long-term health of your home’s plumbing.
Beyond the Patch: When to Call a Professional
We’ve covered some handy DIY tricks to stop a drip in an emergency. But let’s be clear: these are temporary bandages, not cures. Galvanized pipes corrode from the inside out, meaning that visible leak is just the tip of the iceberg. If you’re dealing with widespread corrosion, multiple leaks, pipes that feel fragile or are crumbling, or a major drop in water pressure, it’s time to call in the experts. When DIY repairs fail, or when you simply want peace of mind, a professional plumber is your best bet for a lasting solution.
Permanent Solutions to Fix a Galvanized Pipe Leak
When a temporary patch just won’t cut it, we offer permanent solutions to fix galvanized pipe leak issues in your Sacramento or Rancho Cordova home:
- Pipe Section Replacement: For isolated leaks where the surrounding pipe is still in relatively good condition, we can cut out the corroded segment and replace it with a new section of modern piping material, such as PEX or CPVC. This involves carefully removing the old galvanized pipe, cleaning the threads, and installing new fittings and pipes. When connecting new materials to existing galvanized pipe, we ensure the use of dielectric unions. These specialized fittings prevent galvanic corrosion, which occurs when dissimilar metals (like galvanized steel and copper) come into direct contact, accelerating the deterioration of the older pipe.
- Full Repiping (Whole-House Plumbing Replacement): This is often the most effective and recommended long-term solution, especially for older homes with extensive galvanized piping. If you have widespread corrosion, multiple leaks, or consistently low water pressure, a full repipe means replacing all the old galvanized pipes with new, durable materials like PEX or copper. While it’s a larger investment upfront, it eliminates future worries about leaks, improves water quality and pressure, and significantly increases your home’s value and safety.
We understand that replacing a significant portion of your plumbing system can seem daunting. However, it’s a proactive step that prevents costly emergencies and gives you reliable plumbing for decades to come. For more detailed information on this service, explore our water line repair services.
Why You Should Hire a Plumber for Galvanized Pipe Replacement
You might be handy, but replacing galvanized pipes is a job best left to the professionals. Here’s why we, Go Pro Plumbing, recommend calling our licensed plumbers in Northern California:
- Assessing System-Wide Damage: What looks like an isolated leak could be a symptom of widespread corrosion. Our plumbers have the experience and tools to assess the entire plumbing system, identify hidden risks, and determine the true extent of the damage. We can use cameras to inspect pipes inside walls, giving you a complete picture.
- Proper Tools and Expertise: Galvanized pipe replacement requires specialized tools like pipe cutters, threaders, and crimping tools for PEX. Our team has the right equipment and the expertise to handle these materials correctly, ensuring leak-free connections.
- Ensuring Code Compliance: Plumbing work, especially major replacements, must adhere to local building codes. Our licensed plumbers are up-to-date on all regulations in Sacramento, Rancho Cordova, and the surrounding Northern California areas, ensuring your new plumbing system is safe and compliant.
- Handling Fragile Pipes: Old galvanized pipe is frequently rotted, corroded, and fragile. Trying to remove a section yourself can easily cause other parts of the pipe to crack or snap, turning a small problem into a much larger, more expensive emergency. We have the techniques to work with these delicate pipes without causing further damage.
- Avoiding Galvanic Corrosion: Connecting new pipes (like copper or PEX with brass fittings) directly to old galvanized pipes without proper dielectric unions can accelerate corrosion at the connection point. Our plumbers understand these material interactions and ensure proper installation to prevent future issues.
- Long-Term Peace of Mind: When we perform a pipe section replacement or a full repipe, you get the assurance of a professional job, often backed by warranties. This means reliable water pressure, clean water, and no more worries about those pesky leaks. Our commitment to outstanding customer service and same-day service means we’re here when you need us most.
While you can temporarily fix galvanized pipe leak yourself, a professional plumber ensures a safe, durable, and code-compliant permanent solution that will protect your home for years to come.
Conclusion: Secure Your Home’s Plumbing for the Long Term
We’ve explored the ins and outs of galvanized pipe leaks, from their common causes and tell-tale signs to temporary DIY fixes and the crucial decision of when to call a professional. While a quick patch can certainly save the day and prevent immediate water damage, these are just temporary solutions. The limited lifespan of galvanized pipes, coupled with their tendency to corrode from the inside out, means that a drip today is often a symptom of a much larger, unseen problem tomorrow.
The importance of addressing the root cause cannot be overstated. Relying solely on temporary repairs for aging galvanized plumbing in your Northern California home is like putting a band-aid on a much deeper wound. For long-term peace of mind, improved water quality, consistent water pressure, and improved home value, a permanent solution—whether it’s replacing a section or a full repipe with modern materials like PEX or copper—is the smartest investment.
At Go Pro Plumbing, we understand the unique challenges that older homes in Sacramento and Rancho Cordova face with galvanized piping. Our commitment to outstanding customer service and same-day service means we’re ready to provide comprehensive and lasting repairs. Don’t let a recurring drip get you down or risk further damage to your home.
For a professional assessment of your galvanized pipes and to discuss permanent solutions that will secure your home’s plumbing for decades to come, reach out to us. We’re your trusted plumbing experts in Northern California, dedicated to getting the job done right.