Flush with Success: Your Guide to Changing a Toilet Flusher
By Brian on September 9, 2025
Why Your Toilet Flusher Matters More Than You Think
When you need to change toilet flusher components, you’re tackling one of the most common plumbing issues homeowners face. Here’s what you need to know:
Quick Answer for Changing a Toilet Flusher:
- Turn off water supply and drain the tank completely
- Remove the toilet tank by unscrewing tank bolts
- Unscrew the old flush valve using a spud wrench or pliers
- Install the new flush valve with proper sealing
- Reassemble everything and test for leaks
- Adjust chain slack to 1/2 inch for optimal flushing
The average household loses 10,000 gallons of water yearly through leaks, and a faulty flush valve is often the culprit. Whether you’re dealing with a toilet that won’t stop running, produces a weak flush, or requires holding the handle down, the problem usually traces back to your flusher system.
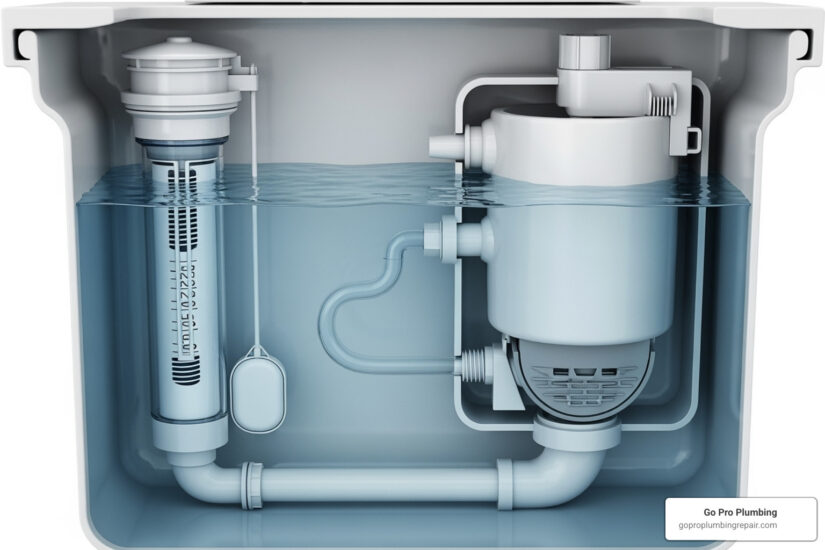
Your toilet’s flush valve works with the flapper and fill valve to create a complete flushing system. When any part fails, you’ll notice higher water bills, constant running sounds, or incomplete flushes that leave waste behind.
The good news? Most toilet flusher problems are fixable with basic tools and a universal replacement kit that costs between $10-30. This DIY project typically takes 1-2 hours and can save you hundreds in plumber fees.

Is It Time for a Replacement? Signs of a Faulty Flusher
Nobody enjoys a toilet that doesn’t quite do its job. A faulty flush valve isn’t just an annoyance—it’s like having a houseguest who never quite knows when to leave. The signs are usually pretty obvious once you know what to look for, and catching them early can save you from watching your water bill climb higher than your stress levels.
Water waste is the biggest red flag when your toilet flusher starts acting up. A running toilet can waste up to 200 gallons of water per day, which quickly translates into high utility bills that’ll make you question whether you accidentally left a faucet running somewhere. That constant trickling sound isn’t just annoying—it’s literally money going down the drain.
The most common sign homeowners notice is a weak or incomplete flush. If you find yourself flushing twice (or three times) to get the job done, your flush valve probably isn’t lifting properly or staying open long enough. It’s like trying to empty a bucket through a straw—technically possible, but not very effective.
Then there’s the classic running toilet scenario. You flush, walk away, and fifteen minutes later you’re still hearing that persistent whooshing sound. This usually means the flapper isn’t sealing correctly against the flush valve seat, often because the valve has warped or developed mineral buildup over time. For more detailed help with this frustrating issue, check out our guide on How to Fix a Running Toilet.
Ghost flushing is another telltale sign that’ll have you wondering if your bathroom is haunted. Your toilet suddenly flushes on its own, usually when you’re trying to sleep or concentrate on something else. This phantom flush happens when water slowly leaks from the tank into the bowl, triggering the fill valve to kick in periodically.
Don’t ignore water pooling at the base of your toilet either. While this can indicate problems with the wax seal, a failing flush valve can also cause water to leak around the tank connection. This isn’t just messy—it can damage your flooring and create bigger problems down the road.
If you’re having to hold the handle down to get a complete flush, you’ve probably developed some impressive finger strength, but you shouldn’t need a workout just to use your bathroom. This usually means the chain connecting your handle to the flapper needs adjustment, or the flush valve itself isn’t functioning properly.
When to Call a Professional Plumber
While we love empowering homeowners to change toilet flusher components themselves, sometimes it’s better to wave the white flag and call in reinforcements. If you’ve tried the DIY approach and your toilet is still misbehaving, or if you can’t locate your water shut-off valve (it happens to the best of us!), it’s time for professional help.
At Go Pro Plumbing, we’ve seen every toilet problem imaginable, and we’re experts at getting your bathroom back to normal quickly. Whether you need Running Toilet Repair or help with persistent Toilet Flush Valve Problems, our team in Sacramento and Rancho Cordova, CA, provides the same-day service you need.
Sometimes a Plumber for Leaking Toilet issues is the smartest investment you can make. We’ll diagnose the problem quickly, fix it right the first time, and give you tips to prevent future issues. Because let’s be honest—life’s too short to spend it wrestling with a stubborn toilet.
Gathering Your Tools and Finding the Right Parts
Before we dive into the hands-on work of how to change toilet flusher components, let’s get organized. Think of this as your pre-game prep – having everything ready makes the whole process so much smoother (and less frustrating when you’re elbow-deep in toilet tank water!).

You’ll want to gather your adjustable wrench for handling the various nuts you’ll encounter, plus slip-joint pliers or a spud wrench – the spud wrench is perfect for those large flush valve nuts, though pliers will work if that’s what you have on hand. Don’t forget a screwdriver (both flat-head and Phillips, just to be safe) for the tank bolts.
Water management is key here, so grab a sponge and bucket to deal with any leftover water in the tank, along with plenty of towels or rags to protect your bathroom floor and surfaces when you lift that tank. You’ll also need plumber’s tape to ensure everything seals properly when you put it all back together.
The star of this whole operation? Your replacement flush valve kit. This is where a little homework pays off big time.
Choosing Your New Toilet Flush Valve
Here’s where things get interesting – not all flush valves are created equal, and picking the wrong one can turn your DIY victory into a frustrating do-over.
Start by hunting down your toilet model number. It’s like a fingerprint for your toilet and usually lives inside the tank, under the tank lid, or sometimes on the back of the bowl near the base. This little number is your golden ticket to compatibility, so snap a photo of it with your phone.
Next, you’ll need to figure out if you have a 2-inch or 3-inch flapper situation. Most traditional toilets use one of these two sizes, and you can usually tell by eyeballing the opening at the bottom of the tank where your current flapper sits. When in doubt, pop that old flapper off and bring it to the hardware store – the folks there have seen it all.
Universal kits can be real lifesavers here. Many manufacturers create these one-size-fits-most solutions that include everything you need: the fill valve, flapper, and sometimes even the toilet handle lever. It’s like getting a complete makeover kit for your toilet tank. You might find options like the Fluidmaster 5403 Universal Flapper on Amazon.com that take the guesswork out of compatibility.
Now, here’s something that might surprise you – there are actually two main styles out there. The flapper-style flush valve is what most of us know and love, with that rubber flapper that lifts up like a little door. But some newer toilets use a canister-style flush valve that looks more like a big cylinder. Don’t worry – we’re focusing on the flapper style since it’s what you’ll find in most homes.
The easiest way to nail this whole selection process? Take your old flapper or the entire old flush valve assembly with you to the plumbing supply store. The staff there can match you up with the perfect replacement or point you toward a compatible universal kit. Look for one that includes a vacuum breaker – it’s a small detail that prevents any water supply contamination issues.
How to Change a Toilet Flusher: A Step-by-Step Guide
Alright, it’s time to roll up our sleeves and get our hands a little wet! Changing a toilet flusher might seem like something only professional plumbers should tackle, but honestly? You’ve got this. We’ll walk through each step together, and before you know it, you’ll have a perfectly functioning flush valve.

Think of this project like assembling furniture – it looks complicated in the instructions, but once you break it down into manageable chunks, it’s really quite straightforward. The key is taking your time and not rushing through any step.
DIY Safety First!
Before we dive in, let’s talk safety for a moment. Working around water and porcelain requires a bit of extra care. Make sure your workspace is well-lit and that you have plenty of room to move around the toilet.
Keep those towels handy – trust us, you’ll be glad you did when you’re dealing with the inevitable drips and spills. And remember, porcelain can crack if you’re too aggressive, so we’ll use a gentle but firm approach throughout this process.
Step 1: Preparation and Draining the Tank
This first step is all about cutting off the water supply and getting that tank bone dry. It’s like prepping a canvas before painting – proper preparation makes everything else go smoothly.
Start by shutting off the water supply. Look for that small shut-off valve hiding behind your toilet, usually mounted on the wall or connected to a metal pipe near the tank. Turn it clockwise until it stops completely – no cheating with half-turns here! If the valve feels stuck or you can’t locate it, don’t force it. Sometimes these valves haven’t been turned in years.
Next, flush the toilet to empty most of the water from the tank. You’ll hear that familiar whoosh as the water drains into the bowl. But here’s the thing – there’s always some stubborn water left at the bottom of the tank.
This is where your sponge becomes your best friend. Soak up every last drop of water from the tank using your sponge and bucket. We want this tank as dry as possible because working with water sloshing around makes everything more difficult and messy.
Finally, disconnect the water supply line from the fill valve at the bottom of the tank. Use your adjustable wrench to carefully loosen the connection. Have a small towel ready because there’s usually a little water trapped in the line that’ll come out when you disconnect it.
Step 2: Removing the Old Toilet Flusher
Now comes the part where we say goodbye to your old flush valve. Don’t worry – this is easier than it looks, even though it involves lifting the entire tank.
Inside the tank, you’ll spot two or three bolts that keep the tank attached to the toilet bowl. These tank bolts are your first target. Use your screwdriver to hold the bolt head steady inside the tank while you use your adjustable wrench underneath the toilet bowl to loosen the nuts. Work slowly here – these bolts can be corroded or over-tightened.
Here’s where things get interesting. With the bolts removed and water line disconnected, you’re ready to lift the tank straight up and off the bowl. This is definitely the heaviest part of the whole project! The tank is more awkward than heavy, but if you’ve got a friend or family member nearby, now’s the perfect time to ask for help.
Place the removed tank upside down on that towel you laid out earlier. This protects both your floor and the tank’s porcelain surface. Plus, working with the tank upside down gives you perfect access to the flush valve.
The old flush valve is held in place by what plumbers call a spud nut – it’s that large plastic or brass nut at the very bottom of the tank. Use your spud wrench or slip-joint pliers to unscrew this nut. Sometimes these nuts are on there pretty tight, so don’t be afraid to put some muscle into it.
Once that spud nut comes off, the old valve assembly should slide right out of the tank opening. Take a moment to look at how everything was connected – it’ll help when you’re installing the new parts.
Step 3: Installing the New Flush Valve and Reassembling
Time for the fun part – installing your shiny new flush valve! This is where all that preparation pays off.
Start by cleaning the tank opening where the old valve came out. Remove any old sealant, mineral buildup, or grime. A clean surface is crucial for creating a proper watertight seal with your new parts.
Your new flush valve might come with a cone washer – that’s a rubber washer with one beveled side. If it has one, slide it onto the tailpiece of the flush valve with the beveled side pointing toward the end. This little detail makes a big difference in preventing leaks.
Insert the new flush valve into the tank opening, making sure the overflow pipe (that tall tube) faces toward where the fill valve sits. Most modern flush valves are designed to click into place or sit snugly in the opening.
From underneath the tank, slide the new spud nut onto the tailpiece and hand-tighten it first. Then use your spud wrench or pliers to tighten it securely. Here’s a pro tip: make it snug enough for a watertight seal, but don’t overtighten. Porcelain can crack if you get too enthusiastic with the wrench.
Your new flush valve kit should include a large rubber gasket (sometimes called a spud washer) that goes over the flush valve’s tailpiece. This gasket creates the all-important seal between the tank and bowl, so make sure it’s positioned correctly.
Now for the moment of truth – carefully lift the tank and position it back onto the toilet bowl. Line up those bolt holes and take your time getting everything aligned properly.
Reinsert the tank bolts and secure them with their washers and nuts from underneath the bowl. Here’s the key: tighten them evenly, alternating between each bolt. This ensures the tank sits level and creates a good seal with the bowl. Again, snug but not over-tight is the goal.
You’re almost there! The hardest part is behind you, and soon you’ll have a toilet that flushes like new.
Final Adjustments and Troubleshooting
We’re almost there! This is where we fine-tune everything to ensure your toilet flushes like a dream.

How to Adjust the Toilet Flusher for a Perfect Flush
Now comes the satisfying part – watching your handiwork come to life! Let’s get everything adjusted just right so your toilet performs like a champion.
Reconnect that water supply by attaching the flexible line back to the fill valve at the bottom of the tank. A little plumber’s tape around those threads never hurts for an extra-tight seal. Use your adjustable wrench to snug it up, but don’t go overboard.
Turn the water back on slowly and watch the magic happen as your tank fills. Keep your eyes peeled for any sneaky leaks around the flush valve, tank bolts, or water supply connection. If you spot any drips, a gentle tightening usually does the trick.
Here’s where the real finesse comes in: adjusting that chain slack. This little detail makes all the difference between a perfect flush and a frustrating one. With the flapper sitting closed, you want about 1/2 inch of slack in the chain connecting the handle lever to the flapper.
Think of it like Goldilocks – not too tight, not too loose, but just right. Too much slack means your flapper won’t lift high enough for a complete flush. Too little slack (or a chain that’s pulled taut) prevents the flapper from sealing properly, leaving you with a constantly running toilet.
Setting the proper water level is equally important. The water should sit about 1/2 inch below the top of that overflow pipe – the tall tube that’s part of your new flush valve. If your tank isn’t filling enough, you might need to adjust the fill valve by tweaking the adjustment screw or rotating body to change the float height.
For an even better flush experience, consider trying an adjustable flapper if your standard one isn’t quite cutting it. These nifty devices let you fine-tune how long the flapper stays open, ensuring more water flows into the bowl for a stronger, more thorough flush. Don’t worry if it takes a few test runs to get everything dialed in perfectly – patience pays off!
What If the Toilet Still Runs?
Don’t panic if your toilet is still making that annoying running sound after all your hard work. We’ve all been there, and it’s usually something simple that needs a quick tweak.
Check that flapper seal first – it’s the most common troublemaker. Your flapper might have mineral deposits, be warped from age, or simply not sitting flush against the valve seat. Give it a good cleaning, and if it looks worse for wear, grab a replacement flapper. When you change toilet flusher components, sometimes it’s just the flapper that needs swapping, not the entire flush valve assembly.
Double-check your chain length because even the smallest adjustment can make a huge difference. If it’s too short and holding the flapper slightly open, water will keep trickling through. A tangled chain can also prevent proper sealing, so make sure it hangs straight and free.
Fill valve issues might be the culprit if water keeps spilling into the overflow tube. When the water level sits too high, it creates an endless cycle of running. Adjust that fill valve down until the water stops at the right level.
Sometimes the problem isn’t what you just replaced but something else entirely – maybe a cracked overflow tube or a faulty fill valve that’s seen better days. If you’ve tried all these adjustments and your toilet is still being stubborn, or if you’re dealing with other mysterious issues like a Toilet Repair Tank Not Filling problem, it’s time to call in the professionals.
Our team at Go Pro Plumbing has seen every toilet mystery imaginable. We specialize in Running Toilet Repair and can quickly diagnose even the trickiest issues. For residents dealing with Toilet Repair Sacramento CA needs, we’re just a phone call away and ready to get your toilet running smoothly again.
Conclusion
Congratulations! You’ve just tackled one of the most common household plumbing challenges and successfully learned how to change toilet flusher components. What started as a frustrating running toilet or weak flush has now transformed into a smooth-operating bathroom fixture that would make any plumber proud.
This DIY project represents so much more than just fixing a toilet. You’ve taken control of your home’s plumbing, potentially saved hundreds of dollars in professional service calls, and made a real impact on water conservation. 10,000 gallons of water we mentioned earlier that households lose annually? You’ve just put a stop to that waste in your own home.
The skills you’ve gained today extend beyond this single repair. Understanding how your toilet’s flush valve, flapper, and fill valve work together gives you the confidence to handle future toilet troubles. Whether it’s adjusting a chain, replacing a flapper, or spotting early warning signs of plumbing issues, you’re now equipped with valuable knowledge that will serve you well.
Water conservation is becoming increasingly important, and your newly functioning toilet flusher is doing its part. A properly working flush valve ensures every flush is efficient and complete, using just the right amount of water without waste.
Of course, we completely understand that not every homeowner feels comfortable diving into plumbing projects. Sometimes the problem runs deeper than a simple flush valve replacement, or you might find additional issues during your repair. That’s perfectly normal, and there’s absolutely no shame in calling for backup.
If you’re in Northern California and find yourself needing expert assistance with any toilet plumbing services, our team at Go Pro Plumbing is here to help. We’re committed to outstanding customer service and same-day service throughout Sacramento, Rancho Cordova, and the surrounding areas. Whether it’s a stubborn running toilet, mysterious leaks, or any other plumbing challenge, we’ve got you covered.
Flush with success and confidence in your new DIY skills! Your toilet is running perfectly, your water bills will thank you, and you’ve got one more home repair under your belt. And remember, whenever you need professional plumbing support, we’re just a phone call away.