Don’t Get Burned: The Essential Steps to Connect Your Gas Stove
By Brian on July 1, 2026
Why Connecting a Gas Stove to a Gas Line the Right Way Matters
Knowing how to connect a gas stove to a gas line safely can save you money — but one wrong move can put your home and family at serious risk.
Here’s a quick overview of the process:
- Turn off the gas supply at the shutoff valve before doing anything
- Wrap the valve’s male threads with yellow Teflon tape (clockwise)
- Attach a street elbow to the stove’s gas port
- Connect the flexible gas connector between the shutoff valve and the street elbow
- Tighten all fittings using the two-wrench technique
- Turn the gas back on and check every connection for leaks using soapy water or a gas leak detector
- Slide the stove into place only after confirming there are no leaks
Gas stoves offer real advantages — precise heat control, lower energy costs, and the ability to keep cooking during a power outage. But the connection process involves live gas lines, and even a small mistake can lead to a leak you can’t smell.
Gas leaks cannot always be detected by odor alone. That’s what makes proper installation technique — and a thorough leak check — so critical.
This guide walks you through every step, from choosing the right connector to knowing when to call a licensed professional instead.

Simple connect gas stove to gas line word guide:
Safety First: Essential Tools and Precautions
Before you pick up a wrench, we must stress that safety is your absolute, non-negotiable priority. Natural gas and liquid propane (LP) are highly efficient fuels, but they are also incredibly volatile. When you work with gas lines, any ignition source — even a tiny spark from a light switch or your phone — can cause a disaster if gas has accumulated in the air.
Critical Safety Precautions
- Shutoff the Gas First: Never attempt to work on an active gas line. You must shut off the local manual valve. If your existing valve is stuck or missing, shut off the gas supply at the main meter.
- Ventilation is Key: Open the windows and doors in your kitchen to ensure a continuous flow of fresh air. This prevents any residual gas from building up in the room while you work.
- Carbon Monoxide Awareness: Gas appliances produce carbon monoxide (CO) if they do not burn fuel completely. Ensure you have a working CO detector installed nearby in your home before operating your new stove.
- No Open Flames: This should go without saying, but keep matches, lighters, candles, and cigarettes far away from the workspace.
The Essential DIY Tool Checklist
You cannot wing this project with whatever is lying around in your junk drawer. You need the right tools to create a gas-tight seal. Gather the following materials before you begin:
- Two 10-inch Adjustable Wrenches: You need two wrenches to perform the “two-wrench technique,” which prevents you from twisting and damaging the pipes hidden inside your wall.
- Yellow Teflon Tape: Standard white plumber’s tape is too thin and will degrade when exposed to gas. You must use heavy-duty yellow Teflon tape, which is specifically rated for gas lines.
- Gas-Rated Pipe Thread Sealant: Also known as “pipe dope,” this liquid sealant provides an extra layer of protection on threaded joints.
- Non-Corrosive Gas Leak Detector Solution: You can purchase a commercial leak-detecting solution or mix your own using water and dish soap.
- Wire Brush and Rag: Essential for cleaning old pipe threads before applying sealant.
If you suspect an existing leak in your home before you even begin, do not start this project. Instead, read our comprehensive gas line leak detection guide or call us immediately for emergency assistance.
How to Connect Gas Stove to Gas Line: Step-by-Step Guide
Now that you have your tools ready and your workspace is fully ventilated, it is time to perform the physical installation. Follow these steps carefully to ensure a seamless connection.

Step 1: Shut Off the Gas Supply
Locate the manual gas shutoff valve behind your stove. This is typically a lever-style valve connected to a black iron pipe. Turn the lever a quarter-turn so that it is perpendicular to the pipe. This indicates the valve is closed. If you are replacing an old stove, turn on one of the old burners briefly to burn off any gas remaining in the line, then turn the burner off.
Step 2: Prepare and Clean the Threads
Pull the old stove out of the way. Inspect the incoming black iron pipe. Use a wire brush to scrub away any old thread sealant, tape, or debris from the male threads of the pipe. Wipe it clean with a dry rag. Clean threads are crucial for a tight seal.
Step 3: Apply Sealant Correctly
Wrap the male threads of the black iron pipe with yellow Teflon tape. Wrap it clockwise (the same direction you will screw the fitting on) twice. Crucial Safety Rule: Never apply Teflon tape or pipe dope to the flared ends of a gas connector. Flare fittings rely on metal-to-metal contact to create a seal. Applying tape or dope to flare threads will actually prevent a proper seal and cause a leak. Only apply sealant to standard tapered pipe threads (MIP or FIP).
Step 4: Install the Street Elbow
Most gas stoves have a gas regulator port that sticks straight out the back. If you connect your flexible line directly to this port, the hose will bend sharply when you push the stove back against the wall, causing a dangerous kink. To prevent this, thread a 90-degree street elbow into the stove’s regulator port first. This directs the connection downward or sideways, allowing the flexible line to curve gently.
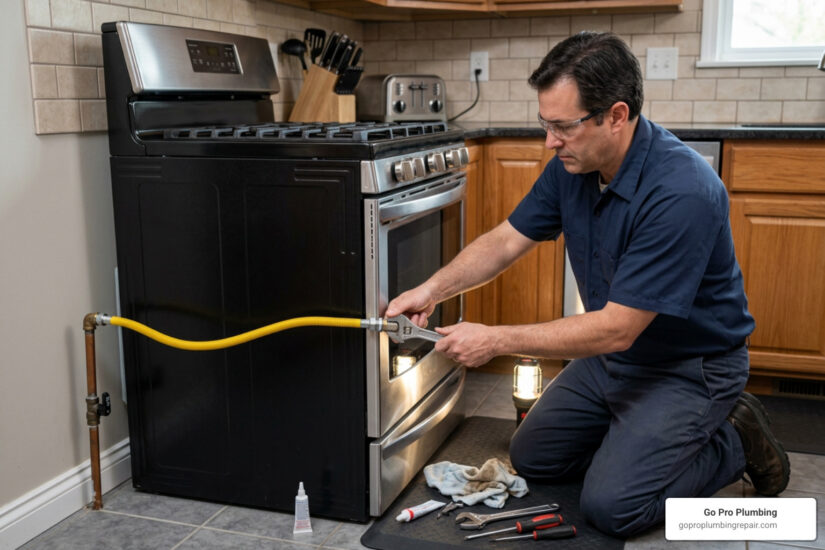
Step 5: Connect the Flexible Gas Connector Using the Two-Wrench Technique
Screw the flare adapter fitting into the street elbow on the stove, and screw the other flare adapter into the wall’s shutoff valve. Once the adapters are in place, attach the flexible stainless steel gas connector to both ends.
When tightening these connections, always use the two-wrench technique. Hold the stationary fitting (like the shutoff valve or the street elbow) with one wrench to keep it from turning. Use the second wrench to tighten the nut on the flexible connector. This prevents you from twisting, cracking, or loosening the pipes inside your wall or damaging the stove’s internal regulator.
Step 6: Tighten the Fittings
Tighten the connector nuts until they are snug, then give them an additional quarter- to half-turn. Do not over-tighten, as this can distort the brass flare fittings and ruin the metal-to-metal seal.
Step 7: Turn On the Gas and Perform the Soapy Water Test
With all connections tight, slowly turn the manual shutoff valve back on (the lever should be parallel to the pipe). Spray your non-corrosive gas leak detection solution or a mixture of dish soap and water onto every single joint you connected.
Watch the joints closely for several minutes. If you see growing bubbles or foaming, you have a leak. If a leak is detected, immediately shut off the gas, loosen the connection, check for cross-threading, re-tighten using your two wrenches, and test again. For more detailed instructions on how to bridge connections between different pipe materials, check out our guide on connecting flexible gas line to black pipe.
Sizing and Adapting Your Gas Connector and Fittings
Choosing the wrong pipe size or connector can starve your stove of the fuel it needs, resulting in weak, flickering flames or burners that fail to light when the oven is running.
Understanding Pipe Capacities
Residential gas lines typically use either 1/2-inch or 3/4-inch pipes. The right choice depends on the length of the pipe run and the total British Thermal Unit (BTU) demand of your stove. A standard home cooktop with four or five burners typically demands around 50,000 to 65,000 BTUs, while professional-grade ranges can exceed 100,000 BTUs.
To help you understand the flow capacities of different materials, look at the capacity limits below for a standard 50-foot run:
| Pipe Material & Size | Maximum Capacity at 50 Feet (BTUs) | Best Suited For |
|---|---|---|
| 1/2-inch Black Iron Pipe | ~72,000 BTU | Standard residential ranges and cooktops |
| 1/2-inch CSST (Flexible) | ~44,000 BTU | Low-demand appliances (dryers, small water heaters) |
| 3/4-inch Black Iron Pipe | ~150,000+ BTU | Professional ranges, multiple shared appliances |
As you can see, corrugated stainless steel tubing (CSST) has a lower flow capacity than smooth black iron pipe of the same diameter due to the internal friction caused by the ridges. If you are running a long line or installing a high-BTU professional range, upgrading to a 3/4-inch line is often necessary to prevent pressure drops.
Handling Mismatched Fittings
It is common to pull out an old stove and find that the connection on your wall does not match the port on your new appliance. For example, you might have a 3/4-inch black iron pipe stub coming out of your wall, but your new gas stove has a 1/2-inch inlet.
To resolve this, you must use approved flare adapters. A standard flexible connector kit usually comes with multiple adapters (such as 1/2-inch MIP, 3/4-inch MIP, and 1/2-inch FIP). Always use the adapters provided by the manufacturer and follow the official GasConnector_Instructions to ensure the threads match perfectly. Never try to force mismatched threads together, as this will strip the fittings and guarantee a dangerous leak.
Choosing the Right Connector to Connect Gas Stove to Gas Line
When purchasing a flexible gas connector, look for a corrugated, polymer-coated stainless steel hose. The bright yellow coating is not just for looks; it protects the stainless steel from common household cleaning chemicals (like ammonia) that can corrode the metal over time.
Ensure the connector is CSA certified and explicitly marked for range use.
Always measure the distance from your wall valve to the stove’s inlet port. Your flexible connector must be at least 2 to 3 inches longer than this maximum distance when the stove is fully pulled out. This extra slack ensures that when you slide the range back into its cutout or pull it out for cleaning, you do not stretch, twist, or put tension on the line. Most residential installations require a connector length of 18, 24, or 36 inches. Never chain two flexible connectors together to reach a longer distance, as this violates local building codes and introduces an extra point of failure.
Code Requirements and When to Hire a Professional
Gas installations in Northern California are subject to strict building codes designed to protect you and your neighbors. Whether you live in Sacramento or Rancho Cordova, you must comply with the California Plumbing Code and the National Fuel Gas Code (NFPA 54).

Key Code Requirements to Keep in Mind
- Accessible Shutoff Valve: Your manual shutoff valve must be installed in the same room as the stove, within 6 feet of the appliance, and it must remain easily accessible. You cannot hide a shutoff valve behind a wall or inside a sealed cabinet where you cannot reach it quickly in an emergency.
- No Wall Penetrations: Flexible gas connectors cannot pass through walls, floors, ceilings, or cabinet partitions. If your gas line comes from an adjacent cabinet, you must run solid black iron pipe through the cabinet wall and install the flexible connector entirely within the stove’s cutout space.
- Ventilation and Makeup Air: If you are installing a high-BTU gas range, you will need a powerful range hood. In California, if your range hood exceeds 400 CFM (Cubic Feet per Minute), building codes require a dedicated “makeup air” system to bring fresh air into your home and prevent dangerous backdrafting of combustion gases.
If you are running a brand-new gas line to convert from an electric stove to a gas model, you will need to pull a local permit and have the line pressure-tested by an inspector. You can learn more about this process on our gas line installation page.
Why You Should Hire a Professional to Connect Gas Stove to Gas Line
While connecting a flexible line to an existing valve is a project some confident DIYers tackle, there are significant risks involved. If you over-tighten a brass fitting, you can cause a hairline fracture that slowly leaks gas behind your stove. If you use the wrong thread sealant, the joint will eventually fail.
Hiring a certified gas plumber from Go Pro Plumbing gives you complete peace of mind. We have the training, specialized manometers, and electronic gas sniffers to guarantee a 100% leak-free installation. Plus, professional installation protects your home insurance coverage and manufacturer warranties, which can be voided if a gas appliance is installed incorrectly by an unlicensed individual.
Frequently Asked Questions about Gas Stove Connections
How do you check for gas leaks after installing a stove?
The safest and most reliable way to check for leaks is by using a non-corrosive gas leak detection solution. Apply the solution generously to all threaded and flare joints. If you see growing bubbles, you have a leak.
Additionally, pay attention to physical signs: a distinct “rotten egg” smell (from the mercaptan added to natural gas) or a faint hissing sound. If you suspect a leak but cannot find it, turn off your gas valve immediately and contact our gas line repair service for professional electronic leak detection.
Can I reuse my old flexible gas connector?
No, you should never reuse an old flexible gas connector. These connectors are designed for one-time installation. When a connector is bent, moved, and tightened, the metal undergoes stress. Reusing an old connector or moving it to a new appliance can cause metal fatigue, leading to cracks and dangerous leaks that are incredibly difficult to detect. Always buy a brand-new connector kit whenever you install a new stove.
What is the difference between 1/2-inch and 3/4-inch gas lines?
The difference lies in diameter and flow capacity. A 1/2-inch line is the standard size for most individual household appliances, capable of delivering up to 72,000 BTUs of gas over a standard distance.
A 3/4-inch line has a much larger volume capacity, making it necessary for high-BTU professional ranges or main trunk lines that feed multiple appliances (like your stove, water heater, and furnace simultaneously).
Conclusion
Connecting your gas stove to a gas line is a fantastic way to upgrade your kitchen’s cooking performance, but it requires absolute precision, the right tools, and strict adherence to safety codes. Remember to always use a new polymer-coated stainless steel connector, wrap only male tapered threads with yellow Teflon tape, apply the two-wrench technique, and perform a thorough soapy water leak test.
Once your stove is safely connected, keep it performing at its best with simple ongoing maintenance:
- Clean your burner grates and caps regularly to prevent grease buildup from blocking the gas ports.
- Check the flame color; a healthy gas flame should be crisp and blue. A yellow or orange flame indicates incomplete combustion, which requires immediate professional attention.
If you are uncomfortable working with live gas lines, or if you need a new gas line run to your kitchen, we are here to help. At Go Pro Plumbing, we serve families throughout Rancho Cordova, Sacramento, and Northern California. We pride ourselves on outstanding customer service and offer same-day service to get your kitchen up and running safely.
Don’t take risks with gas in your home. Contact us today to schedule your professional gas line repair or appliance hookup!