The Ultimate Guide to Irrigation Line Repair: From Breaks to Leaks
By Brian on January 29, 2026
Why Fixing Your Irrigation Line Quickly Matters
To fix irrigation line, you need to locate the leak, shut off the water, excavate the damaged area, cut out the broken section, install the appropriate coupling, test the repair, and backfill the trench. Most DIY repairs cost $40-$70 in materials and take 2-4 hours.
A mysterious puddle in your yard or a sudden spike in your water bill are telltale signs of an irrigation line leak. Even small leaks waste hundreds of gallons, driving up utility costs and leaving your landscape thirsty. That unsightly wet patch is money draining into the ground.
Fortunately, most irrigation line repairs are straightforward DIY projects. Whether it’s a crack from freezing temperatures, a gardening mishap, or invasive tree roots, fixing the problem quickly saves you money, prevents further damage, and keeps your lawn healthy.
In Northern California, where water conservation is critical and professional repairs run $150-$450, learning basic irrigation fixes makes practical sense. This guide will walk you through identifying problems, gathering tools, and making lasting repairs to both PVC and poly pipe systems.

Important fix irrigation line terms:
Identifying the Problem: Signs, Causes, and Locating the Leak
Before you can fix irrigation line damage, you must first identify the problem and its source.

Common Causes of Broken Irrigation Pipes
- Shovel Damage: The most common cause is accidental damage from digging. A misplaced shovel during gardening or planting can easily nick or slice a line.
- Tree Roots: Growing tree roots seek water and can wrap around, crush, or invade pipes, causing cracks and collapses over time.
- Freeze-Thaw Cycles: In colder areas, water left in un-winterized pipes can freeze and expand, bursting the pipe. This often requires frozen pipe burst repair.
- Soil Pressure and Ground Movement: Shifting or compacted soil can stress and crack pipes. Erosion may expose lines to damage from mowers or foot traffic.
- Wear and Tear: Over time, PVC or poly pipe can degrade from UV exposure and soil conditions, becoming brittle and prone to cracking.
- Faulty Installation: Improper installation, like incorrect pipe depth or poor fittings, can lead to future breaks.
Signs That an Irrigation Line Needs Repair
- Puddles and Wet Spots: Unexplained puddles or soggy spots in the yard are the most obvious sign of an underground leak.
- Unusually High Water Bills: A sudden spike in your water bill often points to a hidden leak wasting hundreds of gallons of water.
- Low Water Pressure: Sprinkler heads that don’t spray as far or seem weak can indicate a break in the line that is diverting water pressure.
- Dry Patches on the Lawn: Dry, brown patches in an otherwise watered lawn suggest a leak or blockage is preventing water from reaching that area.
- Hissing or Bubbling Sounds: Listen for hissing or bubbling sounds underground when the system is on, which indicates water escaping a pipe.
- Malfunctioning Sprinkler Heads: Sprinkler heads that won’t pop up, spray erratically, or leak constantly can signal a nearby pipe break or pressure drop.
Locating the Break
Once you suspect a leak, pinpoint its exact location.
- Zone Testing: Run each irrigation zone one at a time and walk the area, looking for the signs mentioned above to isolate the leak.
- Visual Inspection: Look for unusually green, lush spots or areas with settling or eroding soil.
- Listen Closely: In a quiet area, listen for the sound of escaping water while the system is running.
- Before You Dig, Contact 811: Crucially, before you dig, call 811 or visit call811.com to have underground utility lines marked. This free service prevents dangerous and costly accidents. Plan ahead, as marking can take a few days.
- Dig Carefully: When you start to excavate, use a hand trowel as you get close to the pipe to avoid causing more damage.
- Expert Underground Leak Detection: For hard-to-find leaks, Go Pro Plumbing offers expert underground leak detection services, using specialized equipment to find leaks without excessive digging.
Gearing Up: Tools and Materials for Your Irrigation Repair
Having the right tools and materials ready will make the repair process much smoother.

Essential Tools You’ll Need
Here’s a list of what you’ll typically need to fix irrigation line breaks:
- Shovel and Hand Trowel: For excavating; a trowel is best for digging carefully around pipes.
- PVC Pipe Cutters or Utility Knife: For making clean, square cuts on PVC or poly pipe.
- Tape Measure: To measure replacement pipe sections.
- Safety Glasses and Gloves: To protect your eyes and hands.
- Clean Cloths: For wiping pipes clean before applying primer and cement.
- Sandpaper or Deburring Tool: To smooth and scuff PVC pipe ends for better adhesion.
- Heat Gun or Hair Dryer (for poly pipe): To soften poly pipe for easier fitting installation.
- Hose Clamp Pliers (for poly pipe): To tighten hose clamps securely.
Materials for Your Irrigation Line Repair
The materials depend on your pipe type (PVC or poly).
- Replacement Pipe: Either rigid white/gray PVC pipe or flexible black/blue poly pipe. Take a piece of the damaged pipe to the hardware store to ensure you buy the correct size.
- PVC Primer and Cement: Required for creating a chemical weld on PVC pipe.
- Fittings for Different Pipe Types:
- PVC Slip Couplings: Essential for PVC repairs, they bridge gaps in tight spaces.
- Poly Pipe Barbed Fittings: These have barbs that grip the inside of flexible poly pipe.
- Compression Fittings: An alternative for poly pipe that compresses around the pipe to create a seal.
- Hose Clamps or Ring Clamps: Used to secure barbed fittings on poly pipe. Double-clamping is recommended for high-pressure lines.
- Specialty Couplings: For tricky repairs, specialty couplings are available online.
The Step-by-Step Guide to Fix an Irrigation Line
Now that you’ve identified the problem and gathered your gear, let’s get to the details of how to fix irrigation line damage.
Initial Repair Steps (Applicable to Both PVC and Poly Pipe)
- Shut Off Water Supply: First, shut off the main irrigation valve, usually located near your backflow preventer. You can also shut off the specific zone valve if possible.
- Excavate the Area: Carefully dig around the damaged pipe, using a hand trowel as you get close. Clear enough space to work comfortably (about 6 inches around the pipe).
- Preserving Turf (Optional): In grassy areas, cut and lift a square of turf to make replacement easier later.
- Clear and Assess: Clear all dirt from the pipe. Inspect it for additional cracks and mark your cut lines 1-2 inches beyond the damaged area to ensure you’re cutting into solid pipe.
- Make Clean Cuts: Use pipe cutters to make two clean, square cuts and remove the damaged section. Let any remaining water drain from the pipe.
How to Fix an Irrigation Line with PVC Pipe
PVC pipe is rigid and joined with solvent cement.
- Dry-Fit Parts: Before gluing, dry-fit the new pipe and couplings to ensure everything fits correctly.
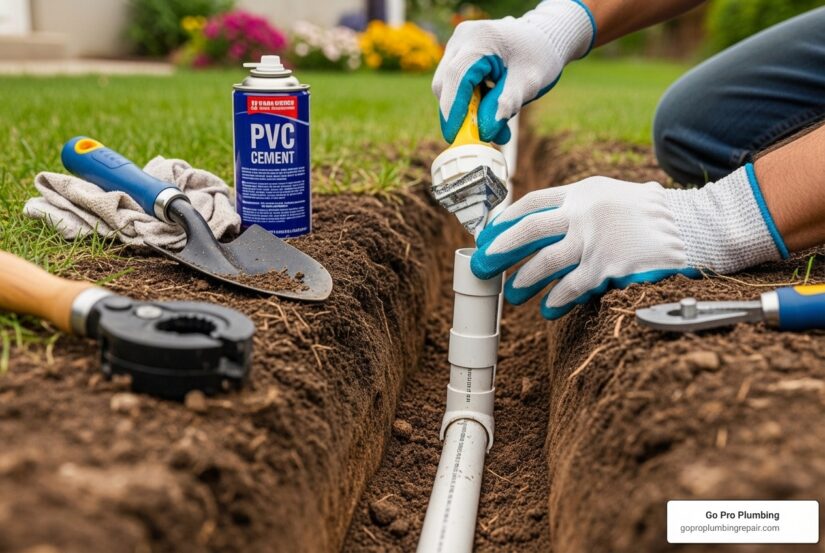
- Clean and Prime: Clean the pipe ends and the inside of the couplings. Apply PVC primer to all surfaces that will be joined.
- Apply PVC Cement: Working quickly, apply an even coat of PVC cement over the primed areas.
- Join the Pipes: Push a slip coupling onto one end of the existing pipe with a quarter-turn to spread the cement and hold for 30 seconds. Repeat on the other existing pipe end.
- Install New Pipe Section: Apply cement to the replacement pipe section and insert it into one coupling. Then, apply cement to the final connection and slide the other coupling over to join the pipes. You may need to flex the pipe slightly to make the final connection.
- Curing Time: Let the cement cure according to the manufacturer’s instructions (at least one hour is typical) before turning the water on.
| Feature | PVC Pipe Repair | Poly Pipe Repair |
|---|---|---|
| Pipe Type | Rigid, white/gray | Flexible, black/blue |
| Joining Method | Solvent cement (chemical weld) | Mechanical (barbed fittings, compression fittings) |
| Tools Needed | PVC cutters, primer, cement, sandpaper | PVC cutters, hose clamp pliers, heat gun (optional) |
| Fittings | Slip couplings, straight couplings, elbows, tees | Barbed fittings, compression fittings, ring clamps |
| Key Advantage | Strong, permanent, high-pressure tolerance | Flexible, easier to work with in tight spaces, no curing |
| Key Disadvantage | Requires curing time, less forgiving for errors | Connections can loosen over time, especially without clamps |
How to Fix an Irrigation Line with Poly Pipe
Poly pipe is flexible and relies on mechanical fittings.
- Prepare Pipe Ends: Clean the poly pipe ends and slide two hose clamps onto each end of the existing pipe.
- Warm Pipe Ends (Optional): To make the pipe more flexible, gently warm the ends with a heat gun or dip them in hot, soapy water.
- Insert Barbed Fittings: Firmly push a barbed coupler into one end of the existing pipe. Attach your new section of poly pipe to the other side of the coupler.
- Complete the Connection: Use a second coupler to connect the new pipe section to the other end of the existing pipe.
- Secure with Hose Clamps: Position the hose clamps over the barbs on the fittings and tighten them securely. Double-clamping is recommended for a stronger hold.
Flushing, Testing, and Backfilling Your Repair
These final steps ensure your repair holds.
- Flushing Out Debris: To flush out dirt, remove the sprinkler heads in the repaired zone. Slowly turn on the water and let it run until it’s clear. Then, turn off the water and reinstall the heads.
- Testing the Repair: Slowly turn the water back on to avoid a pressure surge. Carefully inspect the repair for any drips or leaks. Let the system run for 5-10 minutes to confirm the repair is holding and to purge any air from the lines. If you still have low pressure, there may be other issues. Our team can help with solutions for low water pressure.
- Backfilling the Trench: Once you’re sure the repair is leak-free, backfill the trench with soil in layers, tamping it down gently. Replace the turf, press it down firmly, and water the area to help it settle.
Prevention, Temporary Fixes, and When to Call a Pro
Knowing when to DIY and when to call a professional can save you time, money, and headaches.
Preventing Future Irrigation Line Breaks
An ounce of prevention is worth a pound of cure.
- Proper Winterization: In colder regions, drain your system before the first freeze to prevent burst pipes.
- Burying Pipes at Correct Depth: Ensure pipes are buried 8-12 inches deep (laterals) or 12-18 inches deep (main lines) to protect them.
- Installing a Pressure Regulator: Install a pressure regulator to prevent damage from high water pressure or water hammer.
- Using Root Barriers: Use root barriers near large trees to protect pipes from invasive roots.
- Mapping Your System: Map your system’s layout to avoid accidental damage during future digging.
- Regular Inspections: Regularly inspect your system while it’s running to catch leaks early.
- Smart Controllers: Upgrade to a smart controller that can adjust watering based on weather and detect leaks.
- General Maintenance: Regular general plumbing maintenance helps identify potential issues before they escalate.
Quick Temporary Fixes for Small Leaks
These patches can buy you time until you can perform a permanent repair. These are temporary solutions.
- Rubber Repair Tape: Self-fusing silicone tape is great for pinhole leaks. Stretch and wrap it tightly around the leak for a temporary seal.
- Pipe Repair Clamps: For small cracks on straight pipes, a repair clamp with a rubber gasket can be secured over the leak.
- Epoxy Putty: This can be molded over small cracks or irregular fittings to create a hard, temporary seal.
When to Patch vs. Fully Replace: Patching works for minor pinhole leaks or small hairline cracks on resilient pipe. A full replacement is necessary for large cracks, brittle pipe, or multiple leaks.
When to Call a Professional for Help
While many repairs are DIY-friendly, call the experts at Go Pro Plumbing for:
- Complex Repairs: Extensive damage, multiple breaks, or hard-to-reach leaks (like under a driveway).
- Main Water Line Damage: Any break in the high-pressure main irrigation line.
- Electrical Issues: Problems with controllers, valves, or wiring.
- Recurring Leaks: Constant leaks may indicate a larger system-wide problem that a professional can diagnose.
- Lack of Confidence or Time: If you lack the time, tools, or confidence to do the repair correctly.
- Emergency Situations: For major breaks causing rapid water loss, call for emergency burst pipe repair.
Cost Comparison: A DIY repair typically costs $40-$70 in materials. Hiring a professional ranges from $150-$450 but guarantees a lasting repair and saves you potential headaches.
Frequently Asked Questions about Irrigation Repair
Here are answers to some of the most common questions we get about how to fix irrigation line issues.
Can I repair PVC and poly pipe the same way?
No. The methods are not interchangeable. PVC is a rigid pipe joined with primer and cement (a chemical weld). Poly pipe is flexible and requires mechanical fittings, like barbed or compression fittings, which are often secured with clamps.
Are slip couplings strong enough for buried lines?
Yes, when installed correctly. A proper installation—including cleaning, priming, using quality cement, and allowing for full curing time—creates a strong, durable bond suitable for buried lines. The surrounding soil provides additional support, and any minimal impact on water flow is negligible in most residential systems.
How can I tell if a crack is small enough for a patch?
A patch may work for a pinhole leak or a hairline crack less than an inch long on a pipe that is still in good condition (not brittle). If water is spraying forcefully or the crack wraps around the pipe, a full replacement is needed. Patches are temporary and a permanent repair is always the best long-term solution.
Conclusion
Successfully learning how to fix irrigation line issues is a rewarding skill for any homeowner. Not only does it empower you to tackle common problems, but it also contributes significantly to water conservation and maintaining a healthy, vibrant landscape. From identifying elusive leaks to carefully excavating and joining new pipe sections, you’ve learned the essential steps to bring your irrigation system back to life.
A functional irrigation system means no more mysterious puddles, no more sky-high water bills from hidden leaks, and a consistently green lawn that’s the envy of the neighborhood. It’s about efficiency, savings, and the satisfaction of a job well done.
However, we understand that not every repair is straightforward. For complex jobs, multiple breaks, main water line issues, or if you simply prefer the peace of mind that comes with professional expertise, our team at Go Pro Plumbing is always here to help. We pride ourselves on outstanding customer service and same-day service for our neighbors in Sacramento, Rancho Cordova, and across Northern California.
For expert assistance with your water line repair in Sacramento, CA, contact us today. Let us help you keep your landscape beautiful and your water flowing efficiently.