
The Fill Valve Fix That Saves Your Sanity
By Brian on July 15, 2026
Your Toilet Won’t Stop Running — Here’s What to Do
A toilet repair fill valve job is one of the most common DIY plumbing fixes a homeowner will ever face. And the good news? It’s also one of the easiest.
Quick answer — how to repair a toilet fill valve:
- Turn off the water supply valve behind the toilet
- Flush to drain the tank
- Disconnect the supply line and remove the old fill valve locknut
- Adjust the new fill valve to the correct height
- Install the new valve and attach the refill tube
- Reconnect the water supply and check for leaks
Most homeowners finish the job in under 30 minutes. A replacement valve costs between $8 and $20 at any hardware store.
That constant running sound isn’t just annoying — it’s expensive. A leaking or failing fill valve can waste up to 200 gallons of water per day. In Northern California, where water costs and conservation both matter, that adds up fast.
The fill valve is the part inside your toilet tank that refills it with water after every flush. When it wears out or gets clogged, your toilet runs nonstop, fills slowly, or makes strange whistling sounds. Most fill valves last 5 to 7 years before they start causing problems.
The fix doesn’t require a plumber. It doesn’t require special skills. It just requires knowing what to do — and that’s exactly what this guide covers.
Toilet repair fill valve vocab to learn:
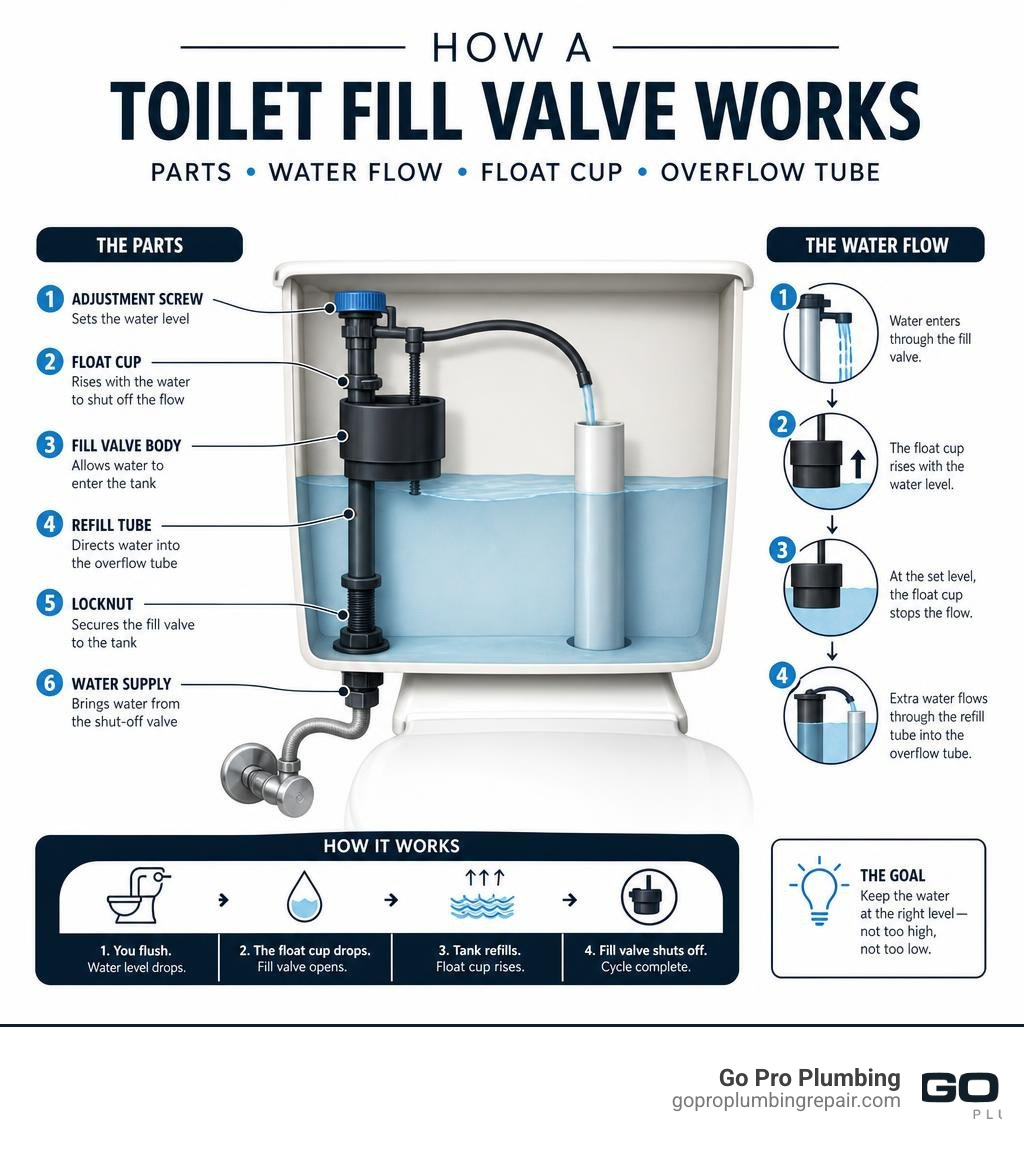
Understanding the Toilet Fill Valve and How It Works
Before you roll up your sleeves and dive into a toilet repair fill valve project, it helps to know what this little plastic device actually does.
Simply put, the fill valve is the gatekeeper of your toilet’s water supply. When you push the flush handle, the flapper at the bottom of the tank lifts, sending water rushing into the bowl. As the water level in the tank drops, the fill valve detects this change and opens up, allowing fresh water to stream in. It has two main jobs: refilling the tank and sending a smaller stream of water down the overflow tube to refill the toilet bowl.
Inside the tank, you will see several key components working together:
- The Float Cup (or Float Ball): This is the plastic cylinder that slides up and down the shaft of the fill valve. As the water rises, the float cup rises with it. Once it reaches a pre-set height, it triggers the valve to shut off.
- The Overflow Tube: This open pipe stands in the middle of the tank. It prevents the toilet from overflowing onto your bathroom floor if the fill valve fails to shut off. Any excess water simply spills into this tube and drains into the bowl.
- The Refill Tube: A small rubber or plastic hose that runs from the top of the fill valve into the overflow tube. It is responsible for restoring the water level in your toilet bowl so sewer gases don’t leak into your home.
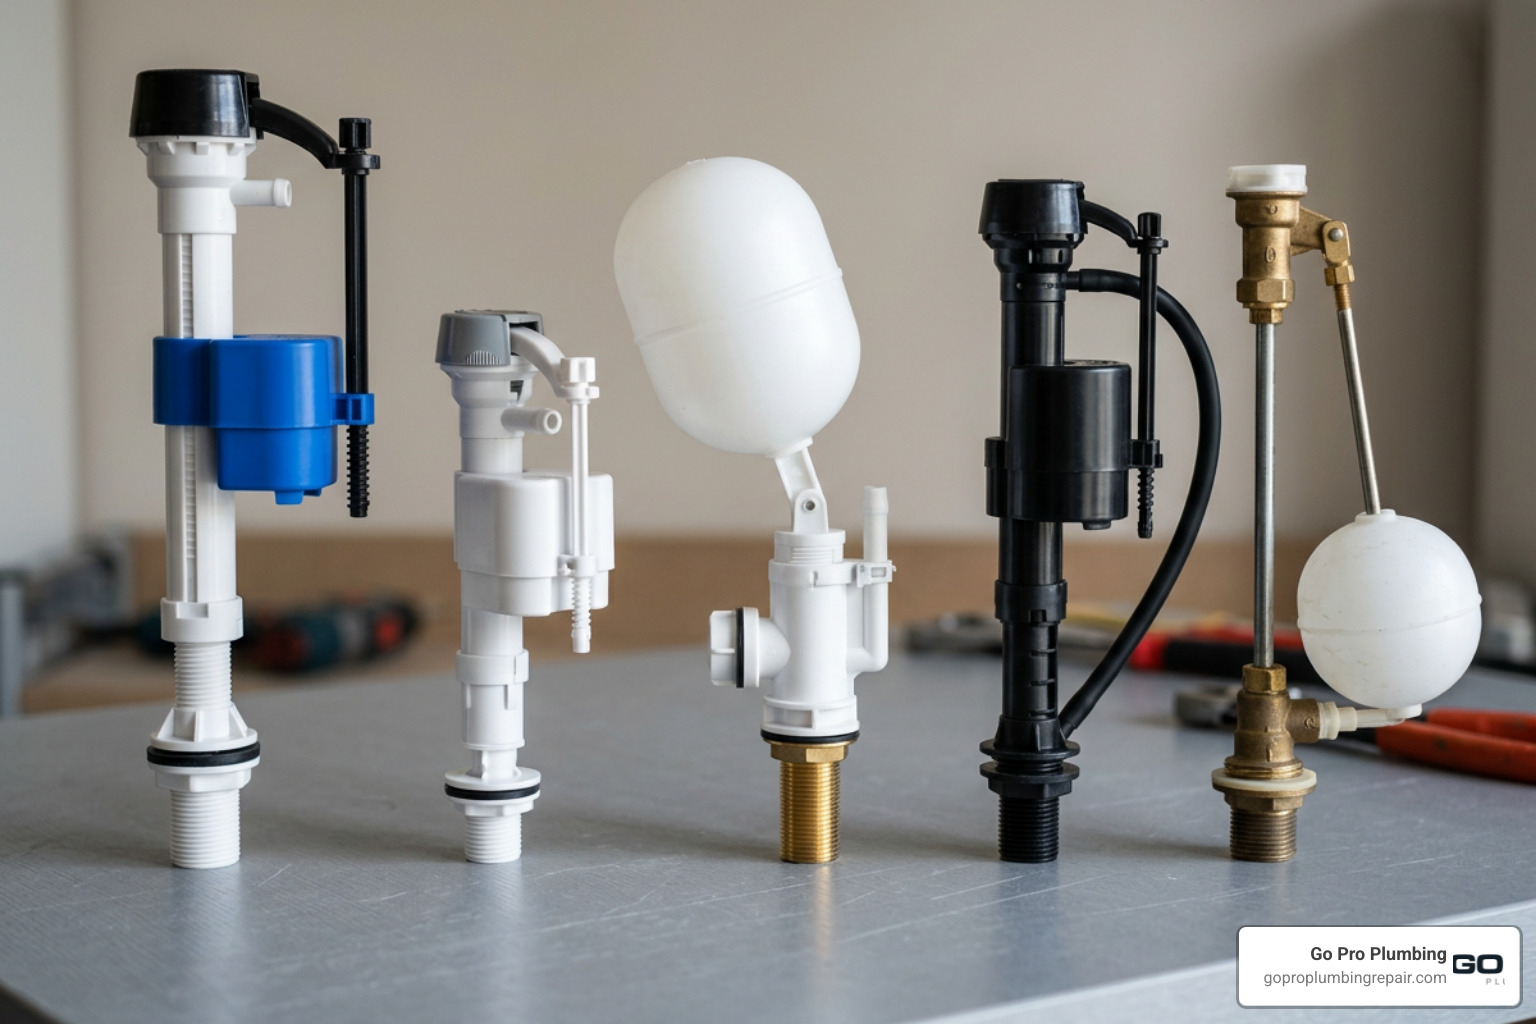
Over the years, fill valve technology has evolved. If you own an older home in Sacramento or Rancho Cordova, you might still have an old-fashioned “ballcock” valve, which uses a large copper or plastic float ball on the end of a long metal rod. Modern toilets almost exclusively use compact, highly reliable float-cup designs like the QuietFILL® Toilet Fill Valve – Korky.
To help you understand your options, let’s look at how the different types of fill valves stack up against one another:
| Valve Type | Mechanism | Pros | Cons |
|---|---|---|---|
| Float-Cup (Modern) | Vertical plastic cylinder that slides up and down the valve body. | Compact, quiet, highly adjustable, and very easy to install. | Minimal cons; standard for almost all modern toilets. |
| Diaphragm (Older) | Lever arm and float ball that uses an internal rubber seal. | Simple design. | Cast-iron or older brass models are prone to mineral buildup and whistling. |
| Brass Shank | Heavy-duty brass base with a modern float-cup upper body. | Extremely durable connection; highly resistant to overtightening. | More expensive; overkill for standard residential setups. |

Troubleshooting Common Toilet Tank Issues
Not every toilet tantrum requires a brand-new valve. Sometimes, a quick cleaning or adjustment is all it takes to restore peace to your bathroom. Let’s look at the most common issues you might experience and how to diagnose them.
Slow Filling
If you flush and have enough time to brew a cup of coffee before the tank refills, you are dealing with a slow-fill issue. This is usually caused by a clogged fill valve. Over time, rust, sediment, and minerals from the water supply can get trapped inside the valve’s upper cap assembly, choking off the water flow. This is especially common in areas with hard water or after local water line maintenance stirs up debris in the pipes. If this sounds like your issue, read our guide on toilet repair tank not filling to learn how to clear the blockage.
Constantly Running Water
A toilet that runs nonstop is usually suffering from one of two issues: a misadjusted fill valve or a leaky flapper. First, look inside the tank. Is the water spilling over the top of the overflow tube? If so, your fill valve is set too high or cannot shut off completely. If the water level is below the top of the overflow tube but the valve keeps cycling on and off, you are likely dealing with “ghost flushing,” which we explain below.
Ghost Flushing
Ghost flushing is when your toilet suddenly decides to fill itself for a few seconds, even though no one has touched the handle. This spooky phenomenon happens when water slowly leaks out of the tank and into the bowl. When the water level drops low enough, the float cup falls, and the fill valve kicks on to top off the tank. While a bad flapper is the most common culprit, a poorly positioned refill tube can also siphon water out of the tank. For a deeper dive into these mechanical gremlins, check out our breakdown of toilet flush valve problems.
Signs You Need a Toilet Repair Fill Valve Replacement
While cleaning can solve temporary clogs, there comes a point when a complete toilet repair fill valve replacement is the only logical choice. Keep an eye out for these warning signs:
- The Valve is Over 5 to 7 Years Old: Like any mechanical part constantly submerged in water, the plastic and rubber components inside a fill valve degrade over time. If your valve has reached its golden years, replace it before it fails and causes a major leak.
- Unexplained Whistling or Screeching: If your toilet sounds like a jet engine taking off every time it refills, the internal seals are worn out or vibrating under pressure.
- Skyrocketing Water Bills: If your utility bill suddenly spikes, a silently running fill valve is the prime suspect.
- Visible Cracks or Physical Damage: Plastic components can become brittle, especially if you have used harsh chemical drop-in bleach tablets in the tank. If you notice cracks or a loose float cup, it is time for a swap.
If you are curious about the financial side of things, our toilet valve replacement cost ultimate guide breaks down what to expect if you decide to go the professional route.
How to Choose and Install a Toilet Repair Fill Valve
Choosing the right replacement part doesn’t have to be a headache. Most modern fill valves are “universal,” meaning they are designed to fit standard two-piece toilets. However, you still need to pay attention to your toilet’s flush valve size.
Older toilets and standard modern toilets use a 2-inch flush valve. If you have a newer high-efficiency toilet (HET) made after 2000, it might feature a larger 3-inch flush valve to deliver a faster, more powerful flush with less water. For these newer setups, you will want to read our toilet repair kit 3 inch guide to ensure you buy compatible parts.
If you want to tackle both the fill valve and the flapper at the same time, we highly recommend picking up a complete kit, such as the Universal Toilet Fill Valve and 2 in. Toilet Flapper Repair Kit. This ensures all your tank’s moving parts are fresh, sealing perfectly, and working in harmony.
Tools and Materials Needed
Before you turn off your water, make sure you have all your tools gathered. There is nothing worse than standing over a dismantled toilet only to realize you are missing a crucial tool!
- A new universal fill valve (or complete toilet repair kit)
- Channel-lock pliers (for stubborn locknuts)
- A small bucket or shallow container (to catch drips)
- A large sponge and old towels (to soak up residual water)
- A replacement water supply line (optional, but highly recommended if your current line is old or made of rigid plastic — see our guide on toilet water line repair for more details)
Step-by-Step Toilet Repair Fill Valve Installation
Ready to fix that noisy toilet once and for all? Grab your tools and follow these simple steps to install your new toilet repair fill valve.
Step 1: Turn Off the Water Supply
Locate the oval-shaped shutoff valve on the wall behind or beneath your toilet tank. Turn it clockwise until it stops. If the valve is old and stiff, turn it gently — you don’t want to snap the handle!
Step 2: Drain the Tank completely
Flush the toilet and hold the handle down to allow as much water as possible to drain out of the tank.
Step 3: Soak Up the Leftover Water
There will still be about an inch of water sitting at the bottom of the tank. Place your shallow bucket under the tank connection, then use your sponge to soak up the remaining water, squeezing it out into the toilet bowl or bucket until the tank is completely dry.
Step 4: Disconnect the Water Supply Line
Using your hands (or channel-lock pliers if it is tight), unscrew the coupling nut connecting the water supply line to the threaded shank at the bottom of the toilet tank.
Step 5: Remove the Old Fill Valve
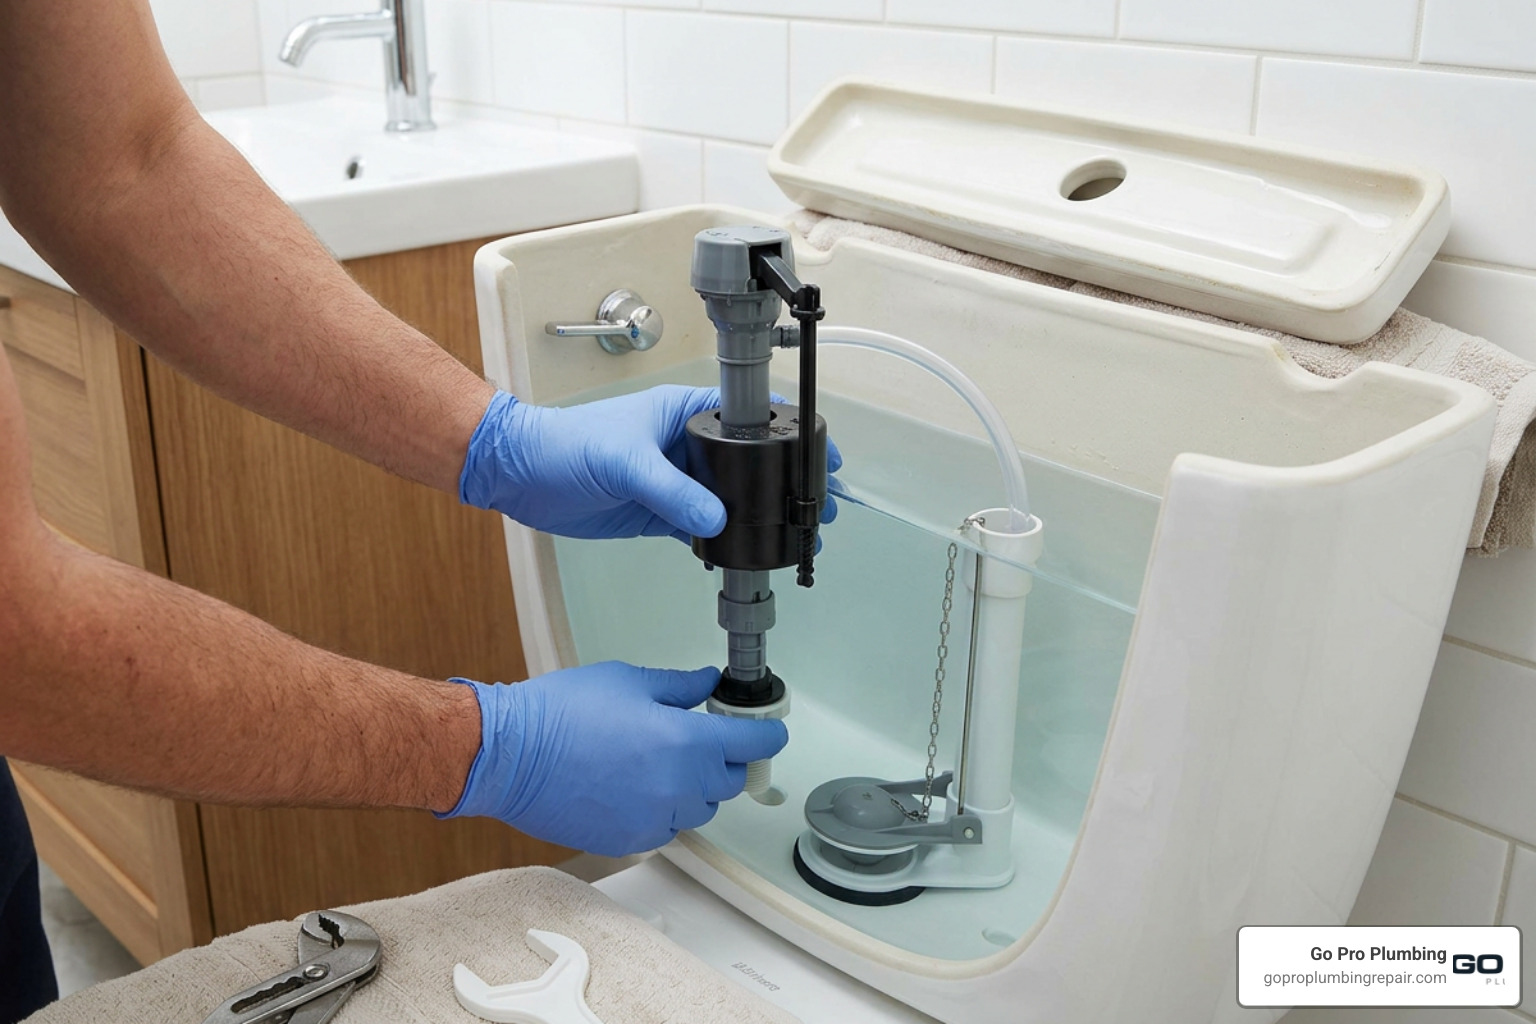
Locate the plastic locknut securing the fill valve shank to the bottom of the tank. Unscrew this locknut and lift the old fill valve assembly straight up and out of the tank.
Step 6: Adjust the Height of the New Valve
Most modern fill valves feature an adjustable height mechanism. Twist the valve body to adjust its height. You want the “Critical Level” mark (often indicated by a “CL” on the plastic) to sit at least 1 inch above the top of the overflow tube.
Step 7: Install the New Valve
Ensure the rubber shank washer is properly seated on the threaded bottom of the new valve (the flat side should face the valve, and the tapered side should face down into the tank hole). Place the valve into the tank, pushing the threaded shank through the hole at the bottom. Hand-tighten the plastic locknut from underneath the tank. Do not overtighten with tools, as this can crack the porcelain tank!
Step 8: Attach the Refill Tube
Clip one end of the small rubber refill tube to the top of the fill valve and attach the other end to the top of the overflow tube using the provided clip. Make sure the tube runs in a straight, slightly downward path without any kinks.
Step 9: Reconnect the Water Supply and Turn On the Water
Thread the water supply line back onto the fill valve shank and hand-tighten. Slowly turn the wall shutoff valve counterclockwise to restore water flow.
Step 10: Adjust the Water Level
As the tank fills, watch the water level. It should stop about 1/2 inch to 1 inch below the top of the overflow tube (or right at the water level mark stamped on the inside of the tank). If it is too high or too low, turn the adjustment screw on the fill valve to set the perfect level.
For a visual walkthrough of this entire process, you can consult The DIYer’s Guide to Toilet Fill Valve Replacement | Family Handyman.
Maintenance Tips to Extend Your Fill Valve’s Lifespan
Now that you have successfully completed your toilet repair fill valve installation, you probably want to make sure you don’t have to do it again anytime soon. Here are a few pro-level maintenance tips to keep your toilet running smoothly:
- Flush Out Debris Annually: If you notice your toilet filling slower than usual, you don’t always need to replace the whole valve. You can easily remove the top cap of the fill valve, place a cup over it, and turn the water on slightly to flush out any trapped sediment or rust.
- Clean the Internal Diaphragm Seal: If your valve is whistling, pop off the top cap, remove the small rubber diaphragm seal, and clean it with warm water and a soft brush.
- Avoid Chemical Drop-In Cleaners: Those blue or bleach-scented tablets you drop into the tank might keep your bowl smelling fresh, but they are incredibly corrosive to the plastic and rubber parts of your fill valve and flapper. Use in-bowl cleaners instead to protect your toilet tank repair work.
Frequently Asked Questions about Toilet Fill Valves
How long does a toilet fill valve typically last?
A standard toilet fill valve lasts between 5 to 7 years. However, this timeline can vary based on your local water quality. If you live in an area with highly chlorinated municipal water or heavy sediment, the rubber seals may degrade faster.
Why does my toilet still run after installing a new fill valve?
If your toilet continues to run after a fresh installation, check the refill tube first. If the tube is pushed too far down inside the overflow tube (below the tank’s water line), it will create a siphon, constantly pulling water out of the tank and causing the valve to run. Another common culprit is a worn-out flapper that isn’t sealing properly. If your toilet is still acting up, read our guide on toilet not flushing to troubleshoot other potential tank issues.
Can I replace a fill valve without turning off the water?
Absolutely not! Trying to remove a fill valve while the water supply is still active will result in an immediate, high-pressure geyser of water flooding your bathroom. Always turn the shutoff valve clockwise and verify the water is completely off before disconnecting any lines.
Conclusion
Replacing a faulty toilet fill valve is a satisfying, budget-friendly DIY project that stops annoying noises and keeps your hard-earned money from literally sliding down the drain.
However, we know that plumbing repairs don’t always go according to plan. If you run into a stubborn, rusted shutoff valve, a cracked tank, or simply don’t have the time to tackle the job yourself, we are here to help.
At Go Pro Plumbing, we provide top-tier residential and commercial toilet plumbing services throughout Sacramento, CA, Rancho Cordova, CA, and the surrounding Northern California region. Our team is dedicated to outstanding customer service and same-day service to get your home back in working order fast.
If you need a hand, don’t hesitate to reach out to a professional toilet repair plumber sacramento ca or contact our team for reliable toilet repair california solutions. We’ll handle the mess so you can get back to your day!