How to Install a Water Heater Expansion Tank Without Making a Splash
By Brian on June 18, 2026
Why Adding an Expansion Tank to Your Water Heater Is a Smart Home Safety Move
Adding an expansion tank to a water heater is one of the most effective ways to protect your home’s plumbing from pressure damage — and in many Northern California homes, it’s now required by code.
Here’s the quick version of how to do it:
- Shut off your water supply and turn off power or gas to the heater
- Check your home’s static water pressure with a gauge
- Adjust the tank’s pre-charge pressure to match your home’s water pressure
- Install a tee fitting on the cold water inlet line
- Thread the expansion tank onto the tee fitting and secure it with a mounting bracket
- Restore water supply, check for leaks, then restore power or gas
That’s the short version. The details — sizing, pressure settings, and common mistakes — matter a lot. Getting any of those wrong can cause the tank to fail early or not work at all.
So why does this even matter? When your water heater heats water, that water expands. In older “open” plumbing systems, that extra volume could push back into the municipal supply line. But most modern homes have a closed system — meaning a backflow preventer or pressure-reducing valve blocks that escape route. The result? Pressure builds up fast. Normal 60 psi can spike to 120 psi or higher, which makes your T&P relief valve drip, stresses your pipes, and shortens the life of your water heater.
A small expansion tank — typically 2 to 5 gallons — absorbs that extra pressure and keeps your system running safely.

Simple adding an expansion tank to water heater word guide:
Understanding Thermal Expansion and Sizing Your Tank
Before you pick up a pipe wrench or head to the local hardware store in Sacramento or Rancho Cordova, you need to understand the physics of thermal expansion and select the correct tank size. Installing a tank that is too small or failing to understand how a closed system operates will render your DIY efforts useless.

When water is heated, it undergoes thermal expansion. If your home has a closed system — typically created by a backflow preventer, check valve, or a pressure reducing valve (PRV) installed at your main water line — that expanding water has nowhere to go.
Without a relief mechanism, the resulting water pressure spikes can stress every connection, joint, and appliance in your home. This pressure buildup is often what causes your Temperature and Pressure (T&P) relief valve to drip. To protect your investment, you can Learn more about the importance of expansion tanks to see how they act as a safety cushion for your home’s entire plumbing system.
To help you choose the right capacity, use this quick comparison table:
| Water Heater Size (Gallons) | Static Water Pressure (PSI) | Recommended Expansion Tank Size |
|---|---|---|
| 30 to 50 Gallons | 40 to 60 PSI | 2 Gallons |
| 30 to 50 Gallons | 61 to 80 PSI | 2 Gallons (or 5 Gallons if borderline) |
| 50 to 75 Gallons | 40 to 60 PSI | 2 Gallons |
| 50 to 85 Gallons | 61 to 80 PSI | 5 Gallons |
| 80+ Gallons (or dual units) | Any standard PSI | 5 Gallons |
How Thermal Expansion Affects Your Plumbing
Water is highly incompressible. When cold water enters your water heater and begins to heat up from around 50°F to a standard hot water temperature of 120°F, it undergoes water volume expansion of approximately 4%.
While 4% might sound minor, in a standard 50-gallon water heater, that translates to an extra 0.5 gallons of water volume. In a closed plumbing system, this extra half-gallon of water has no room to stretch. This causes an immediate, dramatic pressure increase.
A normal static pressure of 60 psi can easily spike to 120 psi or even higher during a heating cycle. Over time, these daily pressure spikes stress the glass lining of your water heater, weaken joint solder, and fatigue appliance valves. If you want to keep your entire hot water setup in optimal condition, refer to our Water Heater Maintenance Complete Guide to prevent these hidden stresses from causing catastrophic leaks.
Sizing Your Expansion Tank Correctly
To choose the right size, you must consider both the total capacity of your water heater and your home’s static water pressure.
- 2-Gallon Tank: This is the standard choice for the vast majority of residential homes with water heaters ranging from 40-60 gallon heaters, provided the home’s water pressure is maintained below 60 psi.
- 5-Gallon Tank (or 4.5-Gallon Capacity): If you have 50-75 gallon heaters, a high recovery rate system, dual water heaters, or if your home’s static water pressure sits on the higher end (between 60 and 80 psi), you should step up to a 5-gallon tank.
When in doubt, it is always safer to size up. An oversized expansion tank will cause no harm to your system, whereas an undersized tank will quickly become overwhelmed, wear out its internal rubber diaphragm, and fail to prevent pressure spikes. For exact dimensions and manufacturer-approved sizing ratios, you can consult the State Water Heaters Expansion Tank Specifications.
Essential Tools and Materials
Having the right tools lined up before you start is the key to a seamless, leak-free installation. Here is what you should have on hand:
- Thermal Expansion Tank: Appropriately sized (2-gallon or 5-gallon).
- Tee Fitting: A brass tee or a specialized slide-on tee (like a push-to-connect fitting) that matches your pipe material.
- Teflon Tape and Pipe Dope: For sealing threaded connections (remember, use them correctly — never mix them on the same threads unless specified).
- Dielectric Union: Essential if you are connecting dissimilar metals (like a brass or copper fitting to a steel tank nipple) to prevent galvanic corrosion.
- Tire Pressure Gauge & Hand Pump: For checking and adjusting the tank’s air pre-charge.
- Pipe Cutter or Hacksaw: To cut into your existing cold water line.
- Mounting Bracket or Support Straps: To take the physical weight of the tank off the plumbing pipes.
If you inspect your pipes during this process and notice that your existing water lines are corroded, fragile, or outdated, it might be time to address those lines first. Check out our guide on Hot Water Heater Pipe Replacement to make sure your new tank is anchored to a solid, reliable pipe network.
Step-by-Step Guide to Adding an Expansion Tank to Water Heater
Now that you have the right tools and the correct tank size, it’s time to roll up your sleeves and begin the actual physical installation.

Preparing Your System Before Adding an Expansion Tank to Water Heater
Safety is our absolute priority. Before you cut into any pipes, you must properly shut down and depressurize your hot water system.
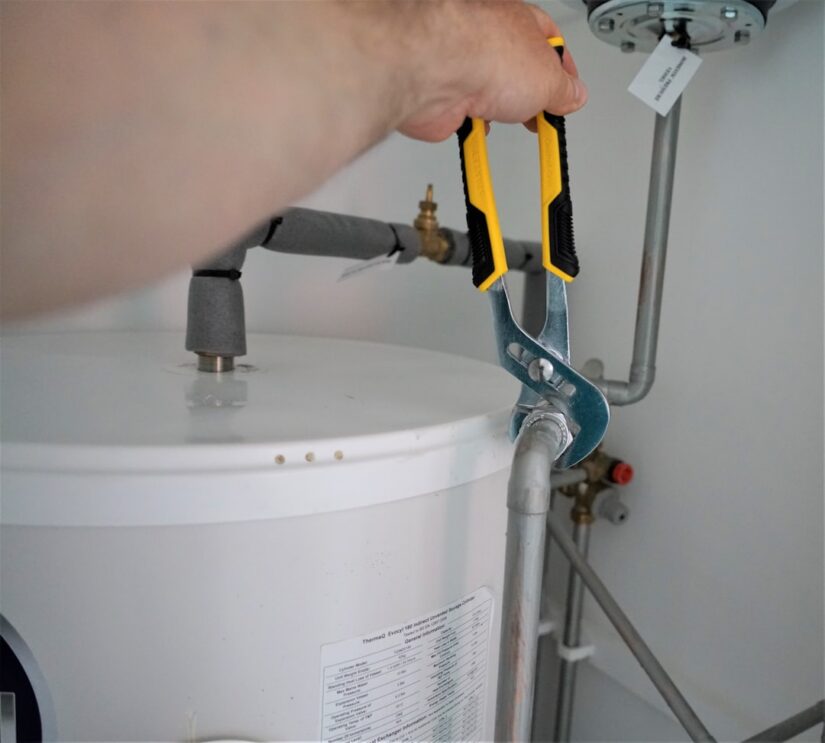
- Shut Off Power or Gas: For electric water heaters, flip the dedicated breaker in your electrical panel to the “off” position. For gas water heaters, turn the gas control valve on the front of the heater to the “Pilot” or “Off” position.
- Turn Off the Water Supply: Close the main water shut-off valve to your house, or close the cold water inlet valve directly above the water heater.
- Relieve System Pressure: Open a hot water faucet at a sink or tub elsewhere in your home (preferably at a lower level or nearby). Leave it open. This allows air into the system and relieves the standing pressure.
- Drain the Water Heater partially: Attach a standard garden hose to the drain valve at the bottom of your water heater. Run the other end of the hose to a floor drain or outside. Open the drain valve and let roughly 2 to 3 gallons of water drain out. This lowers the water level inside the tank and piping so you don’t make a massive mess when you cut the cold water line.
If you run into any issues during this shutdown process — such as a stuck drain valve or a gas valve that won’t budge — don’t force it. Take a look at our detailed tips on Home Water Heater Repair to troubleshoot these common component roadblocks safely.
Checking and Adjusting Pre-Charge Pressure
This is the single most critical step of the entire installation, and unfortunately, it is the one most DIYers skip!
Every expansion tank contains a rubber bladder or diaphragm. On one side of the diaphragm is water; on the other side is a chamber filled with pressurized air. The tank comes from the factory pre-charged (usually around 20 to 40 psi), but this air pressure must be adjusted to match your home’s static water pressure before installation.
- Measure Your Home’s Static Water Pressure: Before you shut off your water, attach a pressure gauge to an outdoor hose bib or your water heater’s drain valve. Open the valve and note the pressure (typically between 40 and 80 psi).
- Locate the Schrader Valve: On the top or bottom of your expansion tank, unscrew the small plastic cap to reveal the Schrader valve (which looks exactly like the air valve on a bicycle or car tire).
- Check the Air Pressure: Use a high-quality tire pressure gauge to check the tank’s pre-charge pressure while the tank is completely empty of water.
- Adjust the Pressure: If your home’s water pressure is 60 psi, use a standard bicycle tire pump to add air to the tank until the gauge reads exactly 60 psi. If the tank’s pressure is too high, gently depress the center pin of the Schrader valve to release air until it matches your target.
Note: Never use an air compressor to fill your expansion tank, as you can easily over-pressurize and rupture the internal rubber diaphragm.
Crucial Safety Steps When Adding an Expansion Tank to Water Heater
When adding an expansion tank to water heater systems, placement and material selection are crucial for safety and system longevity.
- Location: The expansion tank must be installed on the cold water supply line. It should be positioned between the shut-off valve and the water heater’s cold inlet. Never install an expansion tank on the hot water outlet line, and never place a shut-off valve between the expansion tank and the water heater itself.
- Prevent Galvanic Corrosion: If you connect a copper pipe directly to a steel thread on the expansion tank, a chemical reaction will cause the metal to degrade rapidly, leading to pinhole leaks. Always use a dielectric union or a brass tee to transition safely between different metals.
- Maintain Clearances: Ensure the tank is installed with proper clearance from any gas exhaust flue pipes to avoid overheating the tank or creating a fire hazard. For a highly detailed visual breakdown of proper clearance distances and plumbing configurations, check out How to Install a Water Heater Expansion Tank Correctly.
Common Mistakes, Maintenance, and Code Requirements
Once your tank is mounted and pressurized, you want to ensure it stays secure and functions flawlessly for years to come.
Horizontal Installation and Support Requirements
While vertical mounting (with the water connection pointing down) is the preferred method because it prevents air pockets from getting trapped, space constraints sometimes force homeowners to install the tank horizontally.
Can you do this? Yes, but you must provide adequate physical support. A 2-gallon expansion tank weighs about 5 to 6 pounds when empty, but when it fills with water during thermal expansion, it can easily weigh 20 to 30 pounds. A 5-gallon tank can weigh 40 to 60 pounds when full!
If you mount a tank horizontally and rely solely on the copper or brass plumbing pipes to hold that weight, you will eventually crack the pipes or bend the fittings. Always use a heavy-duty mounting bracket or metal support straps secured directly to a nearby wall stud to cradle the tank and relieve stress on your plumbing joints.
Common Installation Mistakes to Avoid
To make sure your installation goes off without a hitch, watch out for these common missteps:
- Improper Pre-Charge: Leaving the tank at its factory pre-charge pressure instead of matching it to your home’s pressure. This causes the internal diaphragm to stretch excessively and fail prematurely.
- Placing the Tank After a Shut-Off Valve: If you close the cold water valve for maintenance and the tank is on the wrong side of it, your water heater is left completely unprotected.
- Mixing Pipe Dope and Teflon Tape on the Same Joint: While some plumbers have their own custom methods, applying thick layers of both tape and dope on a single compression or threaded joint can actually prevent the threads from seating properly, causing slow leaks. Use three wraps of Teflon tape clockwise on male threads, or a thin, even coat of high-quality pipe dope.
- No Support for Vertical Tanks: Even vertical tanks can benefit from a wall bracket to prevent vibrations or accidental bumps from weakening the plumbing connections over time.
For a comprehensive checklist of what to avoid and how to troubleshoot minor installation issues, consult the Water Heater Expansion Tank Guide.
Maintenance Schedule and Signs of Failure
A typical residential thermal expansion tank has a 5-10 year lifespan. However, poor water quality, high static pressure, or improper pre-charge can cut that short.
- The Knuckle-Knock Test: Every six months, gently tap the top and bottom of your expansion tank with your knuckles. The top half (where the air is) should sound hollow. The bottom half (closest to the water connection) should sound solid and dull. If the entire tank sounds solid and heavy, the internal rubber diaphragm has likely failed, and the tank is completely waterlogged.
- The Schrader Valve Test: Remove the plastic cap on the Schrader valve and quickly depress the center pin. If air comes out, your bladder is likely still intact. If water squirts out of the valve, the diaphragm has ruptured, and the tank must be replaced immediately.
- Annual Pressure Checks: Once a year, shut off your water supply, relieve the system pressure, and check the tank’s air pressure with your tire gauge to ensure it hasn’t leaked air over time.
If you notice a waterlogged tank, constant T&P valve dripping, or rust forming around the tank’s threaded connection, it’s time to call in the pros. Explore our Hot Water Heater Repairs services to get your system back in balance quickly.
Frequently Asked Questions About Expansion Tanks
Can an expansion tank be installed on a tankless water heater?
While tankless water heaters do not store a large volume of hot water, they still heat water rapidly on demand. If your home has a closed plumbing system with a backflow preventer or pressure reducing valve, thermal expansion still occurs when the unit fires up.
Furthermore, many local plumbing codes in Sacramento and Rancho Cordova require an expansion tank on any newly installed water heating system, regardless of whether it is a tank or tankless model. If you are looking to upgrade your home to a highly efficient setup, read more about choosing an Energy Efficient Water Heater and how to properly configure it for local code compliance.
What happens if I don’t install an expansion tank?
Without an expansion tank in a closed system, the constant pressure spikes will take a toll on your home. You will likely experience:
- Slow, recurring leaks at pipe joints and faucet aerators.
- A constantly dripping T&P relief valve.
- Premature failure of your water heater’s inner glass lining (which leads to a flooded garage or closet).
- Voided manufacturer warranties on your new water heater.
- Annoying water hammer (banging pipes) when valves close.
Why is my expansion tank making a sloshing noise?
If you hear a gurgling or sloshing sound coming from your expansion tank, it is a clear sign that the internal rubber bladder has ruptured. When the bladder tears, air escapes, and the tank fills completely with water. Without the air cushion to absorb the pressure, the water sloshes around inside the metal shell. A waterlogged tank cannot do its job and must be replaced right away to protect your water heater.
Conclusion
Adding an expansion tank to your water heater is an incredibly smart, highly effective DIY project that can save you thousands of dollars in water damage and premature appliance replacement. By taking the time to size the tank correctly, match the pre-charge pressure to your home’s water system, and secure the tank safely, you protect your entire home’s plumbing network.
However, we know that cutting into water lines, soldering copper, or dealing with gas valves isn’t everyone’s idea of a fun weekend. If you would prefer to have the peace of mind that comes with professional installation, Go Pro Plumbing is here to help.
Serving Sacramento, Rancho Cordova, and the greater Northern California region, we are committed to outstanding customer service and offer rapid same-day service. Let our licensed plumbing experts handle the heavy lifting and ensure your home is fully up to code. Schedule Sacramento Water Heater Installation with us today, and let’s keep your plumbing running smoothly without making a splash!