How to Fix a Toilet Flapper Seal That Just Won’t Quit
By Brian on June 16, 2026
Why a New Toilet Flapper Not Sealing Is More Common Than You Think
If you’re dealing with a new toilet flapper not sealing properly, you’re not alone — and the fix is usually simpler than you’d expect.
Here are the most common reasons a brand-new flapper fails to seal:
- Chain too long or too short — even one extra link caught under the flapper will cause a constant leak
- Wrong flapper size — a 2-inch flapper on a 3-inch flush valve (or vice versa) will never seal correctly
- Damaged or dirty flush valve seat — mineral deposits or small nicks prevent a tight seal, no matter how new the flapper is
- Flapper misaligned on the pegs — if it’s twisted or off-center, water will seep around the edges
- Water level too high — water spilling into the overflow tube mimics a flapper leak
- Wrong flapper material — standard rubber degrades faster in chlorinated or chloramine-treated water
A leaking flapper is the most common cause of a running toilet, responsible for roughly 85% of cases. Left unchecked, it can waste anywhere from 30 to 500 gallons of water per day — a painful hit on your water bill and the environment.
The good news? Most of these problems are fixable in under 15 minutes with no special tools.

Quick new toilet flapper not sealing terms:
Troubleshooting a New Toilet Flapper Not Sealing
You went to the hardware store, picked out a shiny new flapper, installed it with pride, and turned the water back on—only to hear that familiar, mocking hiss of running water. It is incredibly frustrating when a brand-new part refuses to do its one job. However, a new toilet flapper not sealing is rarely a sign of a defective product. More often, it is a symptom of minor installation errors, component mismatch, or secondary tank issues that were masked by your old, worn-out flapper.

To get to the bottom of the issue, we have to look at how the flapper interacts with the entire flush valve assembly. The flapper relies on a combination of gravity, material flexibility, and water pressure to create a watertight seal over the flush valve seat. If any part of this system is slightly out of alignment, the seal will fail.
Before you throw your hands up in defeat, let’s look at the materials at play. The type of flapper you choose has a major impact on how quickly it conforms to your flush valve seat and how long it will last in your local water system.
| Feature | Standard Rubber Flappers | Silicone Flappers |
|---|---|---|
| Average Lifespan | 2 to 3 years (in treated water) | 5+ years |
| Chemical Resistance | Low (degrades quickly with chlorine/chloramines) | High (highly resistant to chemical cleaners) |
| Flexibility & Seal Speed | Moderate (can be stiff when brand new) | High (extremely pliable, conforms quickly) |
| Average Cost | $4 to $8 | $8 to $15 |
Why Is Your New Toilet Flapper Not Sealing?
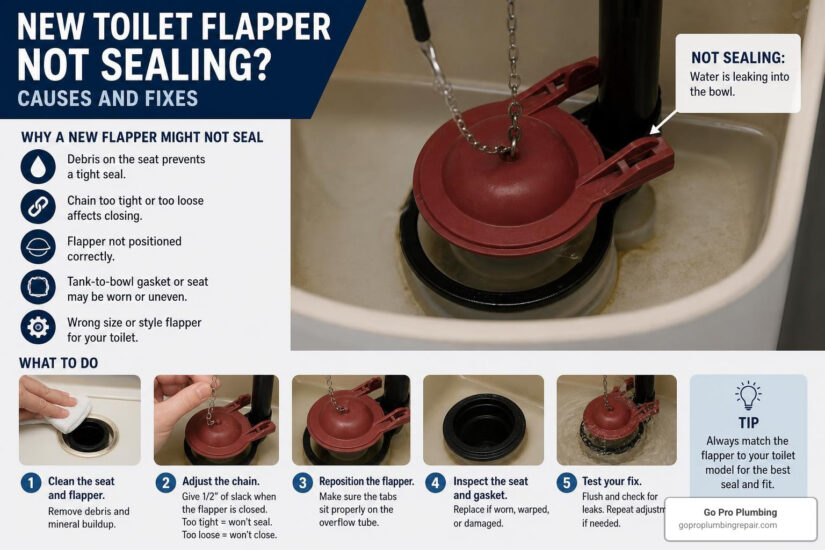
When a brand-new flapper fails to form a watertight seal, the culprit is usually found in one of three areas: the chain, mineral buildup, or physical warping.
First, let’s talk about the chain. If the chain connecting the toilet handle lever to the flapper is too tight, it will pull upward on the flapper, preventing it from resting fully on the flush valve seat. Conversely, if the chain is too long, the excess slack can easily slip underneath the flapper as it closes, creating a tiny gap that allows water to constantly seep into the bowl.
Second, mineral buildup on the flush valve seat is a classic spoiler. Over time, hard water deposits, calcium, and scale build up on the plastic or brass rim of the flush valve. When you install a new flapper, its clean, flat surface cannot form a tight seal over these rough, bumpy deposits.
Finally, while rare, brand-new flappers can occasionally warp if they have been sitting in a hot warehouse or hanging bent on a retail peg hook for too long. If you suspect your new part has a manufacturing defect or is struggling to settle, you can read more troubleshooting tips on the Fluidmaster Support Page or check out this guide on How to Fix a Toilet Leaking Even with a New Flapper.
Quick Tests to Diagnose a New Toilet Flapper Not Sealing
You do not need to guess why your toilet is still running. You can use a few quick, highly reliable tests to pinpoint the exact cause of the leak.
- The Food Coloring Dye Test: This is the gold standard for detecting silent internal leaks. Squirt 10 to 15 drops of food coloring (dark blue, red, or green work best) directly into your toilet tank. Do not flush the toilet. Wait about 20 to 30 minutes. If the water in the toilet bowl starts to change color, you have an internal leak. If the bowl remains crystal clear, your flapper is sealing perfectly, and any running sound is likely coming from the fill valve or overflow tube.
- The Manual Pressure Test: Carefully remove the tank lid and locate the flapper. Using one finger, gently press down on the center of the flapper. If the running sound immediately stops when you apply light downward pressure, the issue is physical alignment, chain tension, or a minor imperfection on the valve seat. If the running sound continues even when you press down hard, the problem lies elsewhere, such as a cracked overflow tube or an incorrect water level.
- The Water Level Drop Test: Turn off the water supply valve behind the toilet. Mark the water level inside the tank with a pencil. Wait 30 minutes and check the water level. If the water has dropped down exactly to the level of the flapper seat and stopped, your leak is definitely at the flapper or the flush valve seat. If the tank drains completely to the very bottom, the leak is likely coming from a faulty tank-to-bowl gasket or loose tank bolts.
For a deeper dive into diagnosing tricky internal leaks, you can read through this community discussion on Bad flapper, or is something else causing an internal toilet leak?.
How to Choose the Right Replacement Flapper
Walking down the plumbing aisle at your local hardware store in Sacramento or Rancho Cordova can be overwhelming. You will find dozens of different flappers, each claiming to be “universal.” The truth is, there is no such thing as a truly universal flapper that fits every toilet ever made.

To choose the right flapper, you first need to identify the size of your flush valve. Most toilets manufactured before 2005 use a standard 2-inch flush valve. However, newer high-efficiency toilets (HETs) designed to save water often use a larger 3-inch or even 4-inch flush valve to release water into the bowl much faster. If you try to fit a 2-inch flapper over a 3-inch opening, it will simply fall through or sit misaligned, causing a massive leak.
If you are unsure of what to buy, you can look up recommendations from fellow homeowners on the Dull Men’s Club Facebook Thread to see which models offer the most reliable, leak-free seals in real-world conditions.
Sizing and Material Selection
If you do not know your toilet’s model number, you can easily determine the correct flapper size using the coffee mug test. A standard ceramic coffee mug has a mouth diameter of roughly 3 inches. If you can lower a standard coffee mug into your tank and it completely covers the flush valve opening, you need a 3-inch flapper. If the mug is significantly larger than the opening, you have a standard 2-inch valve.
Once you know the size, you must choose the right material. While traditional rubber flappers are inexpensive, they do not hold up well in municipal water systems that use chlorine or chloramines for treatment. Chloramines are highly corrosive to natural rubber, causing it to become gummy, brittle, or warped in as little as two years.
For maximum durability, we highly recommend choosing a silicone flapper or a high-grade chloramine-resistant rubber flapper. These materials resist chemical degradation and maintain their flexible, sealing shape for 5 to 8 years. For a comprehensive breakdown of materials and compatibility, refer to the Jaspector Toilet Flapper & Flush Valve Seal Guide.
Step-by-Step Guide to Installing and Adjusting Your Flapper
Now that you have the correct flapper in hand, let’s walk through the installation process to ensure you get a perfect, watertight seal on your very first try.
Before you begin, make sure you have the following basic supplies ready:
- Your new replacement flapper (silicone or chloramine-resistant rubber)
- A clean sponge or rag
- A pair of scissors or wire cutters (to trim excess chain)
- A small bottle of white vinegar (for cleaning mineral scale)
For a broad overview of general toilet maintenance, you can also consult our Step-by-Step Guide to Toilet Parts Replacement.
Preparing the Tank and Removing the Old Flapper
Follow these steps to clean and prepare your toilet tank for the new part:
- Shut Off the Water: Locate the oval-shaped shut-off valve on the wall behind or beneath your toilet. Turn it clockwise until it stops.
- Drain the Tank: Flush the toilet and hold the handle down to drain as much water as possible from the tank.
- Sponge Out the Excess: Use a clean sponge to soak up the remaining inch of water at the bottom of the tank so you can work in a dry environment.
- Disconnect the Chain: Unclip the old flapper chain from the flush lever arm.
- Remove the Old Flapper: Slide the rubber “ears” of the old flapper off the plastic pegs located on the sides of the overflow tube. If you are working on an older brass flush valve, you may need to slide the flapper off a central guide rod instead.
For a quick reference on completing this initial phase, check out this guide on How to Replace a Toilet Flapper in Under 15 Minutes.
Mounting and Fine-Tuning the New Seal
Once the tank is clean and prepped, you are ready to mount your new flapper and adjust it for a perfect seal:
- Clean the Valve Seat: Before installing the new flapper, take your sponge or a rag soaked in white vinegar and thoroughly wipe down the rim of the flush valve seat. This removes any slimy biofilm, algae, or rough mineral deposits that could prevent a clean seal.
- Mount the Flapper: Slide the flexible rubber ears of your new flapper onto the pegs of the overflow tube. Ensure the flapper sits completely flat and centered over the opening.
- Connect and Adjust the Chain: Attach the flapper chain to the hole on the flush lever arm directly above the flapper. This is the most critical step. You want to adjust the chain length so there is approximately 1/4 to 1/2 inch of slack when the flush handle is in its resting position.
- If the chain is too tight: The flapper will be held slightly open, causing a constant leak.
- If the chain is too loose: The flapper won’t lift high enough to allow a full flush, and the excess chain can slip underneath the flapper seal.
- Trim the Excess: Once you have found the perfect link for the clip, use wire cutters or scissors to trim off any excess dangling chain so it doesn’t get caught under the seal.
- Test Your Handiwork: Turn the water supply valve back on and let the tank fill. Listen closely for any running water and perform a visual check to ensure the flapper drops straight down and seals cleanly.
For further step-by-step guidance on adjusting your new components, you can read the PlumbingToolsReview Flapper Replacement Guide.
Beyond the Flapper: When the Flush Valve Is the Real Culprit
If you have carefully installed your new flapper, adjusted the chain to perfection, and confirmed the size is correct, but your toilet still runs, the problem lies beyond the flapper itself.
The flush valve assembly is the large plastic or brass pipe that stands vertically inside your tank. The flapper is merely the “lid” that covers this pipe. If the pipe itself is cracked, or if the rim where the flapper rests is physically damaged, no flapper on earth will be able to stop the leak.
If you suspect the entire assembly needs to be swapped out, you can learn how to do it yourself by reading our guide on Replacing Toilet Flush Valve Without Removing Tank.
Inspecting the Flush Valve Seat and Overflow Tube
Over time, plastic flush valves can become brittle and develop hairline cracks, especially along the overflow tube. If a crack develops below the water line, water will constantly seep into the tube and drain directly into the bowl, completely bypassing the flapper seal.
Additionally, brass flush valves are prone to corrosion and pitting. If you run your finger along the rim of a brass valve seat and feel rough, sharp nicks or pitting, the metal has corroded. You can attempt to sand down minor corrosion using very fine-grit sandpaper or emery cloth. However, if the pitting is deep, the entire flush valve assembly must be replaced. For more details on diagnosing these structural issues, read our article on Toilet Flush Valve Problems.
Adjusting the Fill Valve and Water Level
Sometimes, a running toilet has absolutely nothing to do with a leak. If your fill valve is improperly adjusted, it may continue running water into the tank indefinitely.
Every toilet tank has an overflow tube designed to prevent the tank from flooding your bathroom if the fill valve fails. If the water level inside your tank is set too high, the excess water will constantly spill over the top of the overflow tube and run directly into the bowl. This creates a continuous running sound that is easily mistaken for a leaking flapper.
To fix this, locate the float on your fill valve. Adjust the float adjustment screw (usually a plastic screw on top of the valve) so that the water level shuts off approximately 1/2 inch (15 mm) below the top of the overflow tube.
Also, check the small rubber refill tube that runs from the fill valve to the overflow tube. If this tube is pushed too far down into the overflow tube (below the water line), it will create a siphon, constantly pulling water out of the tank and into the bowl. Make sure the refill tube is clipped securely above the top of the overflow tube. For more on this, check out the Pinellas County Leaky Flapper Guide.
Frequently Asked Questions about Toilet Flappers
How long does a toilet flapper typically last?
Under normal conditions, a standard rubber toilet flapper will last 4 to 5 years. However, if your home is supplied with heavily chlorinated municipal water, or if you use drop-in chemical cleaning tablets inside your tank, the lifespan of a rubber flapper can drop to 2 to 3 years. Chemical tablets are highly corrosive and warp the rubber rapidly. To maximize lifespan, we recommend avoiding chemical tank tablets and opting for premium silicone flappers, which can easily last 5 to 8 years.
Can a toilet tank that isn’t level cause a flapper leak?
No. A common myth is that an unlevel floor or a slightly tilted toilet tank will prevent the flapper from sealing. In reality, the weight of the water inside the tank exerts significant downward pressure on the flapper. This water pressure, combined with the hinges on the overflow tube, is what forces the flapper to seat correctly. As long as the flapper is properly aligned on its pegs and the chain has the correct amount of slack, a minor tilt in the tank will not affect the seal.
Why does my toilet keep running even after replacing the flapper?
If your toilet continues to run after replacing the flapper, the most common causes are:
- The chain is too tight, holding the flapper slightly open.
- The chain is too loose, and a link has slipped under the rubber seal.
- The water level is set too high, causing water to spill into the overflow tube.
- The flush valve seat is covered in mineral scale or has physical nicks and cracks.
- The refill tube is pushed too far down the overflow pipe, siphoning water out of the tank.
For a complete troubleshooting checklist, check out our guide on How to Fix a Running Toilet.
Conclusion
A new toilet flapper not sealing is a common but highly solvable issue. By systematically checking your chain tension, cleaning your flush valve seat, verifying your flapper size, and adjusting your water level, you can easily restore peace, quiet, and water efficiency to your bathroom.
However, if you have tried these troubleshooting steps and your toilet still refuses to behave, it may be time to bring in the professionals. At Go Pro Plumbing, we have been serving homeowners throughout Sacramento, Rancho Cordova, and the wider Northern California region for years. We pride ourselves on our outstanding customer service and offer convenient same-day service to get your plumbing back in perfect working order in no time.
Don’t let a running toilet flush your hard-earned money down the drain. Contact us today or visit our Toilet Plumbing Services Page to schedule a professional inspection and repair!