
How to Fix a Faucet Line Leaking Without Losing Your Sanity
By Brian on July 11, 2026
Why a Faucet Line Leaking Is a Bigger Problem Than It Looks
A faucet line leaking under your sink might seem like a minor annoyance — but it adds up fast.
Quick answer: How to fix a leaking faucet supply line
- Shut off the water valves under the sink immediately.
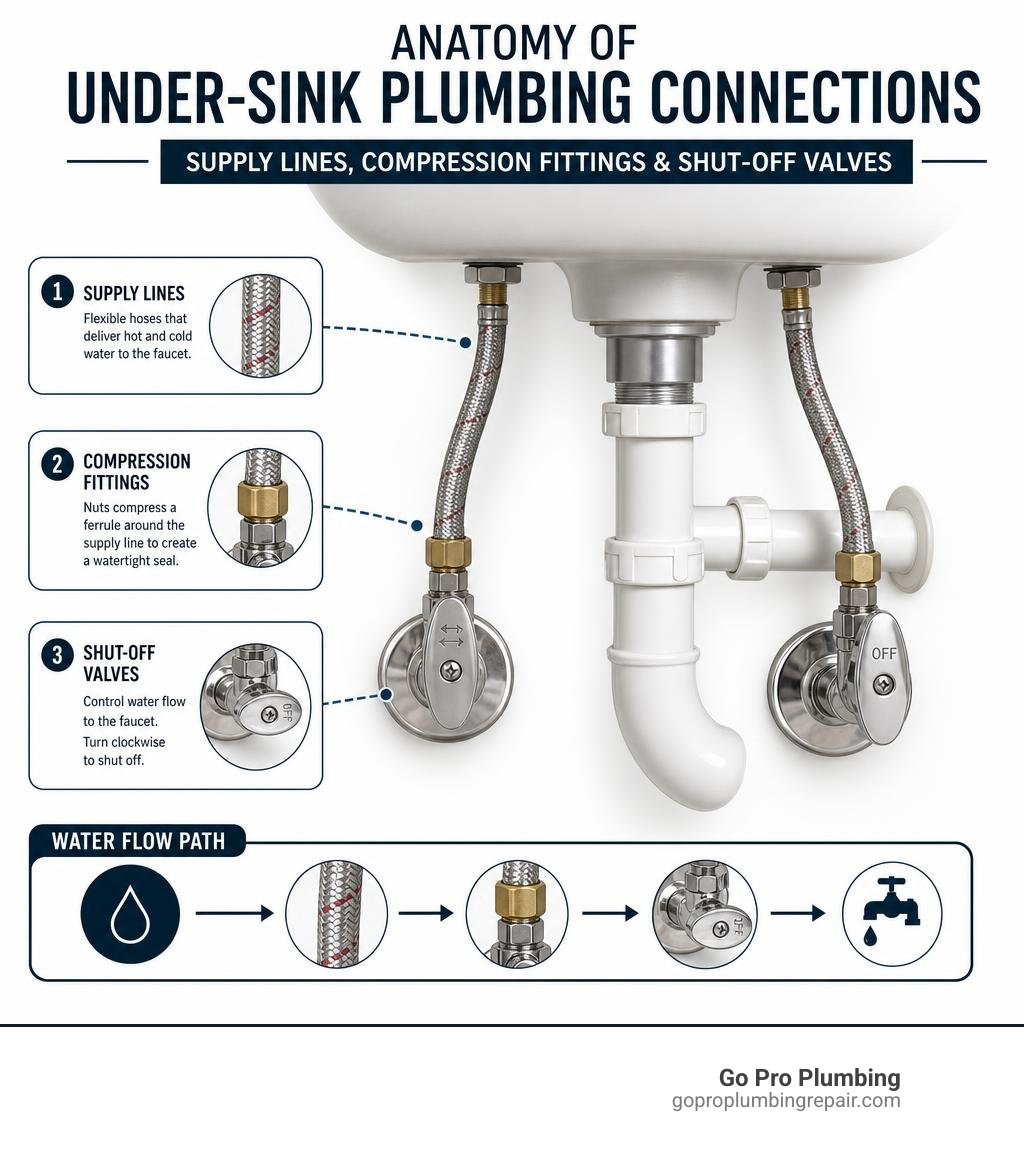
- Dry the area and identify exactly where the leak is coming from (supply line, compression fitting, or shut-off valve).
- Tighten the connection nut gently with an adjustable wrench — do not overtighten.
- Inspect the washer inside the fitting and replace it if it looks worn, cracked, or flattened.
- Replace the supply line if the hose is stiff, corroded, or older than 5-10 years.
- Turn the water back on slowly and check for any remaining drips.
Here’s why this matters beyond the drip itself. According to the 2016 Residential End Uses of Water Study, the average household loses about 17 gallons of water per day to indoor leaks. A faucet dripping at just one drop every two seconds wastes more than 1,000 gallons per year.
That’s not just water down the drain — it’s money, and potential cabinet damage, mold, and wood rot hiding quietly under your sink.
The tricky part? The leak isn’t always where you think it is. Many homeowners replace a supply line, tighten everything down, and still find a puddle the next morning. The real culprit is often damaged threads, a worn rubber washer, or a thread mismatch between the supply line and the shut-off valve.
This guide walks you through exactly how to find, fix, and prevent supply line leaks — without the frustration.
Faucet line leaking helpful reading:
Diagnosing the Source of Your Under-Sink Water Leak
Before you run to the hardware store or grab your wrench, you need to know exactly where the water is coming from. Under-sink plumbing can be a deceptive maze; a drip pooling at the bottom of a braided hose might actually be trickling down from a loose connection way up at the faucet shank.

Taking a systematic approach to leak isolation will save you hours of unnecessary work and prevent you from replacing perfectly good parts. If the leak is severe or you cannot get it under control, utilizing Emergency Plumbing Leak Repair services is the safest way to protect your home. For minor drips, you can start tracking the source yourself using simple home diagnostics and resources like Leak Alerts: Find and Fix Leaks.
Isolating the Leak: Supply Line, Fitting, or Valve?
To find the exact source, perform a thorough visual inspection and tactile test. Grab a flashlight, a dry microfiber cloth, and a few sheets of dry toilet paper or paper towels.
- Dry Everything Thoroughly: Wipe down the entire hot and cold supply lines, the shut-off valves (angle stops), and the underside of the faucet body where the lines connect.
- The Tissue Paper Test: Wrap a small piece of dry tissue paper around three key areas:
- The top connection where the supply line meets the faucet shank.
- The middle of the flexible supply line hose.
- The bottom connection where the line meets the shut-off valve.
- Observe and Feel: Run the faucet for 30 to 60 seconds, then check the tissues. The first tissue to show dampness reveals your leak’s origin.
- Inspect the Shut-Off Valve: If the moisture is concentrated around the stem of the shut-off valve itself, the packing nut on the valve may need tightening, or the entire valve may need replacement.
- Check the Cabinet Walls: Look for water stains, warping, or a musty smell on the cabinet floor and walls. Sometimes a slow, hidden leak has been dripping behind the scenes for months before forming a visible puddle.
Common Causes of a Faucet Line Leaking
Understanding why your faucet line leaking issue occurred in the first place is key to ensuring your repair stands the test of time.
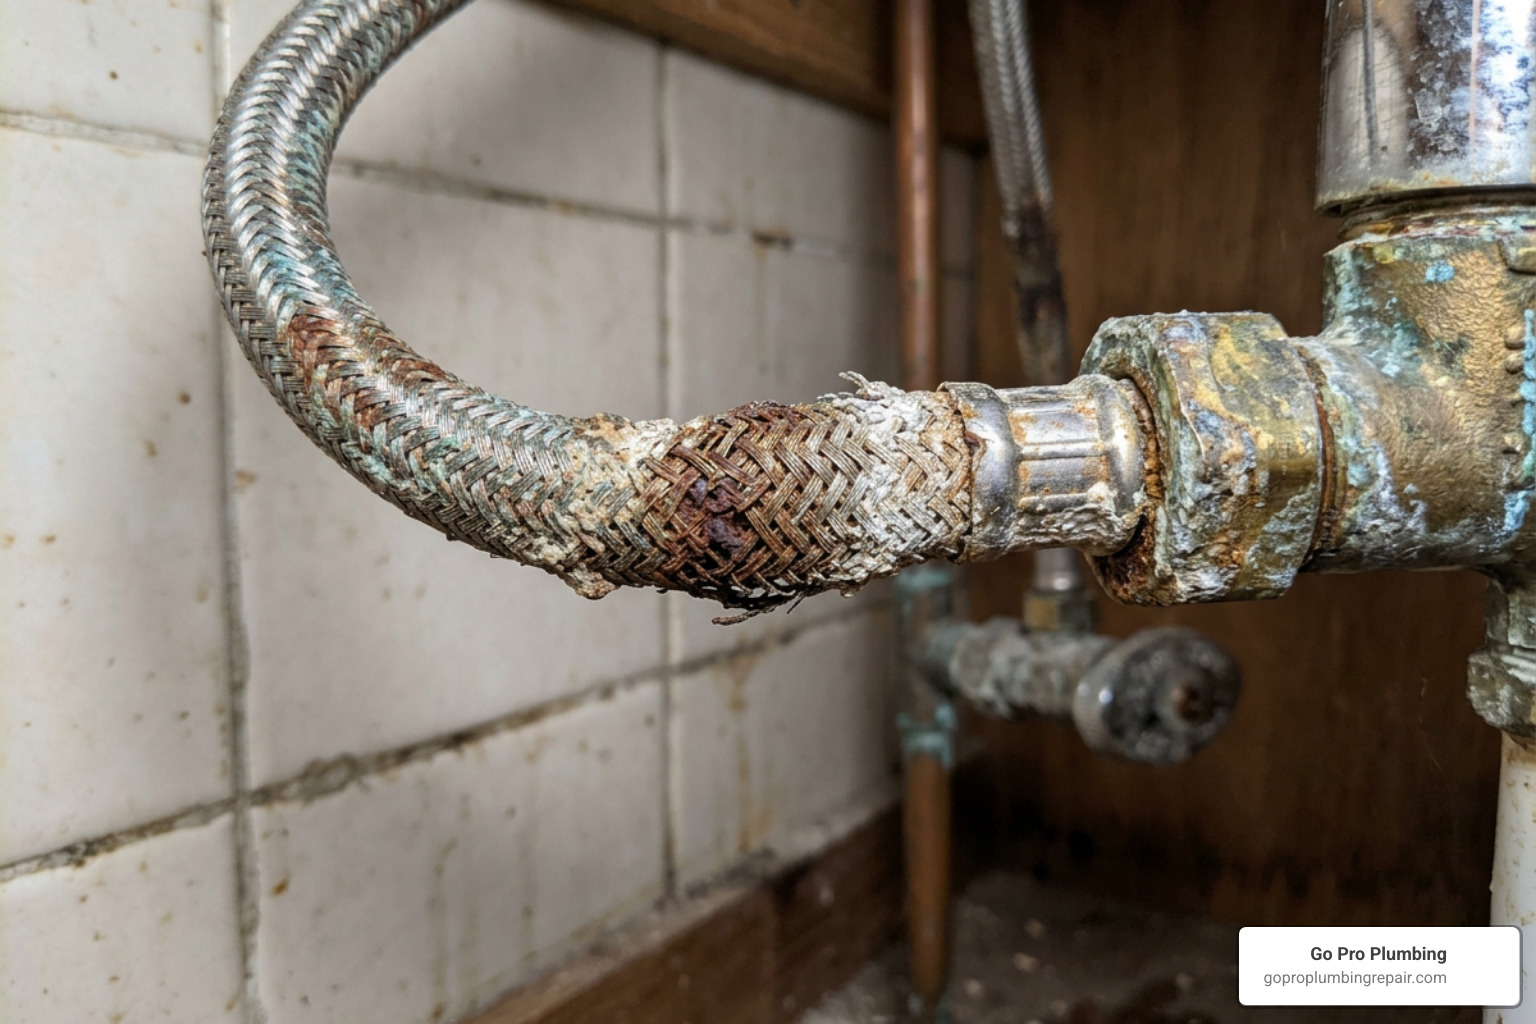
Supply lines operate under constant municipal water pressure. Any weakness in the materials, alignment, or seals will eventually yield to that pressure, resulting in a steady drip or a sudden spray. To understand how these components interact within your home’s larger network, you can explore how your Plumbing Water Supply System functions.
Identifying Why Your Faucet Line Leaking Occurs
Several common factors contribute to under-sink supply line failures:
- Elastomer Gasket Degradation: Inside the female nut of a flexible supply line sits a small rubber or elastomer washer. Over time—especially on hot water lines—this rubber becomes brittle, flattened, or cracked, losing its ability to compress and seal.
- Overtightened Fittings: In DIY plumbing, “tighter” is rarely “better.” Overtightening a compression nut can crush the internal rubber washer, splitting it open or forcing it out of alignment, which immediately causes a leak.
- Age-Related Wear: Most standard flexible supply lines have a reliable lifespan of 5 to 10 years. Over time, the inner polymer tube can weaken, crack, or blister, while the outer protective braiding can corrode.
- Thermal Expansion: The constant shift between hot and cold water causes the metal and rubber components to expand and contract. Over several years, this physical movement can gradually back a threaded nut loose.
- Physical Pinching: If the supply lines are too long or crowded by under-sink storage, household items or heavy pull-down faucet counterweights can bump, rub, or pinch the lines, straining the connections.
For a deeper look into these issues, you can consult this guide on How to Fix a Faucet Leaking from the Supply Lines: Step-by-Step Guide – TheHouseHoldNeeds.com.
Thread Mismatches and Damaged Sealing Surfaces
One of the most frequently overlooked causes of a persistent leak is a thread mismatch or a damaged sealing surface.
Many homeowners assume that if two threads screw together, they must be compatible. However, plumbing fittings rely on specific thread designs. For instance, compression threads (which are straight and designed to compress a washer or brass ring) will not seal properly if forced onto tapered pipe threads (FIP/MIP), which rely on thread interference to seal.
Furthermore, some faucet shanks feature “clamping threads” with flat sides. These flat-sided threads are designed solely to hold mounting nuts that clamp the faucet to the countertop; they are not designed to create a watertight seal. Only perfectly round, smooth-mating threads can establish a reliable seal with a supply line’s compression gasket. If the male shank on your faucet has flat sides, is nicked, has deep grooves, or is covered in hard water calcification, the rubber washer inside the supply line cannot sit flush, leading to a slow, irritating drip.
Step-by-Step Guide to Fixing and Installing Supply Lines
Ready to get your hands dirty? Fixing a leaking supply line is a highly accessible DIY project if you follow the correct sequence.
Before you begin, make sure you have the right tools on hand: an adjustable wrench, a pair of tongue-and-groove pliers, a small bucket to catch water, dry rags, and replacement supply lines or washers. If you find that your pipes are severely corroded or damaged beyond a simple line swap, you may need a professional Water Line Repair to restore your system safely.
Safely Disconnecting and Preparing the Lines
Before loosening any nuts, you must isolate the water supply to prevent a mini-flood under your cabinet.
- Shut Off the Water: Turn the local shut-off valves clockwise until they stop. If the valves are stuck, frozen, or start leaking when turned, you will need to shut off the main water valve to your home.
- Relieve the Pressure: Open the faucet handles completely to release any pressurized water left in the lines.
- Set Up Your Bucket: Place a small bucket or shallow pan directly under the connections to catch the residual water trapped inside the supply lines.
- Loosen the Nuts: Use your adjustable wrench to loosen the nuts on both ends of the supply line. If you are working on a kitchen faucet with a pull-down sprayer, you may need to disconnect the black plastic quick-connect fitting that attaches the sprayer wand.
- Disconnecting Quick-Connects: To safely disconnect a plastic quick-connect collar, push up on the plastic connection, pinch the side tabs or slide back the retaining collar (depending on the brand), and pull down gently. Do not yank or pry it with a screwdriver, as this can easily crack the plastic housing.
- Inspect the Male Threads: Check the male threads on both the shut-off valve and the faucet shank. Look for mineral buildup, cracks, or flattened threads. Clean off any old debris or calcification using a wire brush or a damp cloth soaked in white vinegar.
Installing Braided Lines and Tightening Correctly
When selecting replacement lines, we highly recommend braided stainless steel supply lines over vinyl or rubber alternatives. Braided stainless steel offers superior burst resistance and durability.
- Align the Fitting: Hold the supply line straight and line up the female nut with the male threads. Threading a nut at an angle will cross-thread and permanently ruin the plastic or brass threads.
- Hand-Tighten First: Always thread the nut by hand until it is snug. It should spin smoothly. If you feel resistance after only one turn, back it off and try again.
- Use the Two-Wrench Technique: When tightening the connection at the shut-off valve, use one wrench to hold the valve body steady and a second wrench to tighten the supply line nut. This prevents the valve itself from twisting and twisting the copper pipe inside your wall.
- The Golden Rule of Tightening: Once hand-tight, use your adjustable wrench to turn the nut an additional 1/4 to 1/2 turn. That is all it takes to compress the internal rubber washer and create a perfect seal.
- Skip the Teflon Tape: Do not use Teflon (plumber’s) tape or pipe dope on compression connections or braided supply lines. These connections seal via the internal elastomer washer pressing against a flat mating surface. Adding tape to the threads adds bulk, which can prevent the nut from threading deep enough to compress the washer, actually causing a leak!
Advanced Thread Repairs and Adapter Solutions
What happens if you have tightened the connection correctly, but it still drips due to damaged or out-of-round threads on the faucet shank? You have a few options before resorting to replacing the entire faucet.
If the threads are plastic and have minor nicks, you can sometimes use a fine thread-restoring file to clean up the grooves. However, if the threads are severely stripped or out-of-round, installing an adapter or a nipple is the most reliable solution. For extensive thread damage or older piping issues, calling skilled Pipe Replacement Plumbers is the best course of action.
| Fitting Type | Connection Method | Best Used For | Tape/Dope Required? |
|---|---|---|---|
| Compression Fitting | Compresses a rubber washer or brass ferrule against a smooth surface | Standard modern supply lines and shut-off valves | No (interferes with the seal) |
| FIP Adapter (Female Iron Pipe) | Screws onto tapered male pipe threads | Adapting older pipe sizes or connecting to iron/brass nipples | Yes (Teflon tape or pipe dope on male threads) |
| Adapter Nipple | Transitions between mismatched thread types | Fixing mismatched thread sizes or bypassing damaged faucet shanks | Yes (on the tapered side only) |
Preventive Maintenance Tips for Long-Term Success
To avoid dealing with a surprise faucet line leaking under your sink in the future, implement these simple preventive practices:
- Proactive Replacement: Don’t wait for a flood to occur. Replace your under-sink supply lines every 5 to 10 years as part of your home’s routine maintenance.
- Keep Cabinets Clear: Avoid packing the area directly under your sink with heavy cleaning bottles, buckets, or boxes that can press against or bend the supply lines.
- Install a Water Leak Detector: Place a small, inexpensive battery-powered water alarm on the floor of your sink cabinet. It will alert you the moment a drop of moisture hits the floor.
- Address Hard Water: If you live in an area with high mineral content, clean your aerators annually and monitor your connections for white, crusty scale buildup, which can degrade rubber seals prematurely.
Frequently Asked Questions about Under-Sink Plumbing
What is the fastest way to stop a faucet line leaking?
The absolute fastest way to stop an active leak is to reach under your sink and turn the local shut-off valves clockwise to turn off the water. If the valves are stuck or won’t close completely, immediately shut off your home’s main water supply valve. Once the water pressure is relieved, dry the area and gently tighten the loose compression nut with an adjustable wrench.
Do I need to use Teflon tape on braided supply line connections?
No, you should not use Teflon tape on braided supply line connections. These hoses feature a built-in elastomer seal or rubber washer inside the metal nut. The seal is created by compressing this rubber washer against the smooth end of the faucet shank or valve. Applying Teflon tape to the threads can prevent the nut from tightening down fully, which prevents the washer from compressing and leads to leaks.
When should I replace the entire supply line instead of repairing it?
You should replace the entire supply line if the hose feels stiff, brittle, or shows signs of kinking or bulging. Additionally, if you see rust, corrosion, or frayed metal wires on a braided stainless steel sleeve, or if the hose is more than 5 to 10 years old, it is time for a full replacement. Trying to patch or reuse an aged, degraded hose is highly risky and often leads to sudden water damage.
Conclusion
Fixing a faucet line leaking under your sink doesn’t have to be a sanity-testing ordeal. By taking the time to properly isolate the leak, verifying that your threads match, and avoiding the temptation to overtighten your fittings, you can easily achieve a watertight, professional-grade repair on your own.
However, plumbing under a cramped sink can sometimes reveal hidden issues, such as corroded shut-off valves that refuse to turn, stripped faucet shanks, or complex piping layouts that require professional expertise.
When a DIY fix turns into a larger project, we are here to help. Go Pro Plumbing provides premier residential and commercial plumbing services throughout Northern California, including Sacramento, CA, and Rancho Cordova, CA. We pride ourselves on outstanding customer service and offer same-day service to get your home’s plumbing back in perfect working order quickly and safely.
If you need a hand with a stubborn leak, a pipe upgrade, or any other plumbing challenge, don’t hesitate to reach out. Contact us today or visit our Water Line Repair Sacramento CA service page to schedule your professional repair!