
Step-by-Step Guide to Toilet Parts Replacement
By Brian on June 9, 2026
A Running Toilet Is Wasting More Water Than You Think
Toilet parts replacement is one of the most common — and most impactful — DIY home repairs you can do. A single leaking toilet can waste up to 200 gallons of water per day. That adds up fast on your water bill.
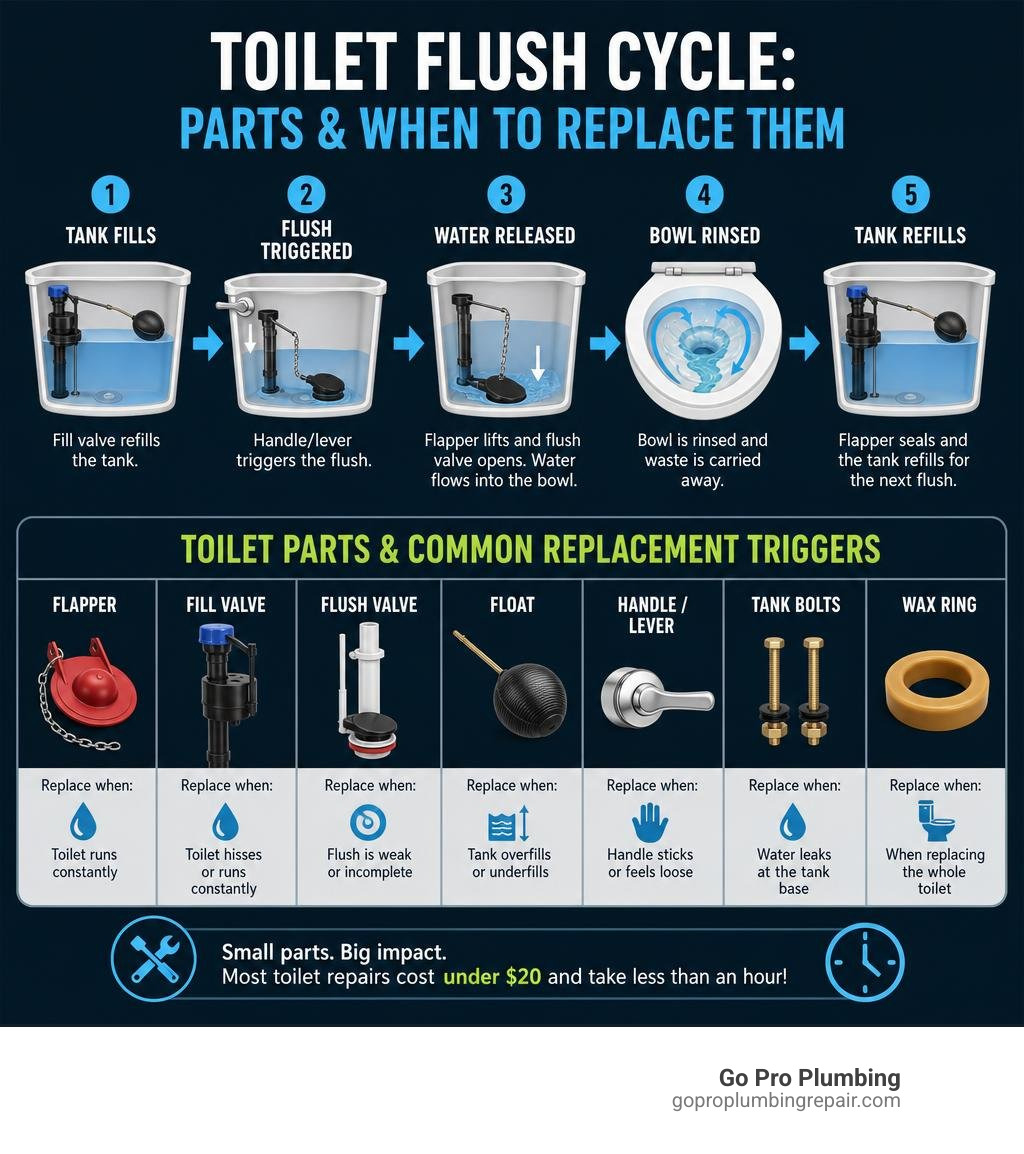
Here’s a quick overview of the most common toilet parts you may need to replace:
| Part | What It Does | When to Replace |
|---|---|---|
| Flapper | Seals the tank after flushing | Every 4-5 years, or when toilet runs |
| Fill valve | Refills the tank after flushing | When toilet hisses or runs constantly |
| Flush valve | Controls water flow into the bowl | When flush is weak or incomplete |
| Float | Signals when tank is full | When tank overfills or underfills |
| Handle/lever | Triggers the flush | When handle sticks or feels loose |
| Tank bolts | Hold tank to bowl | When water leaks at the tank base |
| Wax ring | Seals toilet to floor drain | When replacing the whole toilet |
The good news? Most toilet repairs cost under $20 and take less than an hour — no special skills required.
In this guide, we’ll walk you through exactly how to diagnose the problem, pick the right parts, and fix your toilet step by step.
Toilet parts replacement vocab explained:
Anatomy of a Toilet Tank and Diagnosing Leaks
To tackle a toilet parts replacement project successfully, you first need to understand what is happening inside that porcelain tank. While it might look like a confusing jumble of plastic and rubber, a toilet tank operates on incredibly simple gravity-fed mechanics.
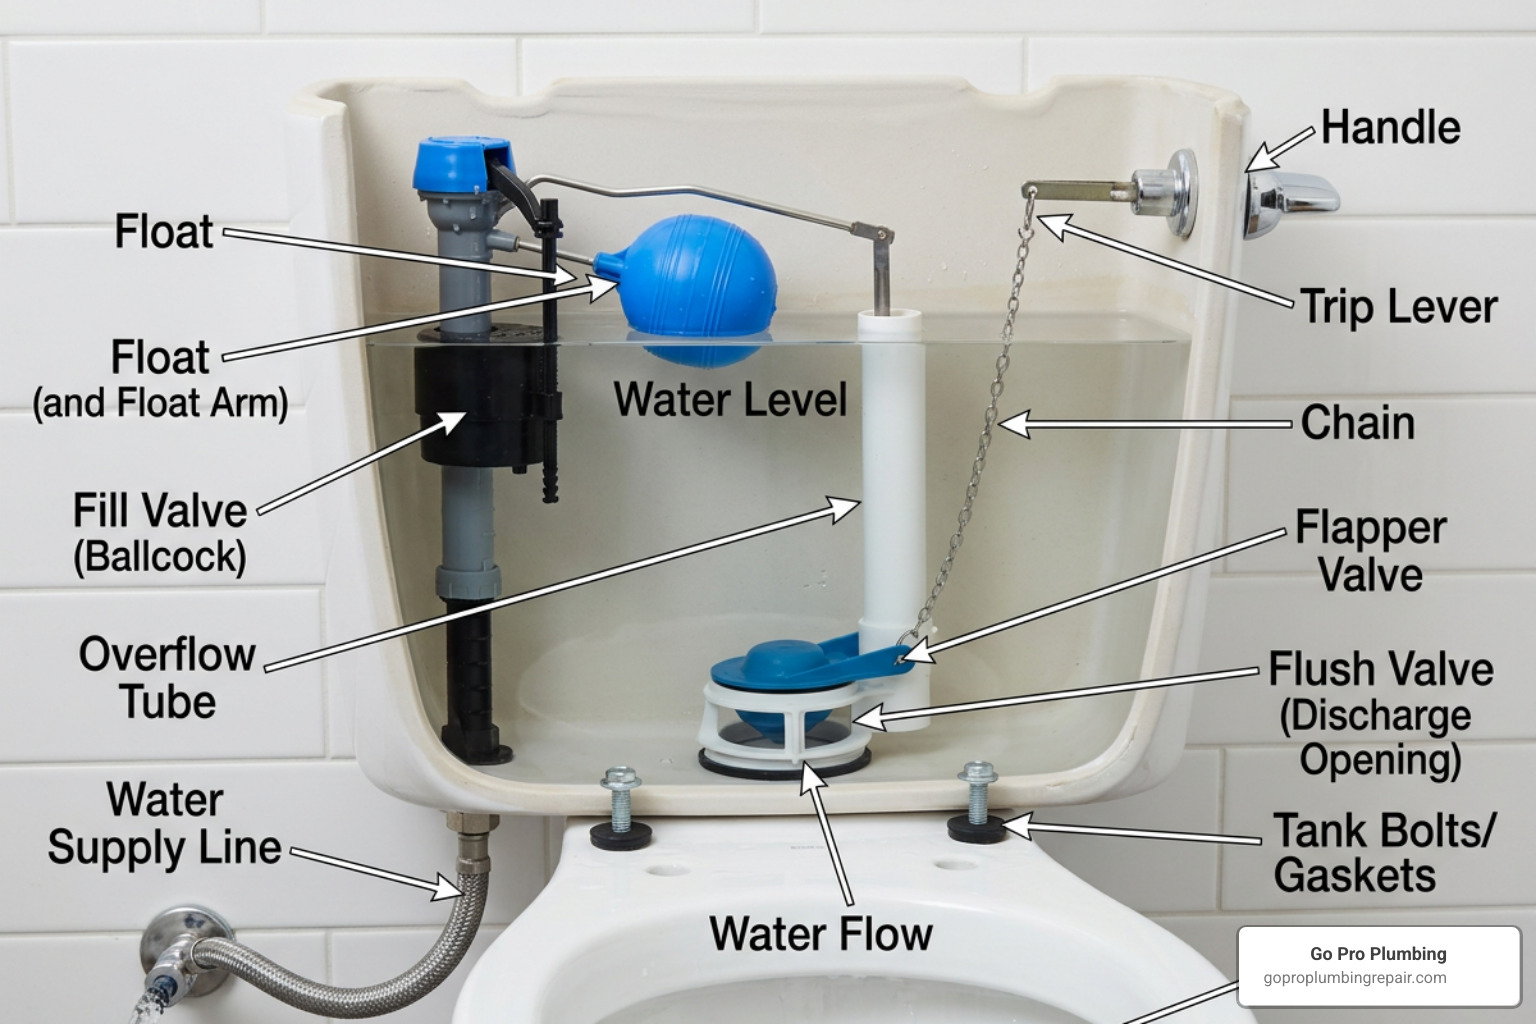
When you look inside your toilet tank, you will see two main valves that control the entire cycle: the fill valve and the flush valve. Here is a breakdown of the key components and what they do:
- Fill Valve: Located on the left side of the tank, this valve is responsible for refilling the tank with clean water after each flush. It connects directly to your home’s water supply line.
- Toilet Flapper: This is the rubber or silicone seal at the bottom of the tank. It is attached to the flush valve and lifted by a chain connected to the handle. When lifted, it allows water to rush into the bowl. Once the tank is empty, it drops back down to seal the opening so the tank can refill.
- Flush Valve: This is the central plastic tube assembly that the flapper attaches to. It guides water out of the tank and into the bowl.
- Overflow Tube: This is the open tube built into the flush valve. If the fill valve fails to shut off, water flows into the top of this tube and drains directly into the bowl to prevent your bathroom from flooding.
- Float Ball or Cylinder: This floating device rises and falls with the water level inside the tank. Once the water reaches a set height, the float signals the fill valve to shut off.
- Trip Lever & Handle: This is the external handle and the internal metal or plastic arm that pulls the flapper chain upward to initiate a flush.
If your toilet is acting up, we have a complete guide on how to fix a running toilet to help you narrow down the exact issue.
Identifying the Cause of a Running Toilet
Is your toilet constantly running, making a faint hissing sound, or turning itself on and off in the middle of the night? Diagnosing the culprit is actually very straightforward.
First, perform the classic dye test. Remove the tank lid and drop a few drops of food coloring or a dye tablet into the tank water. Do not flush. Wait about 15 to 20 minutes. If you see colored water creeping into your toilet bowl, you have a leak. This almost always points to a worn-out flapper that is no longer creating a watertight seal.
Second, check the water level inside the tank. Look at the overflow tube:
- If water is constantly spilling over the top of the overflow tube, your fill valve is either adjusted too high or is faulty and cannot shut off.
- If the water level sits below the top of the overflow tube, but the toilet still runs intermittently (often called “phantom flushing”), water is slowly escaping past a leaky flapper.
How Often to Replace Toilet Components
Like any moving part constantly submerged in water, toilet components do not last forever. On average, a standard rubber toilet flapper will last 4 to 5 years.
However, several environmental factors can dramatically shorten this lifespan:
- Chlorine and Chemical Cleaners: Municipal water treatment plants use chlorine to keep tap water safe, but this chemical degrades rubber over time. Furthermore, if you use drop-in bleach tablets inside your tank, they can rot your rubber flapper and plastic valves in as little as 1 to 2 years.
- Hard Water: In communities across Northern California, mineral deposits like calcium and magnesium can build up on the flapper seat and the fill valve, preventing them from sealing correctly.
- High-Quality Materials: Upgrading to silicone or chlorine-resistant flappers (such as those made with specialized rubber formulations) can extend the component’s life to 6 to 8 years.
Essential Tools and Preparation for Toilet Parts Replacement
Before you head out to purchase parts or start pulling things out of your toilet tank, you need to gather a few basic household tools.

Fortunately, you do not need an expensive plumbing rig for this job. Most homeowners already have these items in their garage or under the kitchen sink:
- An adjustable wrench
- Channel-lock pliers (or standard pliers)
- A large sponge and a small bucket (to collect residual water)
- Safety gloves
- A towel to wipe up spills
If you notice that your wall shutoff valve is leaking or completely seized during this process, you may need a toilet shut off valve replacement before proceeding with internal tank repairs.
How to Safely Shut Off Water and Drain the Tank
Never begin a toilet repair with the water turned on! Follow these steps to safely prep your workspace:
- Locate the Shutoff Valve: Find the small oval metal handle on the wall or floor behind your toilet.
- Turn It Off: Rotate the valve handle clockwise (to the right) until it stops. If the valve is old and stiff, turn it gently to avoid snapping the stem.
- Flush the Toilet: Press and hold the flush handle down to drain as much water as possible from the tank.
- Sponge Out the Rest: You will notice a couple of inches of water left at the bottom of the tank. Use your sponge to soak up this residual water and squeeze it out into your bucket. The tank must be completely dry before you remove the fill valve or flush valve to prevent water from pouring onto your bathroom floor.
Choosing the Right Toilet Parts Replacement
Not all toilets are built the same. Before buying parts, you must identify what kind of toilet you have.
Start by looking for a model number. This is usually stamped in black or blue ink on the inside back wall of the toilet tank or on the underside of the tank lid.
When shopping for parts, you will generally choose between two options:
- Universal Parts: Most standard toilets use a 2-inch flush valve and a standard fill valve. Products like the classic Fluidmaster 400A or the Home Depot Toilet Parts section offer excellent universal options that fit 99% of older and modern two-piece toilets.
- OEM / Proprietary Parts: If you own a modern high-efficiency toilet (such as certain newer models from major brands), you might have a 3-inch or 3.25-inch flush valve, or a canister-style flush mechanism instead of a traditional flapper. These models often require brand-specific replacement seals rather than universal kits.
Step-by-Step Guide to Replacing Key Toilet Parts
If your toilet needs a complete overhaul, using a comprehensive kit like the 2X Long Life Standard 2-Inch Universal Complete Toilet Repair Kit – Korky is a fantastic way to replace all the major components in one go.
Below, we break down the step-by-step instructions for replacing the two most common problem-makers: the fill valve and the flapper.
Replacing the Toilet Fill Valve
If your toilet is making a constant whistling or hissing sound, or if the water level in the tank won’t stop rising, it is time to swap out the fill valve. To learn more about professional service costs for this project, check out our cost of replacing a toilet fill valve guide.
Here is how to do it yourself:
- Disconnect the Supply Line: Place a small bucket or towel under the tank. Use your hands or an adjustable wrench to unscrew the water supply line coupling nut from the bottom of the fill valve shank sticking out of the bottom of the tank.
- Remove the Locknut: Directly above where the supply line was connected, you will see a plastic locknut holding the fill valve tight against the porcelain tank. Unscrew this locknut.
- Pull Out the Old Valve: Lift the old fill valve out of the tank. Ensure the rubber shank washer comes out with it.
- Adjust the Height of the New Valve: Many modern fill valves have an adjustable height. Twist the valve body to adjust its height so that the critical level mark (usually indicated on the valve body) sits at least 1 inch above the top of your overflow tube.
- Install the New Valve: Place the new fill valve into the tank, making sure the rubber washer is seated firmly at the base of the valve shank inside the tank.
- Secure and Reconnect: Thread the plastic locknut onto the shank from under the tank and tighten it hand-tight. Do not over-tighten, as you could crack the porcelain. Reconnect the water supply line.
- Attach the Refill Tube: Clip one end of the small black rubber refill tube to the top of the fill valve and the other end to the top of the overflow tube using the provided clip.
Replacing the Toilet Flapper
Replacing a flapper is a incredibly quick project. If you want to see how easily this can be done, check out this guide on How to Replace a Toilet Flapper in Under 15 Minutes – Home Plumbing Solutions.
Follow these simple steps:
- Remove the Old Flapper: Unhook the chain from the flush lever arm. Slide the rubber “ears” of the flapper off the plastic pegs on the sides of the overflow tube. Remove the flapper from the tank.
- Clean the Valve Seat: Run your finger along the rim of the flush valve seat where the flapper rests. If you feel mineral deposits or slime, use a non-abrasive sponge to wipe it clean. A smooth surface is critical for a perfect seal.
- Install the New Flapper: Slide the ears of your new flapper onto the pegs of the overflow tube.
- Connect the Chain: Clip the flapper chain to the flush lever arm. Make sure the chain hangs directly above the flapper with very minimal slack (about 1/2 inch of play).
Adjusting the Float and Chain After Installation
Once your new parts are physically installed, you must fine-tune them:
- Adjusting the Float: Turn the water supply back on and let the tank fill. Look at where the water stops. It should align with the water line mark stamped on the inside back wall of the porcelain tank (usually about 1 inch below the top of the overflow tube). If it is too high or too low, turn the adjustment screw on top of your fill valve. Clockwise raises the water level; counter-clockwise lowers it.
- Adjusting the Chain: Flush the toilet to test the chain tension. If the chain is too long, the flapper won’t open fully, resulting in a weak flush. If the chain is too tight, it will pull the flapper slightly upward, causing a constant leak. Adjust the clip on the chain links until you achieve about a half-inch of slack.
Troubleshooting After Toilet Parts Replacement
Sometimes, even after installing brand-new parts, your toilet might still behave strangely. Use this handy troubleshooting table to resolve common post-repair issues:
| Issue | Potential Cause | How to Fix |
|---|---|---|
| Toilet still runs constantly | Chain is too tight; flapper cannot seat fully. | Add 1–2 links of slack to the flapper chain. |
| Hissing sound from tank | Fill valve is dirty or water pressure is too high. | Pop off the top cap of the fill valve, place a cup over it, and turn the water on briefly to flush out debris. |
| Weak or incomplete flush | Chain is too loose; water level in tank is set too low. | Shorten the chain; adjust the fill valve float screw clockwise to raise the water level. |
| Double flushing | Flapper is staying open too long. | If you have an adjustable flapper, turn the dial to a higher number to let it close faster. |
| Water leaking from bottom of tank | Tank bolts or fill valve locknut are loose. | Gently tighten the locknuts underneath the tank. Do not over-tighten. |
Frequently Asked Questions about Toilet Repairs
How much water does a leaking toilet waste?
A leaking toilet can waste up to 200 gallons of water per day. Over the course of a month, that is 6,000 gallons of wasted water, which will significantly inflate your local utility bill. Replacing a cheap $5 flapper or a $15 fill valve pays for itself almost immediately.
Can I use chemical toilet bowl cleaners with new rubber parts?
We highly advise against using drop-in chemical cleaning tablets that contain bleach or chlorine. While they keep your bowl smelling fresh, these concentrated chemicals sit in your tank water and rapidly eat away at rubber flappers, silicone seals, and plastic valves. Using them will often void the warranty of your new replacement parts.
When should I call a professional plumber for toilet repairs?
While replacing a flapper or fill valve is an easy DIY task, some situations require professional expertise. You should call a professional plumber if:
- Your porcelain tank has a visible crack.
- The brass tank-to-bowl bolts are completely rusted and cannot be removed without risking breaking the toilet.
- Your bathroom floor is soft, rotting, or leaking water around the base of the toilet (which indicates a failed wax ring).
- Your water shutoff valve is seized or leaking.
If you run into any of these issues, our expert team provides reliable, professional toilet repair in Sacramento to get your bathroom back in perfect working order.
Conclusion
Tackling a toilet parts replacement yourself is a fantastic way to build home DIY confidence, save money, and conserve water. By understanding how your toilet tank works, diagnosing the leak correctly, and following our simple step-by-step instructions, you can easily restore your bathroom’s peace and quiet.
However, if you find yourself dealing with stubborn leaks, rusted hardware, or simply prefer to have an expert handle the job, we are here to help. At Go Pro Plumbing, we are proud to serve homeowners throughout Sacramento, Rancho Cordova, and Northern California. We are committed to outstanding customer service and offer same-day service to resolve your plumbing issues quickly.
Ready to leave it to the professionals? Visit our Go Pro Plumbing Toilet Services page today to schedule your appointment!