Flush with Confidence: Top Toilet Repair Kits for 3-Inch Valves and Handles
By Brian on February 3, 2026
Why a Toilet Repair Kit 3 Inch Can Save Your Sanity (and Your Water Bill)

A toilet repair kit 3 inch is a comprehensive DIY solution for modern toilets with large, 3-inch flush valves, typically those made after 2005. These all-in-one kits are designed to fix common issues like running toilets, ghost flushing, slow tank refills, noisy operation, and weak flushes.
Top 3-inch toilet repair kits include:
- Korky QuietFILL Platinum Large 3-Inch Complete Kit – Features a 5-year warranty and fixes running, noisy, and slow-refilling toilets.
- Fluidmaster PerforMAX High-Performance Kit – Includes color-coded tools and a 7-year warranty for easier installation.
- Danco Complete Toilet Repair Kit – Universal design with premium silicone seals that resist chlorine and chemicals.
These kits typically include a fill valve, flush valve, flapper, gaskets, and hardware—everything needed to overhaul your toilet’s internal mechanisms. A constantly running toilet can waste hundreds of gallons of water per month, significantly increasing your water bill. By replacing all the worn components at once, a complete kit provides a more reliable, long-term fix than replacing a single part, saving you money and multiple trips to the hardware store.

Is a 3-Inch Toilet Repair Kit Right for You?
Constant dripping, phantom flushes, and slow refills are signs that your toilet’s internal mechanisms need attention. A toilet repair kit 3 inch is often the ideal solution, especially for modern, water-efficient toilets. But first, you need to confirm it’s the right fit for your toilet by identifying the problem and the flush valve size.

Common Toilet Problems a 3-Inch Kit Can Fix
A toilet repair kit 3 inch is designed for High-Efficiency Toilets (HET) built after 2005 and can resolve many issues:
- Running Toilet: The most common problem, where a faulty flapper or valve causes water to leak continuously from the tank into the bowl, wasting water and money. Kits like the Korky Large 3-inch Complete Toilet Repair Kit are made to stop this.
- Ghost Flushing: When a toilet flushes on its own, it’s usually due to a slow leak from the tank that triggers the fill valve. A complete kit with a quality flapper and seals will eliminate this.
- Slow Tank Refill: If the tank takes too long to fill, the fill valve is likely the culprit. New high-performance fill valves in these kits ensure quicker, quieter refills.
- Noisy Operation: Excessive noise during flushing or refilling often points to a worn fill valve. Many 3-inch kits include “QuietFILL” technology to reduce noise.
- Weak or Incomplete Flush: A weak flush can result from a poorly functioning flush valve or flapper. A new kit restores the toilet’s original flushing power.
- Leaks from Tank: Water leaking from the tank base or around bolts indicates failing gaskets. A complete kit provides new gaskets, washers, and bolts for a watertight seal, as seen in the Danco Complete Toilet Repair Kit.
How to Confirm You Have a 3-Inch Flush Valve
Using the correct size kit is crucial. Here’s how to determine if your toilet has a 3-inch flush valve:
- Measure the Drain Opening: The most reliable method. Turn off the water, drain the tank, and measure the diameter of the drain opening at the bottom. If it’s about 3 inches across, you need a 3-inch kit.
- Visual Inspection: The flush valve is the large component in the center of the tank. In a 3-inch system, the drain opening it covers will look noticeably larger than a baseball.
- Check the Flapper Size: A flapper for a 3-inch valve is significantly larger than a standard 2-inch one. The size may be stamped on the rubber itself.
- Consider Your Toilet’s Age and Type: Toilets made after 2005, especially High-Efficiency Toilets (HET) with 1.6 GPF or 1.28 GPF ratings, commonly use 3-inch flush valves. For example, the Fluidmaster K-540A-015 kit is specified for HET toilets from 2005 and newer.
If you’re unsure, check your toilet’s model number online or consult the manufacturer’s specifications to find the correct part information.
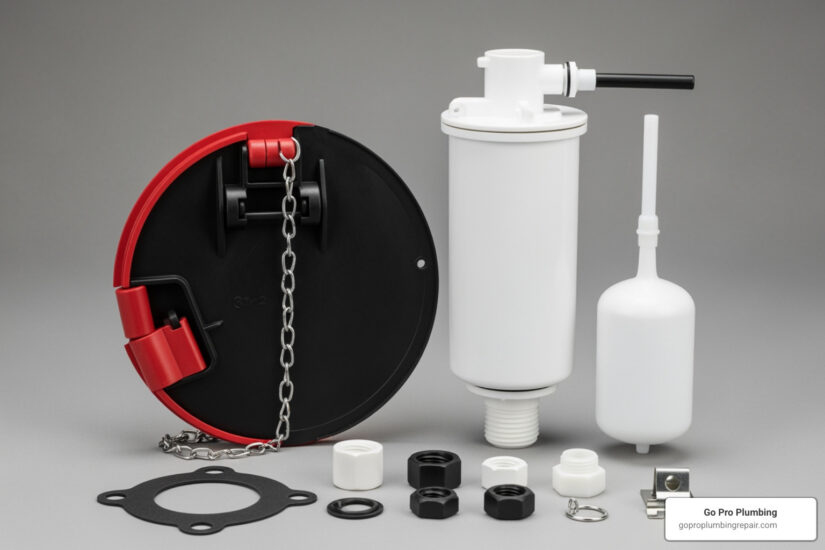
What’s Inside the Box? Anatomy of a Complete 3-Inch Repair Kit
A complete toilet repair kit 3 inch provides an entire internal overhaul for your toilet tank. Understanding each component and the importance of material quality is key to a long-lasting repair.

Core Components and Their Functions
A typical toilet repair kit 3 inch includes several crucial parts:
- Fill Valve: Refills the tank after a flush and controls the water level. Modern fill valves are quieter and more efficient, with adjustable heights to fit various tanks, like the one in the Danco Complete Toilet Repair Kit.
- Adjustable Flush Valve: The large component at the tank bottom that releases water into the bowl. Adjustable models, like in the Fluidmaster PerforMAX kit, eliminate the need for cutting and fit most HET toilets.
- 3-Inch Flapper: The seal that covers the flush valve opening. Kits include large, 3-inch flappers, often adjustable to optimize water use and prevent leaks. The Korky 3-inch EasyFix Flush Valve Repair Kit is known for its durable flapper.
- Tank-to-Bowl Gasket: A thick rubber ring that creates a watertight seal between the tank and bowl, preventing leaks at the base.
- Stainless Steel Bolts and Washers: Corrosion-resistant hardware that secures the tank to the bowl, preventing rust, leaks, and wobbling.
- Toilet Handle: Many complete kits include a new handle to ensure all flushing components work together smoothly.
Why Material Quality Matters
High-quality materials are essential for durability and preventing future repairs, especially for homeowners in Northern California dealing with treated or hard water.
- Chlorine Resistance: Tap water in areas like Rancho Cordova and Sacramento contains chlorine, which degrades standard rubber. Look for chlorine-resistant materials, like Korky’s “longest-lasting red rubber” or Danco’s premium silicone seals, to ensure longevity.
- Silicone Seals: Silicone is a superior, flexible, and durable material for seals. It resists chemicals and warping, providing a consistent, tight seal that prevents ghost flushing and running toilets.
- Hard Water and Chemical Durability: Quality components are engineered to resist mineral buildup from hard water and other chemicals, preventing premature wear. Korky’s materials, for instance, are designed to resist bacteria and hard water.
- Warping Prevention: Cheaper plastics can warp over time, causing leaks. Premium materials are designed to maintain their shape, ensuring a reliable seal for years.
Investing in a toilet repair kit 3 inch with high-quality materials means a more reliable repair, less wasted water, and greater peace of mind.
Choosing the Best Toilet Repair Kit 3 Inch for Your Needs
To select the right toilet repair kit 3 inch, you’ll need to understand the difference between universal and brand-specific kits and know which features to prioritize for a successful repair.
| Feature | Universal Kit | Brand-Specific Kit |
|---|---|---|
| Pros | – Wide compatibility (fits most 3-inch flush valve toilets) | – Perfect fit for specific toilet models/brands |
| – Often more readily available | – Engineered for optimal performance with that brand’s design | |
| – Good for general repairs and if you’re unsure of exact model | – Can sometimes offer unique features custom to the brand | |
| Cons | – May not fit ALL toilet models (e.g., some 1-piece toilets, specific Kohler models) | – Less versatile; only works with specific models |
| – Performance might be slightly less optimized than a perfect brand-specific fit for certain unique designs | – Can be harder to find or more expensive | |
| Best For | – Most homeowners with 3-inch HET toilets (post-2005) | – Owners of specific high-end or unique toilet models (e.g., some Kohler, Toto models) where universal kits may not provide an ideal fit or performance |
| – DIYers looking for a straightforward solution to common problems | – Ensuring manufacturer warranty compliance (though many universal kits offer their own warranties) |
Universal vs. Brand-Specific: What’s the Difference?
The main difference is compatibility. Universal kits, like the Danco Complete Toilet Repair Kit, are designed to fit most 3-inch flush valve toilets, making them a great choice for most DIYers. They often feature adjustable components to fit various tank heights. However, “universal” doesn’t mean every toilet; some specific models (like certain Kohler or 1-piece toilets) may require a brand-specific kit. These kits are engineered for a perfect fit and optimal performance on a particular toilet model. Fluidmaster, for example, offers kits for specific brands alongside their universal options.
For a reliable universal option, consider the 3″ Universal Toilet Flush Valve Repair Kit from Korky.
Key Features to Look For in a quality toilet repair kit 3 inch
Look for these features to distinguish a great kit from a good one:
- Adjustable Flapper & Water Usage Customization: An adjustable flapper allows you to fine-tune the flush volume, saving water and optimizing performance. The Fluidmaster K-540A-015 kit is a good example.
- Adjustable Flush Valve Height: This feature simplifies installation by eliminating the need to cut the valve to size, ensuring it fits more tank depths.
- Included Installation Tools: Some kits, like the Fluidmaster PerforMAX, include color-coded tools to make the DIY process even easier. See the K-540A-015 Universal 3-In. Flush Valve Repair Kit with Tool for an example.
- Warranty Information: A strong warranty indicates durability. Look for kits with a 5-year warranty or more. Some high-performance kits offer a 7-year warranty, providing excellent peace of mind.
Where to Purchase Your Kit
You can find a toilet repair kit 3 inch at most major retailers:
- Home Improvement Stores: Large centers carry a wide range of universal options.
- Local Hardware Stores: Stores like Ace Hardware often have knowledgeable staff and a good selection.
- Online Retailers: These offer the widest selection and competitive pricing from brands like Danco, Korky, and Fluidmaster.
Always buy from a reputable vendor to ensure you get an authentic product with warranty support.
A DIY Guide: Installing Your 3-Inch Toilet Repair Kit
Installing a toilet repair kit 3 inch is a manageable DIY project. This guide will walk you through the process of restoring your toilet’s performance.
Before you begin, gather your tools:
- Adjustable wrench or pliers
- Screwdriver (Phillips and flathead)
- Sponge or old rags
- Bucket
- Utility knife (optional)
- Safety glasses
Step 1: Preparation and Removal of Old Components
- Shut Off Water Supply: Turn the shut-off valve behind the toilet clockwise until it stops.
- Drain the Tank: Flush the toilet and hold the handle down to empty as much water as possible.
- Disconnect Supply Line: Place a bucket under the fill valve connection. Use a wrench to loosen the nut connecting the water supply line to the bottom of the tank. Some residual water will drip out.
- Remove Tank Bolts: Use a screwdriver inside the tank to hold the bolt heads while using a wrench underneath to loosen the nuts securing the tank to the bowl.
- Lift Tank from Bowl: Once the bolts and supply line are disconnected, carefully lift the tank off the bowl and place it on a protected surface. Use a sponge to remove any remaining water.
Step 2: Installing the New Valves and Gaskets
- Install the New Flush Valve: Insert the new 3-inch flush valve through the large drain hole from inside the tank. Ensure its rubber gasket is properly seated on the outside bottom of the tank.
- Tighten the Locknut: From underneath, slide the large plastic locknut onto the flush valve and hand-tighten. Use a wrench or the provided tool to tighten it another quarter-turn. Do not overtighten, as this can crack the porcelain.
- Install the Fill Valve: Insert the new fill valve into the smaller hole in the tank bottom. From underneath, secure it with the washer and locknut, being careful not to overtighten.
- Connect the Refill Tube: Attach the small refill tube from the fill valve’s nipple to the overflow pipe on the new flush valve, using the provided clip to secure it.
- Place the Tank-to-Bowl Gasket: Fit the new, large doughnut-shaped gasket over the flush valve’s threads on the underside of the tank, ensuring it is centered.
Step 3: Reassembly and Final Adjustments
- Re-mount the Tank: Carefully align the tank bolts and gasket with the holes on the toilet bowl and lower the tank into place.
- Tighten Bolts Evenly: Insert the new bolts and washers. From underneath, hand-tighten the nuts, then use a wrench to tighten them evenly, alternating between bolts to prevent cracking. The tank should be secure but not over-clamped.
- Reconnect Water Supply: Reattach the water supply line to the new fill valve and tighten it with a wrench.
- Check for Leaks: Slowly turn the water supply back on. As the tank fills, inspect all connections for drips. If you see a leak, gently tighten the corresponding nut.
- Adjust Water Level: The water level should be about one inch below the top of the overflow pipe. Adjust the fill valve’s float to set the correct level.
- Set the Flapper Chain Length: Attach the new flapper and connect its chain to the handle lever. The chain should have about 1/2-inch of slack when the flapper is closed. Test the flush and adjust as needed for proper function.
Frequently Asked Questions about 3-Inch Toilet Repair Kits
Here are answers to common questions about toilet repair kit 3 inch options.
What is the benefit of a complete kit over just replacing the flapper?
While a bad flapper often causes a running toilet, a complete kit is a better long-term solution. Here’s why:
- Comprehensive Repair: A kit replaces all major internal parts (fill valve, flush valve, gaskets), which often wear out around the same time. This provides a complete overhaul.
- Prevents Future Leaks: By replacing everything at once, you reduce the chance of another component failing soon after, saving you from repeat repairs.
- Ensures Component Compatibility: All parts in a kit are designed to work together, eliminating compatibility issues that can arise from mixing and matching brands.
- Cost-Effective: A complete kit prevents the ongoing water waste from multiple small leaks and saves you from buying individual parts over time, making it more economical in the long run.
How long does a toilet repair kit last?
A quality toilet repair kit 3 inch should last for several years. Lifespan depends on material quality and water conditions.
- Warranty: Reputable kits from brands like Korky and Fluidmaster typically offer a 5-year warranty, with some high-performance models providing a 7-year warranty. This is a good indicator of expected durability.
- Material Quality: Longevity is influenced by materials. Chlorine-resistant rubber and premium silicone seals are designed to withstand treated water and hard water for longer.
- Water Quality: Hard or heavily chlorinated water can accelerate wear. Kits with materials designed to resist these conditions will last longer.
With proper installation, a quality kit can often function well beyond its warranty period.
Can I use a 3-inch kit on a 2-inch toilet?
No, you cannot use a 3-inch kit on a 2-inch toilet. The parts are not interchangeable.
- Incompatibility: The flush valve opening in a 3-inch toilet is significantly wider than in a 2-inch toilet.
- Incorrect Fit: A 3-inch flapper is too large to seal a 2-inch opening, and a 2-inch flapper is too small for a 3-inch opening. This will cause constant and severe leaks.
- Performance Issues: The toilet will not function correctly, leading to poor flushing, constant running, and an inability to hold water in the tank.
Correctly identifying your toilet’s flush valve size is the most critical first step. Always measure before buying a kit.
Restore Your Toilet’s Performance and Save Water
Repairing your toilet with a toilet repair kit 3 inch is an empowering DIY project that fixes annoying problems while saving water and money. For most common issues with 3-inch flush valves, these kits offer a comprehensive, durable, and cost-effective solution.
However, not everyone is comfortable with DIY plumbing, and some toilet problems can be more complex than a kit can solve. If you’re in Northern California, including Rancho Cordova and Sacramento, and face a toilet issue that seems beyond your scope, professional help is just a call away.
At Go Pro Plumbing, we pride ourselves on outstanding customer service and offer same-day service for all residential and commercial plumbing needs, including expert toilet repairs. For complex issues, or if you’re unsure about the repair, our licensed and experienced plumbers are ready to ensure the job is done right the first time.
Don’t let a leaky toilet disrupt your peace of mind or inflate your water bill. Whether you use a toilet repair kit 3 inch or call in the pros, restoring your toilet’s performance is a smart move for your home and wallet.
For more information about our toilet services in Northern California, visit us at More info about toilet services.