The Ultimate DIY Guide to Replacing Your Delta Shower Cartridge
By Brian on June 19, 2026
Why Delta Tub Shower Cartridge Replacement Is Worth Doing Yourself
Delta tub shower cartridge replacement is one of the most common — and most fixable — plumbing problems homeowners face.
Quick answer: How to replace a Delta shower cartridge
- Turn off the water supply to the shower
- Remove the handle and trim (escutcheon plate)
- Pull out the old cartridge using pliers or a cartridge puller
- Clean the valve body interior
- Insert the new cartridge, aligned to the valve slots
- Reassemble the trim and handle
- Turn the water back on and test for leaks
A worn or failing cartridge is usually behind leaks, temperature swings, or a handle that’s hard to turn. The good news? You don’t need to call a plumber for this — in most cases, it’s a straightforward DIY fix that takes under an hour.
The tricky part is knowing which cartridge you need. Delta has made dozens of models over the years, and the right replacement depends on your valve series and when it was manufactured. Get that wrong and you’re back to square one.
One note worth taking seriously: some Delta cartridge models have a track record of failing within months. The RP46074 cartridge, for example, is rated just 2.3 out of 5 by over 100 users, with multiple reports of leaks returning within 3–6 months. Choosing the right part — and installing it correctly — makes all the difference.
This guide walks you through everything: identifying your cartridge, the tools you need, step-by-step installation, and how to test the result.

Basic delta tub shower cartridge replacement vocab:
- difference between moen 1225 and 1225b
- different moen cartridges
- remove cartridge from shower faucet
Signs Your Shower Cartridge Needs to Be Replaced

How do you know it is actually time to tackle a delta tub shower cartridge replacement? Your shower has a few very specific ways of crying out for help. Recognizing these early signs can save you from a massive water bill, or worse, water damage behind your bathroom walls.
Constant Dripping or Leaking
If you turn your shower handle completely to the “off” position and yet a steady “drip, drip, drip” continues to echo from the showerhead or the tub spout, your cartridge seals are failing. Over time, the rubber seats, springs, and O-rings inside the valve body wear down. This allows water to slip past the physical barriers of the cartridge even when the handle is tightly shut.
Extreme Temperature Fluctuations
Are you tired of the “shower roulette” where a sudden toilet flush elsewhere in the house turns your relaxing shower into an icy blast or a scalding stream? Delta cartridges feature pressure-balance technology designed to keep water temperature within a comfortable ±3.6°F (±1.7°C). If you are experiencing wild temperature swings, the internal balancing spool inside the cartridge is likely stuck or corroded, meaning it can no longer adjust to pressure changes.
Low Water Pressure from One Temperature
If you have great water pressure when you run purely cold water, but the flow drops to a sad, weak trickle the moment you turn the handle toward hot (or vice versa), the cartridge is the prime suspect. Mineral deposits, sediment, or a failing pressure-balancing mechanism can clog one side of the cartridge, restricting the flow of either the hot or cold inlet.
A Stiff or Hard-to-Turn Handle
Your shower handle should glide smoothly. If adjusting the temperature feels like a mini-workout, or if you hear a grinding noise when you rotate the lever, mineral scale has built up inside the valve sleeve. This friction ruins the plastic and rubber parts inside, indicating that a full swap is overdue. To learn more about how these components wear out and what to watch for, check out our Shower Cartridge Replacement Complete Guide.
How to Identify Your Delta Tub Shower Cartridge Replacement Model
Before you run out to the hardware store or order a part online, you must identify the exact cartridge currently sitting inside your wall. Delta has manufactured several distinct valve series over the decades, and they are not interchangeable.
The March 2006 Cutoff: Pre-2006 vs. Post-2006
The most critical detail in Delta cartridge identification is the manufacturing date. In March 2006, Delta introduced the MultiChoice Universal Valve system. This changed the physical footprint of their cartridges.
- Pre-March 2006: Older Monitor 13 and 14 Series showers use the RP19804 cartridge (often featuring a blue or white body with a leg length that differs from newer models).
- Post-March 2006: Modern MultiChoice 13 and 14 Series showers use the RP46074 cartridge (identifiable by its white body and grey top).
If you try to jam a post-2006 cartridge into a pre-2006 valve body, it simply will not fit, and you risk damaging the brass housing.
Identifying by Series
- 13/14 Series (Single-Function): These control temperature by rotating the handle, but the volume of water remains constant. They use either the RP19804 (pre-2006) or the RP46074 (post-2006).
- 1500/1700 Series (Dual-Function): These feature a separate volume control lever stacked on top of the temperature dial. If your shower was made prior to April 2006, it utilizes the RP32104 Shower Cartridge, which is a dual-function pressure-balanced cartridge.
- 1600 Series: An older but incredibly reliable series. The 1600 Series cartridge is actually the best-rated product in Delta’s cartridge lineup, boasting an impressive 4.4 out of 5 rating from over 209 customer reviews.
- 600 Series: If you have an older single-handle faucet with a push-button diverter or a classic metal or acrylic ball handle, you likely have a 600 Series valve. These do not actually use a modern cartridge! Instead, they rely on a ball assembly, cam, packing, and small rubber seats and springs.
For a deeper dive into matching your specific trim to the correct internal parts, read our guide on Delta Faucets Cartridge Replacement.
Tools, Materials, and Preparation

Like any DIY project, preparation is the key to avoiding a mid-afternoon crisis where your water is shut off and your bathroom is in pieces. Lay out all your tools on a soft towel in the tub to protect your tub’s finish and prevent small screws from sliding down the drain.
Tools and Materials Needed
- New genuine Delta replacement cartridge
- Phillips head screwdriver
- Allen (hex) wrench (usually 1/8-inch or 3/32-inch for the handle set screw)
- Adjustable wrench or channel-lock pliers
- Strap wrench (highly recommended to avoid scratching the decorative bonnet nut)
- Needle-nose pliers
- Silicone-based plumber’s grease (do not use petroleum-based products, which degrade rubber)
- Old toothbrush (for cleaning out mineral buildup)
- White vinegar (for dissolving hard water scale)
- A towel or rag to cover the drain
Safety Prep: Shutting Off the Water and Relieving Pressure
You must turn off the water supply before touching a single screw. If you skip this step, the moment you loosen the bonnet nut, water pressure will launch the cartridge out of the wall like a rocket, flooding your bathroom.
- Locate the Shut-off Valve: The best-case scenario is finding local screwdriver shut-off stops directly on the shower valve body behind the escutcheon plate. If your valve doesn’t have these, you must turn off the main water supply valve for your entire home.
- Drain the Lines: Go to the lowest faucet in your home (usually an outdoor spigot or a basement sink) and turn it on. Then, turn your shower handle to the fully open position. This drains any residual water left in the pipes and completely relieves the pressure.
- Block the Drain: Shove a rag or towel into your tub drain. Those tiny set screws and retaining clips have a magnetic attraction to open drains, and losing one will turn a 30-minute job into a frustrating search.
For additional prep tips and a general overview of the process, you can refer to How Do You Replace the Cartridge in a Delta Shower? for a helpful reference.
Step-by-Step Delta Tub Shower Cartridge Replacement
Now that the water is off and your tools are ready, let’s walk through the physical replacement process step-by-step.
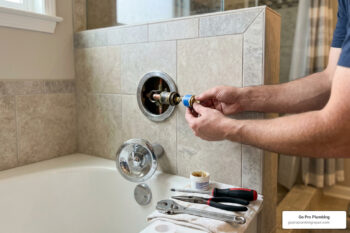
Step 1: Remove the Handle and Trim
Use your hex key or screwdriver to loosen the set screw holding the handle in place. If your handle has a decorative index button (the little plastic cap showing red/blue), gently pry it off with a non-marring tool to access the screw underneath. Pull the handle straight off. Next, unscrew and remove the escutcheon plate (the large metal trim plate against the tile) and slide off the sleeve.
Step 2: Spin Off the Bonnet Nut
Behind the sleeve, you will see a brass bonnet nut holding the cartridge inside the valve body.
- Pro Tip: These nuts are notorious for seizing due to mineral buildup. Do not force it with heavy pliers, or you risk twisting and breaking the copper tubes connecting the valve body.
- Use a strap wrench or wrap a rag around the nut before using your adjustable wrench. Spin it counterclockwise to remove it.
Step 3: Extract the Old Cartridge
Grasp the stem of the cartridge with your pliers and pull straight out. If the cartridge is stubborn, wiggle it gently from side to side as you pull.
- Note: If you are working on an older 1700 Series valve using the RP32104 Shower Cartridge, make sure you note how the cartridge is aligned. The cartridge has a small tab on the side that matches a notch on the left side of the brass valve body.
Step 4: Clean and Inspect the Valve Body
Take a flashlight and peer inside the brass valve body. You will likely see mineral scale, debris, or pieces of old black rubber seals.
- Dip an old toothbrush in white vinegar and scrub the inside of the valve body clean.
- Flush the valve body by turning the water supply on just a tiny bit for a couple of seconds to blow out any loose debris, then turn it right back off.
- Check the interior walls of the valve for any deep scratches or burrs that could prevent the new cartridge from sealing properly.
Step 5: Lubricate and Insert the New Cartridge
Apply a thin coat of silicone-based plumber’s grease to the O-rings and rubber seals of your new cartridge. This helps it slide in smoothly and prevents the rubber from pinching or tearing.
- Align the tabs on the cartridge with the matching notches in the brass valve body.
- Push the cartridge straight in until it seats firmly.
- For a helpful visual guide on how the cartridge seats and locks into place, check out the steps in Remove Cartridge from Shower Faucet.
- If you are working on a standard modern single-handle unit, you can also refer to the How to Install the Delta® T13/14 Cartridge & Trim – Video for a visual run-through of the alignment and trim assembly.
Step 6: Reinstall the Bonnet Nut and Trim
Hand-tighten the bonnet nut back onto the valve body. Once it is hand-tight, use your wrench to give it another 1/4 turn. Do not overtighten it, as this can distort the cartridge body and cause leaks. Slide the sleeve back on, reinstall the escutcheon plate, and temporarily put the handle back on so you can test the system.
Finding the Right Delta Tub Shower Cartridge Replacement
When shopping for parts, it is highly recommended to buy genuine Delta OEM (Original Equipment Manufacturer) parts. While cheaper off-brand cartridges exist, they often lack the precise tolerances required to prevent leaks.
Retailers and Return Policies
You can easily purchase genuine parts at major retailers. For example, you can browse the extensive selection of Delta – Faucet Cartridges – The Home Depot to find the exact model you need. Most major retailers offer a convenient 90-day return period, which gives you plenty of peace of mind if you accidentally purchase the wrong model and need to swap it.
If you are looking for specific replacement assemblies, such as the classic RP19804, you can find options like the Flowrite Pro Delta Faucets RP19804 Shower Cartridge Replacement Assembly to get your shower back up and running.
Troubleshooting, Adjustments, and Testing
Once the cartridge is installed, there are a few adjustments and tests you must run before you declare the job complete.
Dealing with a Stuck Cartridge
If your old cartridge refuses to budge, do not panic and do not start hammering on it.
- Spray a generous amount of penetrating lubricant (like WD-40 or PB Blaster) around the edges of the cartridge.
- Let it sit for 15–20 minutes to break up the mineral bonds.
- If it still won’t budge, you can use a dedicated cartridge puller tool to safely extract it without damaging the brass valve.
- For extreme cases where the cartridge breaks apart during removal, read our guide on how to Disassemble Delta Shower Valve.
Adjusting the Rotational Limit Stop
Every new Delta cartridge comes with a safety feature called the Rotational Limit Stop (RLS). This is a small plastic ring (usually blue or red) located at the front of the cartridge. It limits how far the handle can rotate into the hot water zone, preventing accidental scalding.
- Pull the plastic limit stop forward.
- Rotate it counterclockwise to increase the maximum hot water temperature, or clockwise to decrease it.
- Push the ring back into place to lock it.
- Always use a thermometer to test the water temperature at the tub spout—it should never exceed 120°F (49°C).
Testing Your Work
Before putting the final handle screw back in:
- Turn the water supply back on slowly.
- Check the bonnet nut area carefully for any signs of weeping or dripping.
- Turn the shower on and verify that cold water flows when the handle is turned slightly, and hot water flows when turned fully.
- Turn the shower off and verify that the water shuts off completely without dripping.
Delta Cartridge Model Comparison Table
| Cartridge Model | Series / Era | Key Features | Average Rating / Review Count | Common DIY Issues |
|---|---|---|---|---|
| RP46074 | MultiChoice 13/14 Series (Post-2006) | Single-function pressure balance | 2.3 / 5 (102 reviews) | Reports of leaks returning in 3–6 months |
| RP19804 | Monitor 13/14 Series (Pre-2006) | Classic single-function pressure balance | 4.1 / 5 (Over 500 reviews) | Finding correct leg length for older valves |
| RP32104 | 1500 / 1700 Series (Pre-2006) | Dual-function pressure balance | 4.0 / 5 (98 reviews) | Proper alignment of the left-side tab |
| 1600 Series | 1600 Series (All Eras) | Classic pressure-balanced cartridge | 4.4 / 5 (209 reviews) | Sourcing genuine OEM parts |
Frequently Asked Questions
What should I do if my Delta shower cartridge is stuck?
If your cartridge is seized inside the valve body, do not use excessive force, as you can bend the copper supply lines behind the wall. Spray the area with a penetrating oil or soak a rag in white vinegar and wrap it around the valve body to dissolve mineral scale. If it remains stuck, use a cartridge puller tool to pull the cartridge straight out safely.
How do I adjust the hot water temperature on a new Delta cartridge?
You can adjust the temperature by changing the position of the Rotational Limit Stop (the colored plastic teeth on the nose of the cartridge). Pull the limit stop out, rotate it counterclockwise to allow more hot water into the mix, and press it back into place. Always test the temperature with a thermometer to ensure it does not exceed safe limits.
Can I use a renovation kit for older Delta 600 Series showers?
Yes! If you have an older 600 Series shower, you can use the Renovation Kit – 600 Series Tub & Shower in Chrome RP54870 | Delta Faucet to update your trim without tearing out the wall. These kits do not use a standard cartridge; instead, they utilize a ball assembly, seats, and springs to rebuild the internal valve.
Conclusion
Tackling a delta tub shower cartridge replacement is an incredibly rewarding DIY project that saves you money and restores peace and quiet to your bathroom. With the right replacement parts, a little patience, and this guide, you can easily stop the drips and regain control over your shower’s water temperature.
However, if you run into a seized bonnet nut that won’t budge, a cartridge that breaks off inside the valve, or if you simply prefer to have an expert handle it with same-day service, we are here to help. At Go Pro Plumbing, we serve Rancho Cordova, Sacramento, and the greater Northern California area with outstanding customer service and professional plumbing expertise.
Ready to get your shower running perfectly? Get Professional Shower and Tub Repair Services from our friendly, expert team today!