The Easiest Way to Replace a Toilet Flush Valve
By Brian on October 31, 2025
Why Toilet Flush Valve Replacement Matters for Your Home
Toilet flush valve replacement is one of the most common plumbing repairs that can save you hundreds of dollars in water bills while fixing annoying toilet problems. The flush valve acts as the gatekeeper for your toilet’s water supply – when you press the handle, it lifts a flapper or seal to let water flow from the tank into the bowl.
Quick Answer for Toilet Flush Valve Replacement:
- Shut off water and drain the tank completely
- Remove the tank from the toilet bowl (for two-piece toilets)
- Unscrew the old flush valve from the bottom of the tank
- Install the new flush valve with proper gaskets and seals
- Reassemble everything and test for leaks
- Call a professional if you encounter rusted bolts or cracked porcelain
A failing flush valve can waste gallons of water daily, driving your water bill through the roof. According to our research, ignoring a bad flush valve leads to constant dripping that can cause water damage around the toilet base and put extra strain on other parts like the fill valve and supply line.
The good news? Most homeowners can handle this repair themselves with basic tools and a replacement kit. You’ll save money on your utility bills and stop that annoying sound of a constantly running toilet.

Is Your Flush Valve Faulty? Signs and Consequences
Your toilet has been acting up lately, hasn’t it? Maybe it’s making strange sounds in the middle of the night, or perhaps it just won’t stop running no matter how many times you jiggle the handle. These aren’t just minor annoyances – they’re your toilet’s way of crying for help.
When your flush valve starts failing, it’s like having a leaky faucet that you can’t see. The water keeps flowing, your bills keep climbing, and the problem only gets worse with time. The good news? Once you know what to look for, identifying a faulty flush valve becomes much easier.
Common Signs of a Failing Flush Valve
The phantom flush is probably the most telltale sign that something’s wrong. You know the one – when your toilet suddenly decides to flush itself at 2 AM, startling you awake. This happens when the flush valve’s seal gets compromised, allowing water to slowly leak into the bowl until the tank empties enough to trigger a refill cycle.
A constantly running toilet is another dead giveaway. If you hear that continuous whooshing sound coming from your bathroom, your flush valve isn’t sealing properly. Water keeps trickling from the tank into the bowl, forcing the fill valve to work overtime trying to keep up. Our guide on how to fix a running toilet covers this issue in detail.
Weak or incomplete flushes can also point to flush valve problems. When the valve doesn’t open fully or doesn’t stay open long enough, you don’t get that powerful rush of water needed for a proper flush. You might find yourself having to flush twice – or even three times – to get the job done.
Listen for hissing sounds coming from your toilet tank. That subtle but persistent noise usually means water is slowly escaping through a worn-out seal. Even if you don’t see water trickling into the bowl, that hissing tells you money is literally going down the drain.
Does your handle need to be held down for a complete flush? This frustrating issue often means the flapper isn’t lifting properly or won’t stay up long enough. The flush valve mechanism might be warped, corroded, or just plain worn out.
Slow tank refill can also signal flush valve trouble. While this problem sometimes stems from the fill valve, a flush valve that won’t seal completely forces the tank to constantly replace escaping water, making refills take forever.
Take a peek inside your tank and look for visible cracks on the flush valve assembly or a flapper that looks warped, slimy, or stiff. These are clear signs that toilet flush valve replacement is in your immediate future. You can learn more about these issues in our comprehensive guide to toilet flush valve problems.
Why You Shouldn’t Ignore a Bad Flush Valve
Ignoring a failing flush valve is like ignoring a small leak in your roof – the problem will only get bigger and more expensive over time. The most immediate consequence hits your wallet through increased water bills. A continuously leaking flush valve can waste hundreds of gallons per month, turning a manageable utility bill into a budget-busting surprise.

Potential water damage is another serious concern. That constant dripping doesn’t just disappear – it can seep around the toilet base, causing rot in your subfloor, encouraging mold growth, and even leading to structural problems. We’ve seen beautiful bathrooms ruined because homeowners put off a simple toilet flush valve replacement.
When your toilet can’t flush properly, you’re also looking at clogged toilet risk. Weak flushes struggle to clear waste and toilet paper, leading to frequent blockages that are both disgusting and inconvenient. Nobody wants to deal with a plunger more often than absolutely necessary.
The domino effect doesn’t stop there. A constantly running toilet puts extra strain on your fill valve and supply line, forcing these components to work much harder than they were designed to. This accelerated wear means you’ll likely face additional repairs sooner rather than later – turning one simple fix into multiple expensive problems.
The bottom line? Addressing flush valve problems early saves money, prevents damage, and keeps your bathroom functioning smoothly. For comprehensive solutions to toilet tank issues, explore our toilet tank repair services.
Your Step-by-Step Guide to Toilet Flush Valve Replacement
Alright, let’s roll up our sleeves! Toilet flush valve replacement might sound like a job for the pros, but it’s actually a rewarding DIY project that most homeowners can tackle with confidence. Think of it as giving your toilet a fresh start – and your wallet will thank you for skipping the service call.
The best part? You’ll get that satisfying feeling of fixing something with your own two hands. We’re focusing on two-piece toilets here since they’re the most common, but don’t worry if you have a one-piece – we’ll cover those special considerations later.

Before we dive in, let’s talk safety. Water and tools don’t always play nice together, so make sure that water supply is completely shut off before you start. Trust us on this one – nobody wants to deal with an unexpected geyser in their bathroom!
Gathering Tools and Parts for Your Toilet Flush Valve Replacement
Getting organized before you start will save you from those frustrating mid-project trips to the hardware store. Here’s what you’ll need to make this toilet flush valve replacement go smoothly.
Your adjustable wrench will be your best friend for disconnecting the water supply line and handling those tank bolts. You’ll also want channel-lock pliers – these are essential for gripping that large nut that holds the flush valve to the tank. Don’t try to muscle through this job without proper pliers; your knuckles will regret it.
For cleanup, grab a sponge and bucket or even a wet-vac if you have one. There’s always more water hiding in those nooks and crannies than you expect. A screwdriver set (both Phillips and flathead) might come in handy for various screws, depending on your specific flush valve design.
The star of the show is your replacement flush valve kit. This is where getting the right part really matters – more on sizing in the next section. Most quality kits include new gaskets and bolts, which is perfect because you’ll need new tank-to-bowl gaskets and bolts when you separate that tank from the bowl.
Don’t forget a rag or towel to protect your floor and keep things tidy. For more guidance on choosing the right supplies, check out our information on toilet repair kits.
The Replacement Process: A Detailed Walkthrough
Ready to transform that troublesome toilet? Let’s walk through this step by step, and remember – take your time. Rushing through plumbing projects rarely ends well.
Step one is all about water control. Find that shut-off valve behind your toilet (usually on the left side) and turn it clockwise until it stops. Give the toilet a flush to drain the tank and bowl, then use your sponge to get every last drop. You’d be amazed how much water likes to hide in there.

Next, disconnect that supply line. Put your bucket underneath where the supply line meets the tank bottom – there’s always a little water waiting to surprise you. Use your adjustable wrench to loosen the connection nut, and don’t worry if a bit of water comes out.
Now for the fun part – separating the tank from the bowl. Look underneath where the tank sits on the bowl, and you’ll see two or three bolts holding everything together. Use your wrench or screwdriver to remove the nuts from these bolts. Here’s where having a helper comes in handy – carefully lift that tank straight up and set it on a towel-covered surface.
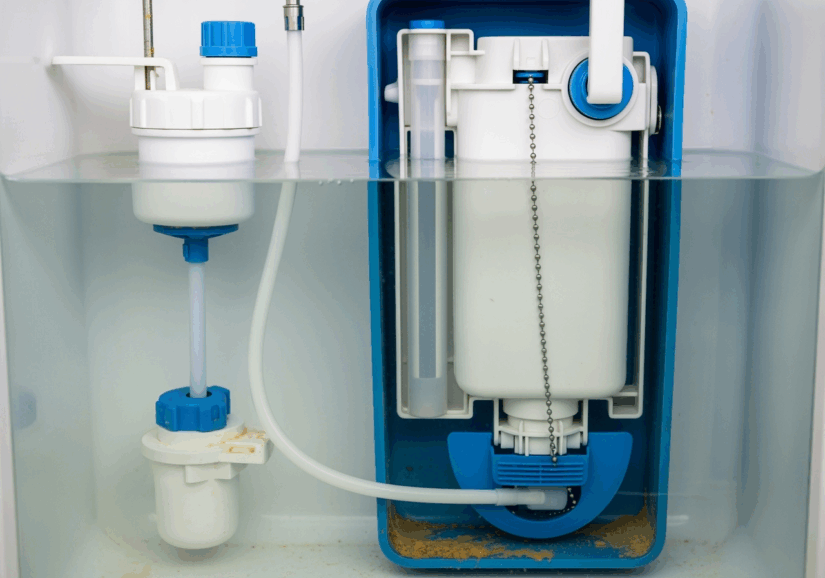
Time to say goodbye to the old flush valve. Inside the tank, you’ll see the flush valve assembly with its overflow tube. Flip the tank over and look for that large nut on the bottom – that’s what’s holding your old valve in place. Grab those channel-lock pliers and turn the nut counter-clockwise. Once it’s off, the whole assembly lifts right out from inside the tank.
Installing the new flush valve is like putting together a puzzle. Slide the new assembly into the hole at the tank bottom, making sure the overflow tube points toward the back where your fill valve lives. From underneath, add the rubber gasket, plastic washer, and securing nut in that order. Hand-tighten first, then snug it up with your pliers – but don’t go crazy! Cracked porcelain is nobody’s friend.
Putting everything back together is just the reverse process. Set the tank back on the bowl, align those bolt holes, and insert the new bolts with their washers. Tighten the nuts underneath evenly – alternate between them so the tank sits level and stable.
The final step is reconnecting and testing. Hook up that supply line, slowly turn the water back on, and watch your tank fill up. Give it a few test flushes and check carefully for any leaks around the connections. Adjust the flapper chain if needed – you want just a little slack when the flapper is closed.
And there you have it! Your very own successful toilet flush valve replacement. If you’re more of a visual learner, you can watch a video on installing a new flush valve for additional guidance.
Choosing Your Valve and Special Considerations
Picking the right flush valve can feel like solving a puzzle – but don’t worry, we’re here to help you find the perfect piece! The key is understanding that not all toilets are created equal, and choosing the wrong valve can turn your DIY victory into a frustrating do-over.

Choosing the Right Part for Your Toilet Flush Valve Replacement
Think of your toilet flush valve replacement like buying shoes – size matters! The most important measurement you’ll need is the valve diameter. Most toilets use either 2-inch or 3-inch flush valves, and getting this wrong means another trip to the hardware store.
To measure, simply look at the opening where the old flush valve sits at the bottom of your tank. Many newer high-efficiency toilets (HETs) actually use the larger 3-inch valves – or sometimes even 4-inch ones – because they create a faster, more powerful flush that clears the bowl better.
Next, you’ll want to consider whether you have a single flush or dual flush system. Traditional toilets have single flush valves that give you the same amount of water every time you press the handle. But if your toilet has two buttons or a handle that lifts different ways for different flush volumes, you’ve got a dual-flush system that needs a specific dual-flush replacement valve.
When in doubt, universal kits can be lifesavers. Brands like Fluidmaster make universal toilet flush valve replacement kits designed to work with various toilet types. These often come with adjustable components, but you’ll still need to make sure the diameter matches your tank opening.
If you have a water-saving HET toilet (designed for 1.6 gallons per flush or less), make sure your replacement valve is also designed for high-efficiency performance. This keeps your toilet working as intended and your water bills low.
The smartest approach? Check your toilet’s model number before shopping. You’ll usually find it stamped inside the tank near the water line, or sometimes on the underside of the tank lid. With this number, you can find the exact replacement parts designed for your specific toilet.
One-Piece vs. Two-Piece Toilets: What’s the Difference?
Here’s where toilet design really affects your repair strategy. Two-piece toilets – where the tank and bowl are separate pieces bolted together – are what we focused on in our step-by-step guide. These are the most common type, and they’re generally easier to work on because you can remove the tank completely.
One-piece toilets, on the other hand, have the tank and bowl molded as a single unit. They look sleek and modern, but they can make your toilet flush valve replacement a bit trickier. Since you can’t lift the tank off, you’ll need to work entirely from inside the tank area.
The fastening process is often different too. Instead of a large nut underneath the tank, one-piece toilets might use a fastening screw and claw mechanism that secures from inside. The good news is that manufacturers usually provide specific guidance – like these instructions for one-piece toilets from Gerber.
Before you start your project, take a moment to identify which type you’re working with. It’ll save you confusion later and help you gather the right tools from the start.
When to Call a Professional Plumber
Look, we’re all for the DIY spirit! There’s something deeply satisfying about fixing your own toilet and knowing you saved a few bucks. But let’s be honest – sometimes a toilet flush valve replacement can throw you a curveball that’s better handled by someone with more experience under their tool belt.
You know that moment when you’re knee-deep in a repair and suddenly think, “Uh oh, this isn’t going as planned”? That’s your cue to step back and consider calling in the pros.
Rusted or stubborn bolts are probably the most common roadblock we hear about. Those tank bolts can get seriously corroded over time, especially in areas with hard water. When they won’t budge, your first instinct might be to apply more force – but trust us, that’s a recipe for disaster. Stripped bolt heads or cracked porcelain will turn your simple flush valve replacement into a much bigger (and more expensive) project.
Speaking of cracked porcelain, if you spot any cracks in your toilet tank or bowl during the process, stop what you’re doing immediately. A crack means the structural integrity is compromised, and no amount of flush valve magic is going to fix that. You’ll likely need a whole new toilet, and that’s definitely professional territory.
Maybe you followed our step-by-step guide to the letter, but you’re still dealing with persistent leaks after your repair. This can be frustrating! It might mean the new parts are defective, something wasn’t installed quite right, or there’s an underlying issue that wasn’t obvious at first glance. A professional can quickly diagnose what’s going wrong.
Some complex toilet models – especially high-tech ones with fancy features or really old vintage toilets – can have flush valve systems that are more intricate than your standard setup. If you’re staring at your toilet’s innards thinking it looks nothing like our guide, that’s a sign you might need someone familiar with your specific model.
And here’s something we always tell folks: there’s absolutely no shame in admitting you’re not comfortable with the repair or simply don’t have the time to tackle it properly. Your peace of mind is worth more than the money you might save doing it yourself.
At Go Pro Plumbing, we’ve seen it all when it comes to toilet repairs, including every type of toilet flush valve replacement you can imagine. We offer same-day service throughout Northern California because we know a broken toilet can’t wait. Whether you’re in Sacramento, Rancho Cordova, or anywhere else in our service area, we’re here to help get your toilet back to perfect working order without the stress.
Don’t let a leaky toilet turn into a weekend-ruining project. You can find a toilet repair plumber in Sacramento, CA or check out our complete range of professional toilet plumbing services to see how we can help.
Frequently Asked Questions about Toilet Flush Valves
We love helping homeowners understand their toilets better! After years of toilet flush valve replacement calls, we’ve noticed the same questions come up again and again. Let’s explore the most common ones that might be on your mind too.
How long does a toilet flush valve last?
Most toilet flush valves have a typical lifespan of 5 to 10 years, though the rubber flapper component often needs attention first. Think of it like the tires on your car – they’re doing all the hard work and naturally wear out faster than other parts.
Several factors can either extend or shorten your flush valve’s life. Hard water is probably the biggest troublemaker we see. All those minerals floating around in your water supply love to build up on valve components, making rubber parts stiff and creating rough surfaces that prevent proper sealing.
Chemical cleaners are another culprit that surprises many homeowners. Those convenient drop-in tank cleaners might seem like a great idea, but they often contain harsh chemicals that eat away at rubber seals and flappers. We generally recommend steering clear of them if you want your flush valve to last.
Usage frequency matters too, of course. A toilet in the main family bathroom will naturally wear out faster than one in a rarely-used guest powder room. And like most things in life, material quality makes a real difference – investing in a higher-quality flush valve with durable plastics and robust rubber components usually pays off in the long run.
The key is keeping an eye on your flapper for early warning signs like stiffness, cracks, or that slimy feeling that tells you it’s time for a change.
Can I just replace the flapper instead of the whole flush valve?
In many cases, yes, you can just replace the flapper – and it’s definitely the easier route. If your toilet is running or you hear that annoying trickling sound, a worn-out flapper is often the only problem. A simple flapper swap is quicker, cheaper, and much less involved than a full toilet flush valve replacement.
But sometimes the flapper is just the messenger, not the real problem. If you’ve got a warped valve seat – that’s the surface where the flapper sits to create the seal – even a brand-new flapper won’t be able to do its job properly. The valve seat might be rough, pitted, or warped from years of use, and no amount of flapper-swapping will fix that.
Cracked or damaged overflow tubes are another sign you’ll need the whole valve assembly. If that plastic tube is broken, you’re looking at a complete replacement job. Same goes for mechanical failures in those newer canister-style valves – when the internal mechanism gives up, a new flapper won’t help.
Our advice? Start with the flapper if that’s what looks problematic. It’s an easy test, and you’ll know pretty quickly if that solved your issue. If the problem persists after a new flapper, then it’s time to consider replacing the entire flush valve.
How much water does a leaking flush valve waste?
Brace yourself for this one – a leaking flush valve can waste an absolutely shocking amount of water. We’re talking about hundreds of gallons per day from a continuously running toilet. Even what seems like a tiny, barely-there leak can waste 200 gallons or more daily. Over a month, that adds up to thousands of gallons!
All that wasted water shows up directly on your water bill, and many of our customers are genuinely stunned when they see how much money they’ve been literally flushing away. Once we fix their flush valve, their next water bill often drops dramatically.
The sneakiest leaks are the “silent” ones – they’re so quiet you might not even know they’re happening. The water trickles so slowly that you can’t hear it, but your water meter is still spinning.
Here’s a simple trick to check for these silent leaks: drop a few drops of food coloring (dark blue or red works best) into your toilet tank. Wait about 15-20 minutes without flushing. If you see any colored water appear in the toilet bowl, you’ve got a leak, and your flush valve or flapper is likely the cause.
Taking care of a leaking flush valve quickly is honestly one of the easiest ways to save water and money – plus you’ll finally get some peace and quiet from that annoying running sound!
Save Water and Money with a New Flush Valve
Taking care of a faulty flush valve isn’t just about stopping that annoying running sound – it’s one of the smartest home improvements you can make. When you invest in a toilet flush valve replacement, you’re actually investing in your home’s efficiency and your own peace of mind.
The benefits start showing up immediately. Water conservation becomes automatic once your toilet stops its constant dripping and running. You’ll be amazed at how much water a single faulty valve can waste – we’re talking hundreds of gallons that were literally going down the drain every month.
Your lower utility bills will be the most welcome surprise. Many homeowners tell us they wish they’d fixed their flush valve sooner after seeing their water bills drop. The money you save often pays for the repair kit and your time many times over, making this one of those rare home repairs that actually puts money back in your pocket.
But the benefits go beyond your wallet. Improved toilet performance means your bathroom works the way it should – quiet refills, effective flushes, and no more middle-of-the-night phantom flushing sounds. Your daily routine becomes smoother when your toilet just works reliably.
Perhaps most importantly, you’re preventing further damage to your home. A simple flush valve repair now protects other toilet components from wearing out prematurely and keeps water damage from creeping into your bathroom floor.
Whether you decide to tackle this DIY project yourself or call our expert team at Go Pro Plumbing, addressing that faulty flush valve is always a smart move. Don’t let a small leak turn into a big headache or an expensive emergency repair.
For all your toilet needs – from a simple toilet flush valve replacement to more complex plumbing challenges – we’re here to help. Explore our comprehensive toilet services and find how we can keep your home running smoothly and efficiently.