
Fixing Your Bathtub Leak Without Calling a Plumber
By Brian on August 15, 2026
A Small Leak Above Your Ceiling Could Be Costing You Thousands
A bathtub overflow leak is one of the most common — and most ignored — plumbing problems in homes. And it can get expensive fast.
Quick answer: Most bathtub overflow leaks are caused by a worn rubber gasket behind the overflow plate. Here’s what to know:
- Most common cause: Deteriorated rubber gasket (80% of cases)
- Other causes: Loose overflow plate screws (15%), cracked overflow pipe (5%)
- Typical repair cost: $15–$35 in parts if you DIY
- Time to fix: 30–45 minutes for most homeowners
- Risk of ignoring it: Mold can start growing within 24–48 hours; structural repairs can run into the thousands
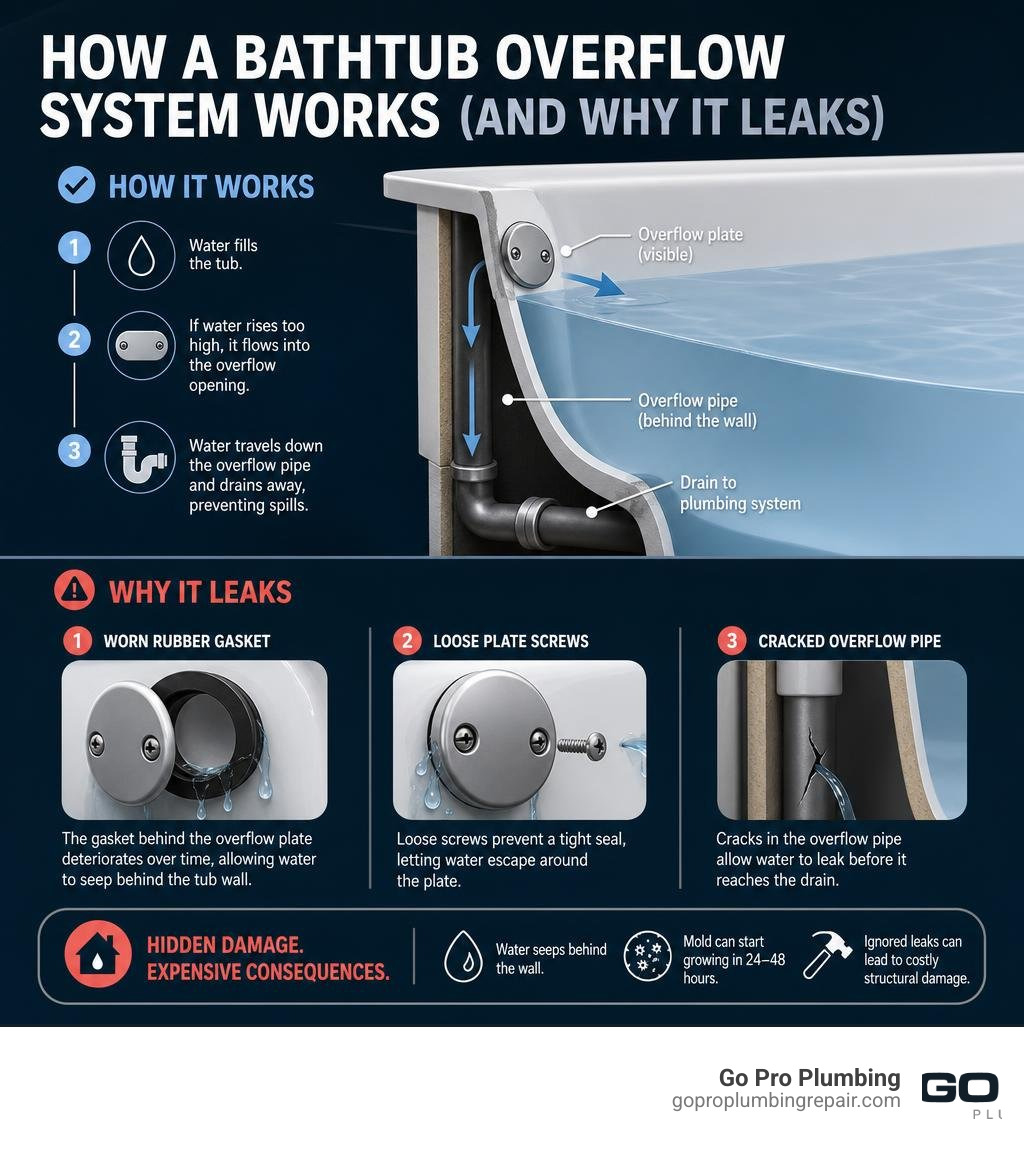
The overflow drain is the oval opening near the top of your tub wall. It’s a safety feature — it catches excess water before it spills over the rim. But when the rubber gasket behind it breaks down, water sneaks behind the tub wall instead of going down the drain.
The damage is hidden at first. Then one day you notice a water stain on the ceiling below your bathroom. Or a musty smell that won’t go away. By then, the damage is already done.
One homeowner ignored a small drip for just three months and ended up with $12,000 in structural repairs and mold remediation. That’s the real cost of waiting.
The good news? In most cases, this is a repair you can handle yourself in under an hour with basic tools.
Relevant articles related to Bathtub overflow leak:
Understanding and Diagnosing a Bathtub Overflow Leak
To successfully tackle a bathtub overflow leak, you first need to understand the mechanics at play behind your tub wall. The overflow drain is more than just a decorative metal plate; it is a critical safety feature of your home’s waste-overflow assembly.
When you fill your bathtub or when children splash around, the water level rises. If it reaches the overflow plate, the water is supposed to enter the opening and travel down the overflow tube. This tube completely bypasses the main tub floor drain, routing the excess water directly into your home’s P-trap. This essential design prevents accidental floods if a tap is left running or if the drain stopper remains closed. However, because this system remains hidden behind the tub wall, a failure in its components can quietly cause severe structural damage before you ever see a drop of water.

So, why does this safety system fail? According to industry statistics, there are three primary culprits behind a leaking overflow drain:
- Deteriorated Rubber Gaskets (80% of cases): The gasket is a circular, tapered seal made of rubber or neoprene that sits between the back of the bathtub wall and the metal flange of the overflow pipe. Over time, constant exposure to water, fluctuating temperatures, and soap scum causes this rubber to dry out, crack, compress, or rot.
- Loose Overflow Plate Screws (15% of cases): Sometimes, the screws holding the faceplate to the internal bracket back out due to normal structural vibrations or physical impact. When these screws loosen, the compression on the rubber gasket is lost, allowing water to slip past the seal.
- Cracked or Damaged Pipes (5% of cases): In rare instances, the overflow pipe itself (whether old brass or PVC) can crack, split, or pull away from the main drain assembly.
In Northern California, particularly around Sacramento and Rancho Cordova, our local hard water plays a significant role in accelerating these failures. The high mineral content in our water leaves behind calcium and magnesium deposits. These rough mineral scale buildups act like sandpaper against the rubber gasket every time the tub is filled, causing the seal to fail much sooner than the typical 8-to-12-year lifespan.
If you suspect you have a leak but cannot pinpoint the exact source, utilizing a professional Leak Detection Sacramento service is the safest way to prevent extensive drywall damage.
For a deeper technical dive into the mechanics of this system, you can read the resource on Tub Overflow — How the Safety Drain Works and Why It Leaks | Jaspector.
How to Tell the Difference: Overflow Leak vs. Main Drain Leak
It is incredibly common for homeowners to mistake a bathtub overflow leak for a main drain line issue, leading them to cut unnecessary holes in their downstairs ceilings. Before you start pulling things apart, use this handy comparison table to diagnose the exact location of your leak:
| Feature / Symptom | Bathtub Overflow Leak | Main Drain Line Leak |
|---|---|---|
| When does the leak occur? | Only when the tub is filled high, during active splashing, or when showering. | Every single time water drains out of the tub, regardless of the water depth. |
| Is the leak continuous? | No. It stops once the water level falls below the overflow plate. | No, but it recurs consistently whenever the drain stopper is opened. |
| Visual ceiling damage pattern | Stains or drips align with the front end of the tub where the overflow pipe descends. | Stains align directly beneath the tub’s floor drain or P-trap assembly. |
| Puddle testing method | Pour water directly into the overflow opening using a cup to see if it triggers the leak. | Fill the bottom of the tub with 2 inches of water (below the overflow) and release the stopper. |
How to Fix a Leaky Bathtub Overflow Gasket
If you have confirmed that the leak only occurs when water reaches the overflow level, you are in luck. Replacing a failed overflow gasket is widely considered one of the easiest and most cost-effective DIY plumbing repairs a beginner can perform.
Instead of paying for a professional service call, you can typically purchase a high-quality replacement gasket kit for $15 to $35. Taking the DIY route not only saves you immediate labor costs but also protects your home from catastrophic water damage that could cost thousands of dollars to remediate. For a comprehensive overview of the repair process, you can consult this guide on How to Fix a Leaky Bathtub Overflow Tube.
Tools and Materials Needed for a Bathtub Overflow Leak Repair
Before you begin, gather the following basic tools and materials:
- Screwdriver: A flathead or Phillips screwdriver (depending on your overflow faceplate screws).
- Needle-Nose Pliers: Crucial for extracting the old, brittle gasket if it is stuck behind the tub.
- Replacement Overflow Gasket: A new tapered rubber or neoprene gasket. (Tip: Foam gaskets are available, but soft rubber gaskets stretch better and provide a superior, long-lasting seal).
- Rubbing Alcohol and a Rag: To thoroughly clean the mounting surface on the back of the tub.
- Plumber’s Putty or Silicone Caulk (Optional): Some homeowners like to apply a thin bead of silicone or a small rope of plumber’s putty around the front of the gasket for an extra layer of protection, though a high-quality gasket installed correctly does not strictly require it.
Step-by-Step Gasket Replacement Process
Follow these clear, step-by-step instructions to replace your worn-out gasket:
- Prep the Area: Place a washcloth or towel over the main tub drain. This is a lifesaver—it prevents you from accidentally dropping the small faceplate screws down the drain!
- Remove the Faceplate: Unscrew the one or two screws securing the metal overflow cover plate to the tub wall. Carefully pull the plate away. If your tub uses a trip-lever drain stopper, the plate will be connected to a metal linkage rod. Gently pull this rod up and out of the overflow pipe.
- Extract the Old Gasket: Look inside the overflow hole. You will see the rubber gasket squished between the back of the tub wall and the metal pipe flange. Use your needle-nose pliers or a flathead screwdriver to carefully peel and pull the old gasket out. Be gentle so you don’t push the overflow pipe too far back. (Note: The pipe should have about 1/4 to 1/2 inch of play or movement, which is normal and helps you slide the new gasket in).
- Clean the Mounting Surface: Dip a rag in rubbing alcohol and reach inside the overflow hole. Scrape away any old plumber’s putty, mineral scale, or soap scum buildup on both the back of the tub wall and the front face of the pipe flange. A clean, smooth surface is absolutely vital for the new gasket to create a watertight seal.
- Position the New Gasket: Take your new gasket and notice its shape. Bathtub overflow gaskets are tapered (beveled) to match the sloping angle of the tub wall. The thick side of the gasket must face downward, while the thinner side faces upward. Slide the gasket through the overflow hole and position it securely between the pipe flange and the back of the tub. Ensure it is perfectly centered around the opening.
- Reinstall the Faceplate: If your system has a linkage rod, feed it back down into the pipe. Align the faceplate over the overflow hole. Ensure the notch or slot at the bottom of the faceplate is pointing directly down (this allows any water that splashes onto the front of the plate to drain back into the tub).
- Secure the Screws: Insert the screws and hand-tighten them first. Use your screwdriver to tighten them the rest of the way, alternating back and forth between the two screws to ensure even pressure. Tighten them snugly to compress the rubber gasket, but do not overtighten, as this can crack your tub’s porcelain/acrylic finish or strip the brass threads behind the wall.
How to Test Your Bathtub Overflow Leak Repair
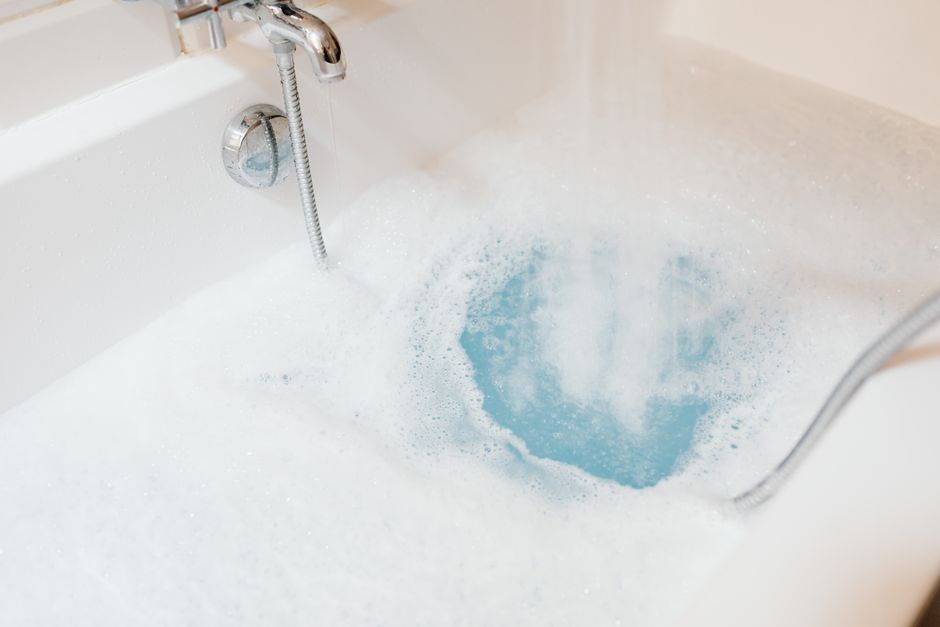
Once your new gasket is installed, you must perform a thorough draining test to verify that the leak is completely resolved before you close up any access panels or declare the job finished.
- Step 1: Close the main tub stopper.
- Step 2: Fill the bathtub with cold water (using cold water is a great energy-saving practice during plumbing tests). Fill it all the way up until the water level reaches and actively flows directly into the overflow plate openings.
- Step 3: Let the water run into the overflow for 2 to 3 minutes.
- Step 4: Shut off the water faucet.
- Step 5: Inspect the connection points. If your bathroom has an access panel behind the tub (often located in an adjacent closet or hallway wall), open it and shine a flashlight on the overflow assembly. You can place a dry piece of brown paper or a paper towel directly beneath the pipe to catch and easily visualize even the tiniest falling water droplet.
- If you do not have an access panel, closely monitor the ceiling directly below the bathroom for any signs of fresh moisture or dripping. If the paper towel or ceiling remains dry, your repair is a success!
Troubleshooting Continued Leaks
If you complete the test and find that water is still dripping behind the tub, do not panic. There are a few common installation errors and secondary issues to check:
- Improper Gasket Placement: Over 60% of continued leaks are caused by the gasket shifting out of alignment during faceplate installation, or because the gasket was installed upside down (with the thin side facing down instead of the thick side).
- Misaligned or High Pipe: If the previous installer set the overflow pipe slightly too high or at an angle, the gasket may not compress evenly. You may need to loosen the screws, realign the pipe flange, and retighten.
- Rusted or Stripped Screws: If the screws are rusted, they may feel tight even though they haven’t fully compressed the gasket against the tub wall. Replace them with fresh brass screws.
- Cracked Overflow Pipe: If the gasket is perfectly sealed but water is still leaking, the metal or PVC overflow pipe itself may have a hairline crack.
If you’ve tried adjusting the gasket and the leak persists, it is time to bring in professional equipment. As a leading Water Leak Company Sacramento CA, we can quickly locate hidden structural leaks and resolve complex pipe misalignments.
Preventing Future Leaks and Understanding Water Damage Risks
Ignoring a bathtub overflow leak is a recipe for property damage. Because the water leaks behind the tub wall and down into the floor joists, the damage is completely hidden from view until it becomes a major problem.
Within just 24 to 48 hours of exposure to moisture, mold and mildew can begin to colonize hidden wall cavities and ceiling spaces. This poses serious respiratory health risks to your family and pets. Over time, the wood framing, subflooring, and ceiling drywall will absorb this water, leading to dry rot, structural sagging, and eventually a ceiling collapse.
To protect your home and avoid needing an Emergency Plumbing Leak Repair, implement these simple preventative maintenance habits:
- Annual Visual Inspections: Once a year, take a few minutes to inspect your overflow plate. Ensure the screws are tight and look closely inside the slot with a flashlight to check if the rubber gasket looks cracked or dry.
- Adjust Your Shower Head: If your shower head is angled so that water constantly sprays directly onto the overflow faceplate, adjust it. Constant direct water pressure can wear down the seal prematurely.
- Avoid Harsh Chemical Drain Cleaners: Caustic chemical drain openers generate extreme heat and contain harsh acids that rapidly degrade rubber and neoprene gaskets. Use enzyme-based cleaners or a mechanical drain snake instead.
- Monitor Bath Time: Avoid submerging the overflow plate repeatedly or leaving children unattended in a deep tub where constant heavy splashing occurs.
Frequently Asked Questions About Bathtub Leaks
When should I call a professional plumber instead of attempting a DIY fix?
While a simple gasket swap is highly doable, you should put down the wrench and call a licensed professional if you encounter any of the following scenarios:
- Cracked or Corroded Pipes: If you shine a light behind the tub and notice the brass or PVC overflow tube is cracked, split, or heavily corroding, you will need a complete Pipe Replacement Sacramento CA to ensure a safe, code-compliant repair.
- No Pipe Movement: If the overflow pipe behind the tub wall is completely rigid and has zero movement, you won’t be able to slide the new gasket in without damaging the assembly.
- Severely Rusted or Stripped Screws: If the faceplate screws are rusted solid and snap off inside the brass mounting flange, extracting them requires specialized tools.
- Active Ceiling Leaks: If water is actively pooling or dripping through your downstairs ceiling, this is a plumbing emergency that requires immediate professional extraction and repair.
Can I use silicone caulk instead of replacing the gasket?
Using silicone caulk as a substitute for a new rubber gasket is highly discouraged. While it might seem like an easy shortcut to just slather silicone around a leaky gasket, it is only a temporary band-aid.
The constant water pressure, temperature changes from hot baths, and structural vibrations will cause silicone to fail and peel away within a few months. Furthermore, applying silicone from behind the tub wall can trap water against your tub’s exterior, leading to rust and mold. Replacing the gasket is the only reliable, long-term solution.
Does homeowners insurance cover bathtub overflow leaks?
In most cases, homeowners insurance coverage depends entirely on the cause and duration of the leak:
- Covered: If the leak was caused by a sudden, accidental event—such as a child accidentally leaving the bathtub faucet running, causing a one-time major overflow that damaged the ceiling downstairs—insurance will typically cover the dryout and structural repairs.
- Not Covered: If the insurance adjuster determines that the water damage was caused by a slow, ongoing leak from a deteriorated gasket that you neglected to fix over several months, the claim will likely be denied due to “maintenance neglect.” This is why addressing a bathtub overflow leak immediately is so critical. Always document the repair process with photos to provide clear evidence to your insurance provider.
Conclusion
A bathtub overflow leak is a small plumbing issue that can quickly escalate into a multi-thousand-dollar home disaster if left unchecked. Fortunately, armed with a screwdriver, a new $20 rubber gasket, and 30 minutes of your time, you can easily protect your home from water damage and mold growth.
However, plumbing repairs don’t always go strictly according to plan. If you run into stubborn, rusted screws, cracked drain pipes, or if you simply prefer the peace of mind that comes with professional installation, our team is here to help.
At Go Pro Plumbing, we provide premier residential and commercial plumbing services across Sacramento, Rancho Cordova, and the greater Northern California region. We are fully committed to outstanding customer service and offer same-day service to get your home back in perfect working order. Don’t let a small drip turn into a major headache—visit our Go Pro Plumbing Showers and Tubs Services page or contact us today to schedule your professional inspection!