
How to Fix a Toilet Tank Leak in 7 Simple Steps
By Brian on September 22, 2026
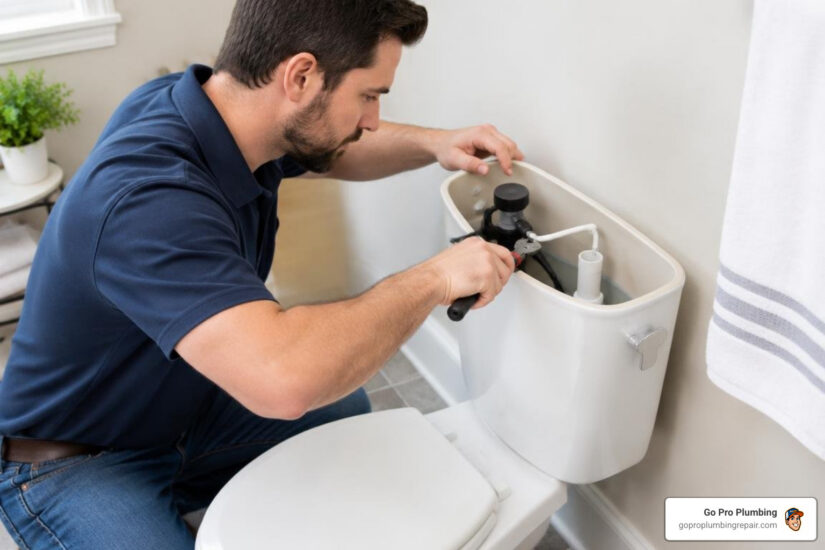
Stop a Toilet Tank Leak Before It Wastes Water
To fix a toilet tank leak, first turn off the water valve behind the toilet and find out where the water is going. Water appearing in the bowl usually points to a worn flapper or a fill-valve problem. Water on the floor often comes from the supply connection, tank bolts, or the gasket between the tank and bowl.
Most common tank repairs take less than 30 minutes with basic tools. Start with these checks:
- Add a few drops of food coloring to the tank and wait 15 to 20 minutes without flushing. Color in the bowl means an internal leak.
- Dry the outside of the tank, connections, and floor. Press paper towels around bolts, the supply line, and the tank-to-bowl seam to find an external drip.
- Replace worn rubber parts, adjust the fill valve, or reseal the tank as needed.
A running or silently leaking toilet can waste up to 200 gallons a day. Catching it early can protect your floor and may reduce your water bill.
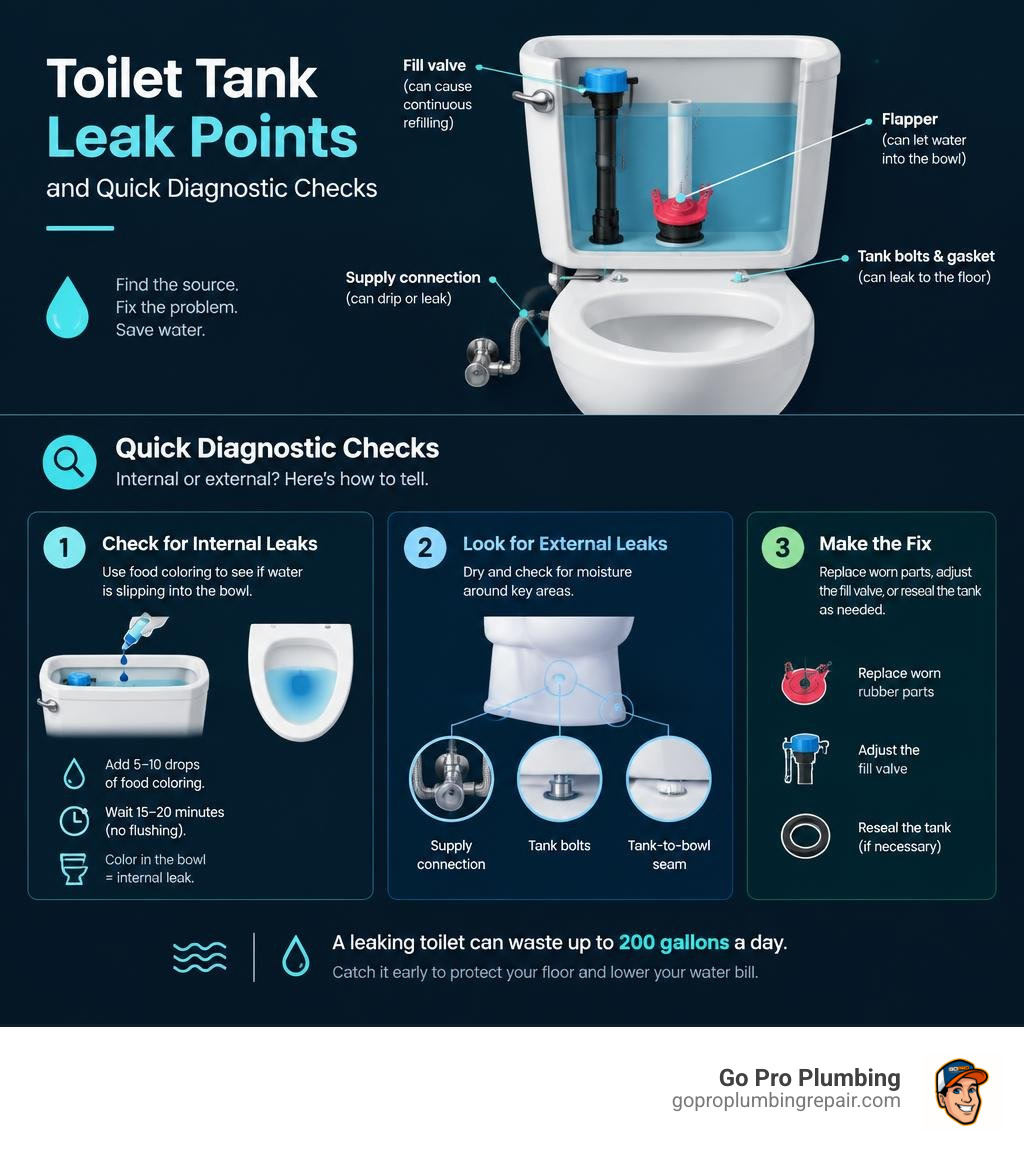
Diagnosing the Leak: Internal vs. External Toilet Issues
Before reaching for your wrench, you need to know exactly what kind of leak you are dealing with. Toilet tank leaks fall into two main categories: internal leaks, where water slips silently into the bowl, and external leaks, where moisture pools on your bathroom floor. Knowing the difference saves you time, prevents unnecessary part replacements, and stops water damage in its tracks.
For internal leaks, use the food coloring test (also known as the silent leak dye test). Remove the tank lid and place 5 to 10 drops of dark food coloring directly into the tank water. Do not flush the toilet. Wait 15 to 20 minutes. If the water in your toilet bowl turns colored, water is seeping past the flush valve seal or flapper. Internal leaks often cause “ghost flushing”—that eerie moment when your toilet randomly refills for a few seconds in the middle of the night without anyone touching the handle. If you notice your fixture cycling on and off, learning how to fix a running toilet will help you resolve the internal seepage quickly.
External leaks require a different approach. First, determine whether moisture on the outside of the porcelain is active leakage or simple tank condensation (“tank sweating”). When warm, humid bathroom air hits a cold porcelain tank filled with fresh groundwater, moisture beads up on the exterior surface.
To confirm an active leak, thoroughly dry the tank exterior, the supply line, and the floor with a towel. Lay fresh paper towels directly under the tank bolts, around the water supply line nut, and beneath the base of the tank. Check back after 15 minutes. Wet spots on the paper towels pinpoint the exact origin of the drip. You can consult How to Fix a Toilet That’s Leaking From the Tank for additional diagnostic insights when isolating tricky external seepage.
Sizing Your Flush Valve: 2-Inch vs. 3-Inch Models
When buying replacement parts, one size does not fit all. Modern toilets feature different flush valve diameters depending on their age and engineering.
- 2-inch flush valves: Found in standard residential toilets built before 2005 as well as many traditional fixtures today. The flapper opening at the bottom of the tank measures roughly 2 to 2.5 inches in diameter, and the flapper itself is about 3 inches across.
- 3-inch (or 4-inch) flush valves: Standard on high-efficiency toilets (HET) engineered to clear waste using less water (1.28 to 1.6 gallons per flush). These larger valves deliver a faster, more forceful rush of water into the bowl. The flapper itself typically measures 4 inches or wider across its top face.
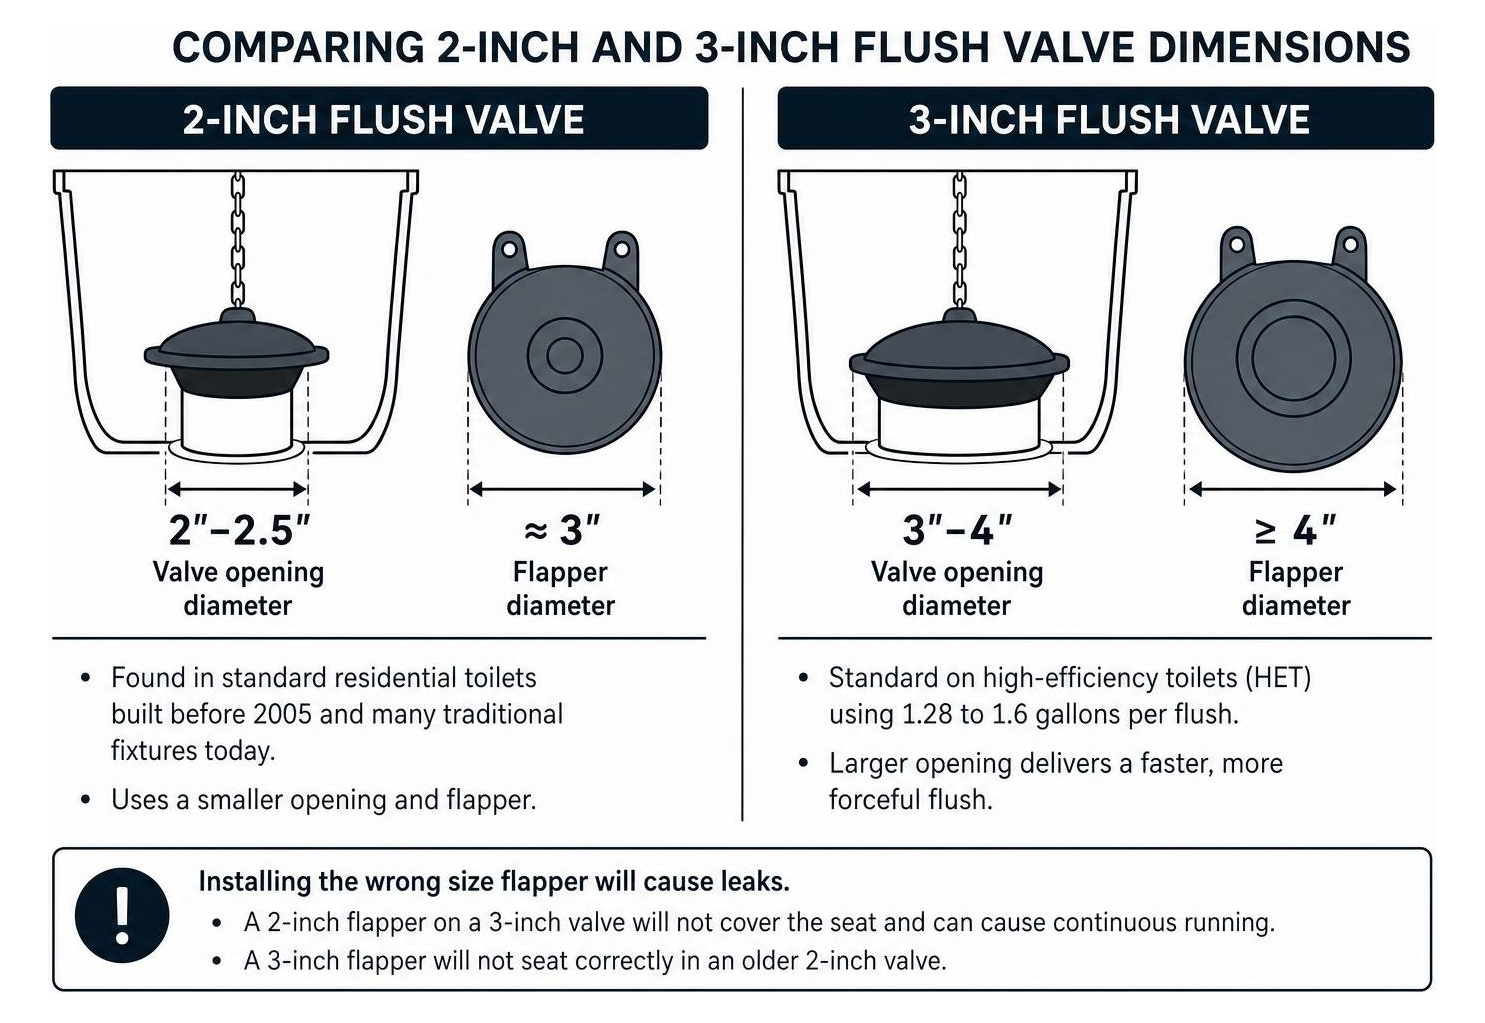
Installing a 2-inch flapper on a 3-inch valve will cause continuous running because the rubber cannot cover the seat. Conversely, a 3-inch flapper will not seat correctly inside an older 2-inch assembly. If you have a modern high-efficiency toilet, review our toilet repair kit 3 inch guide before purchasing replacement components.
7 Practical Steps to Fix Toilet Tank Leaks
Most internal and external tank repairs take less than an hour to complete. By following a structured process, you can repair cracked seals, restore proper water levels, and stop running water without damaging the porcelain.
| Issue | Common Symptoms | Primary Fix |
|---|---|---|
| Worn Flapper | Ghost flushing, dye in bowl during test | Replace flapper and adjust chain |
| Faulty Fill Valve | Constant hissing, water spilling into overflow tube | Clean valve cap or replace fill valve |
| Degraded Gasket | Water pooling between tank and bowl on flush | Replace tank-to-bowl spud gasket |
| Loose Tank Bolts | Steady drip from bolt heads under the tank | Replace rubber washers and brass bolts |
| Supply Line Leak | Wet connection at bottom of fill valve | Tighten or replace braided supply line |
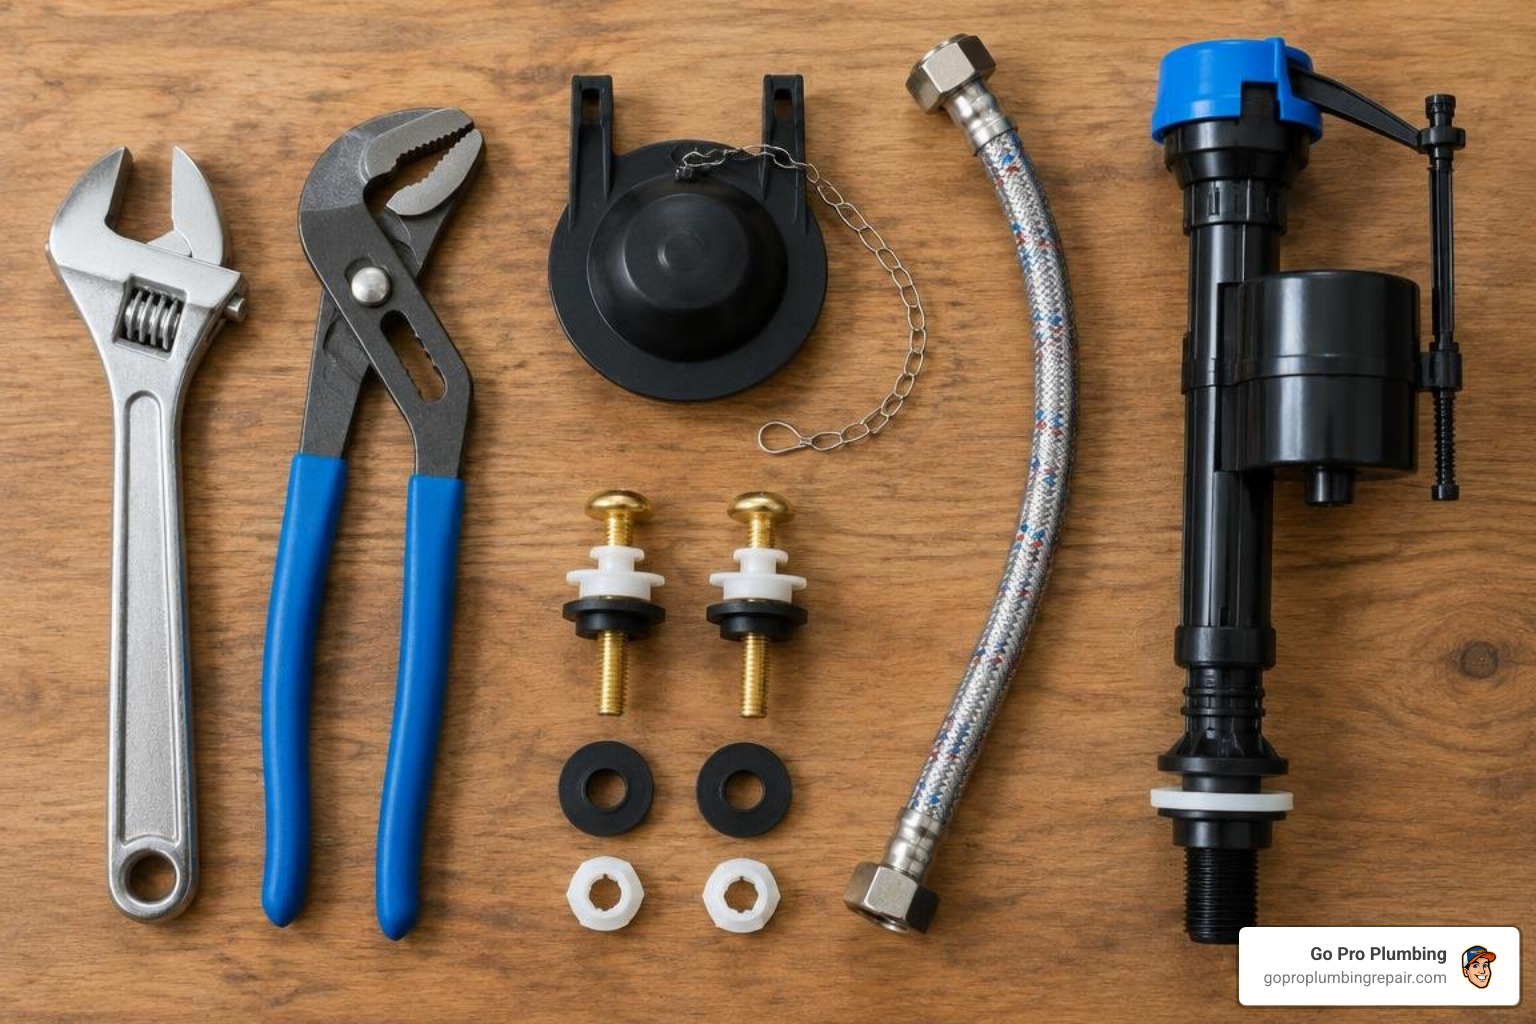
Prepare Tools and Materials to Fix Toilet Tank Issues
Having the correct tools on hand prevents unnecessary trips to the hardware store and eliminates the risk of cracking delicate porcelain fixtures:
- Adjustable wrench & Channel-lock pliers: For loosening supply nuts and brass tank bolts. (Avoid heavy-duty pipe wrenches, which can easily crack porcelain.)
- Flathead screwdriver: To hold tank bolts steady from inside the tank while loosening locknuts underneath.
- Sponge, bucket, and old towels: To catch residual water when the tank drains.
- Replacement parts: A universal flapper (or brand-specific 2″ or 3″ model), a modern fill valve (such as the high-performance Fluidmaster 400H), and a universal tank-to-bowl gasket kit with rubber washers and solid brass bolts.
For a comprehensive overview of parts compatibility, check our step by step guide to toilet parts replacement.
Steps 1 & 2: Shut Off Water Supply and Drain the Tank
Step 1: Shut Off the Water
Locate the oval shutoff valve (angle stop) on the wall beneath the left side of the toilet tank. Turn the handle clockwise until it stops. If the valve feels stiff, turn it gently to avoid snapping older copper piping.
Step 2: Empty the Tank Completely
Flush the toilet and hold the handle down until almost all the water drains into the bowl. Remove the tank lid and set it safely on a flat, carpeted or towel-lined surface. Use a large car-washing sponge to soak up the remaining 1 to 2 inches of standing water at the bottom of the tank, wringing it out into your bucket until the tank is completely dry.
Step 3: Replace the Flapper to Fix Toilet Tank Running Water
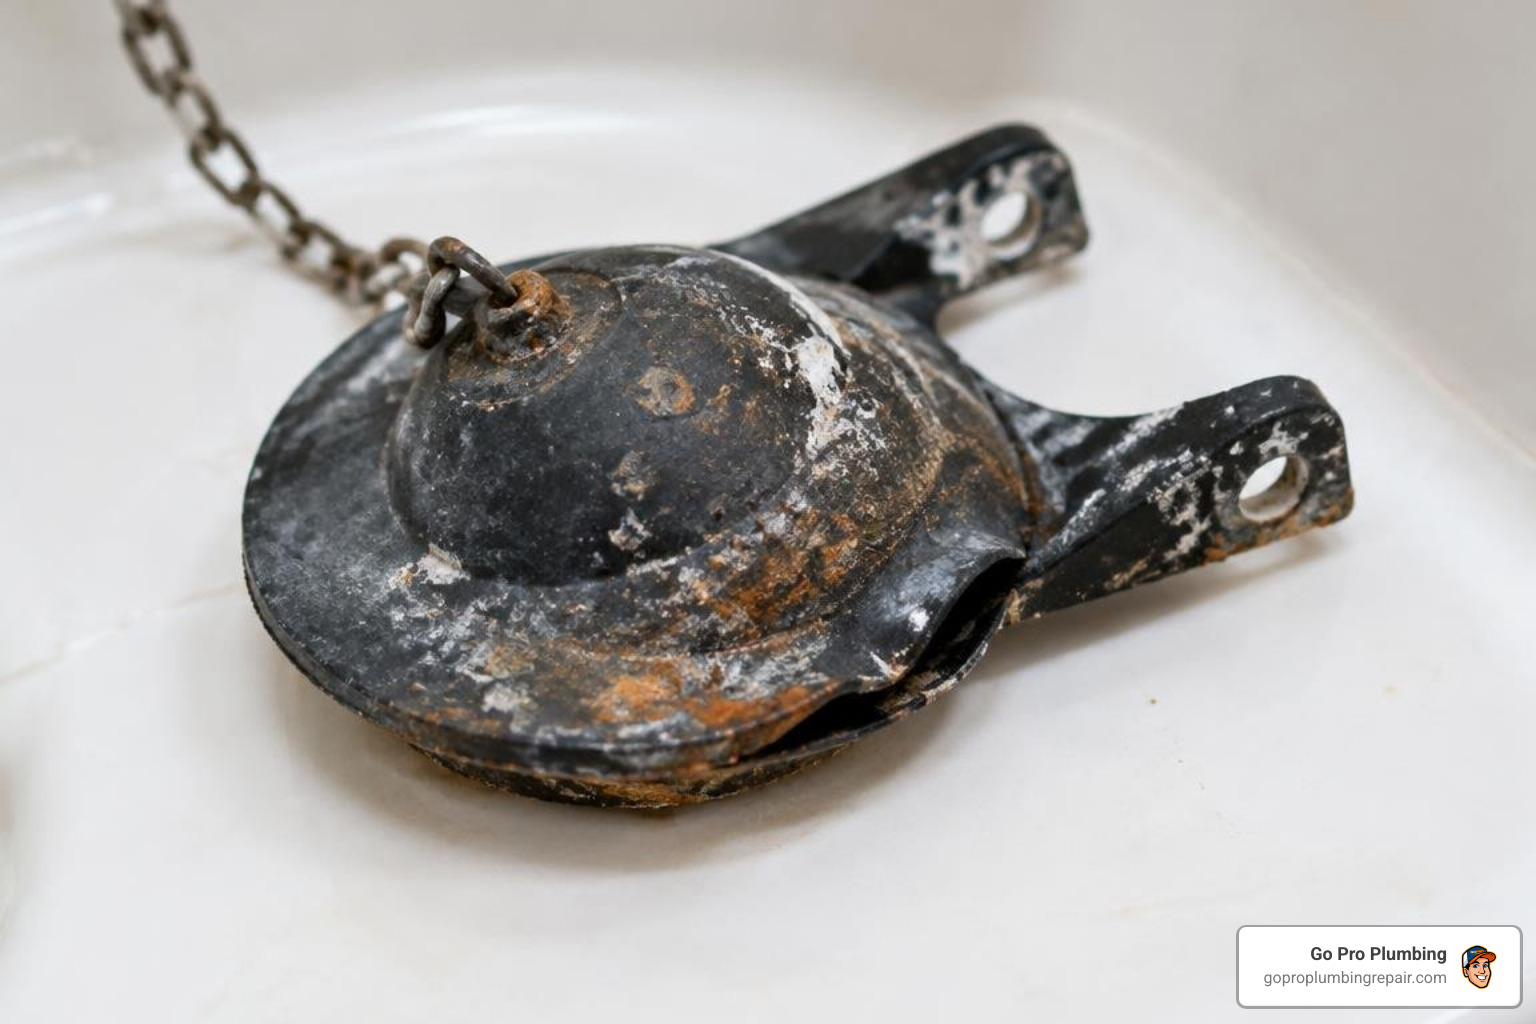
A deteriorated rubber flapper is responsible for over 90% of running toilet issues. Over time, municipal chloramines cause rubber seals to warp, blister, and lose their watertight bond against the flush valve seat.
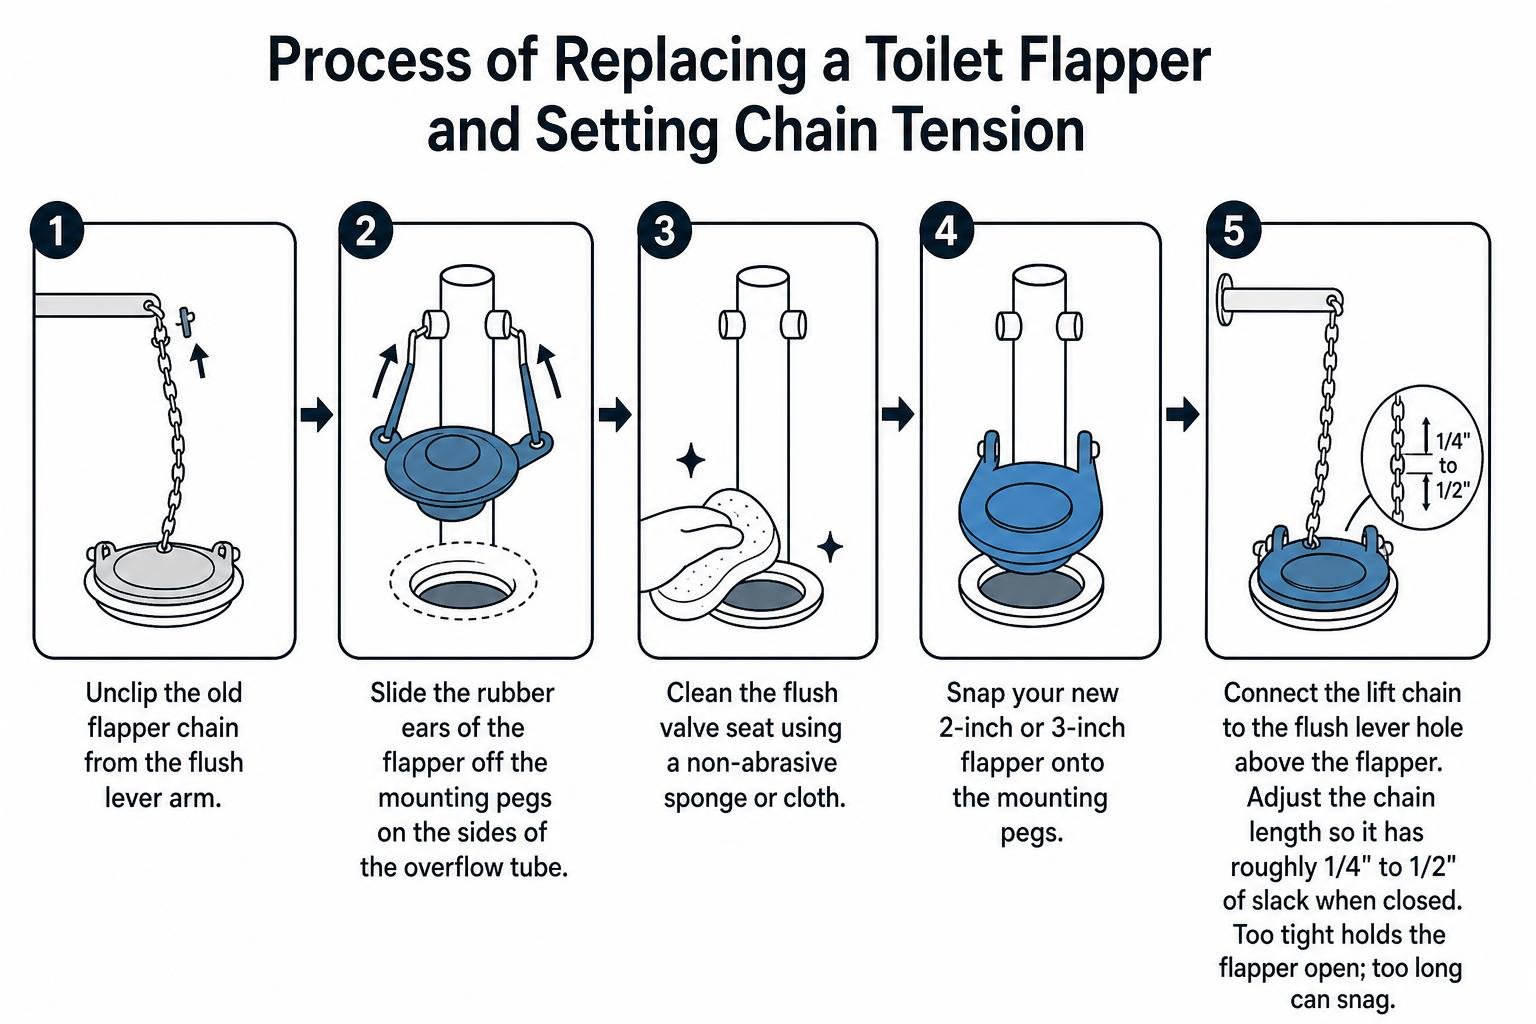
- Unclip the old flapper chain from the flush lever arm.
- Slide the rubber ears of the flapper off the mounting pegs located on the sides of the vertical overflow tube.
- Clean the flush valve seat using a non-abrasive sponge or cloth to remove built-in mineral scale and slime.
- Snap your new 2-inch or 3-inch flapper onto the mounting pegs.
- Connect the lift chain to the flush lever hole directly above the flapper. Adjust the chain length so it has roughly 1/4 to 1/2 inch of slack when closed. If the chain is too tight, it will hold the flapper slightly open; if it is too long, it can snag beneath the rubber flap.
For detailed troubleshooting on chain tension and lever alignment, follow our toilet tank chain fix guide. To understand how simple rubber seal replacements eliminate phantom flushes, see Fix Your Running Toilet Tank: Stop Leaks and Constant Water Waste Now – Water System Wiki.
Step 4: Adjust or Replace the Fill Valve
If water is continuously hissing or spilling over the top of the open overflow tube, your fill valve needs adjustment or replacement.
- Adjust Float Height: Modern fill valves feature an adjustment screw on the float arm. Turn the screw counter-clockwise to lower the water shutoff point. The standing water line should sit roughly 1 inch below the top of the overflow pipe.
- Clear Internal Debris: Turn off the water, hold a cup upside down over the top of the fill valve cap, push down, and twist the cap 1/8 turn counter-clockwise. Slowly turn the water supply back on for 5 seconds to flush scale and sediment out of the valve body before replacing the cap.
- Full Valve Replacement: If the valve diaphragm has failed, unscrew the supply line nut under the tank, remove the plastic locknut securing the valve shank to the bottom of the tank, and lift the assembly out. Insert your new fill valve, ensuring the critical level mark (C.L.) molded on the valve body sits at least 1 inch above the top of the overflow tube per Universal Plumbing Code. Hand-tighten the bottom locknut, then add a half-turn with pliers. Clip the small black refill tube securely to the top of the overflow pipe.
For detailed steps on quieting erratic fill cycles, refer to the fill valve fix that saves your sanity.
Steps 5 & 6: Replace the Tank-to-Bowl Gasket and Bolts
If water leaks from beneath the tank whenever you flush, the large rubber spud gasket or the tank bolt washers have deteriorated.
Step 5: Disconnect and Remove the Tank
Disconnect the water supply line from the bottom of the fill valve. Using a flathead screwdriver inside the tank and an adjustable wrench on the nuts beneath the bowl, unscrew the two (or three) tank-to-bowl bolts. Carefully lift the porcelain tank straight up off the bowl and rest it on its side on soft towels. If your flush valve assembly is also damaged, review our guide on replacing toilet flush valve without removing tank to determine if complete valve replacement is necessary while the unit is disassembled.
Step 6: Install New Gaskets and Hardware
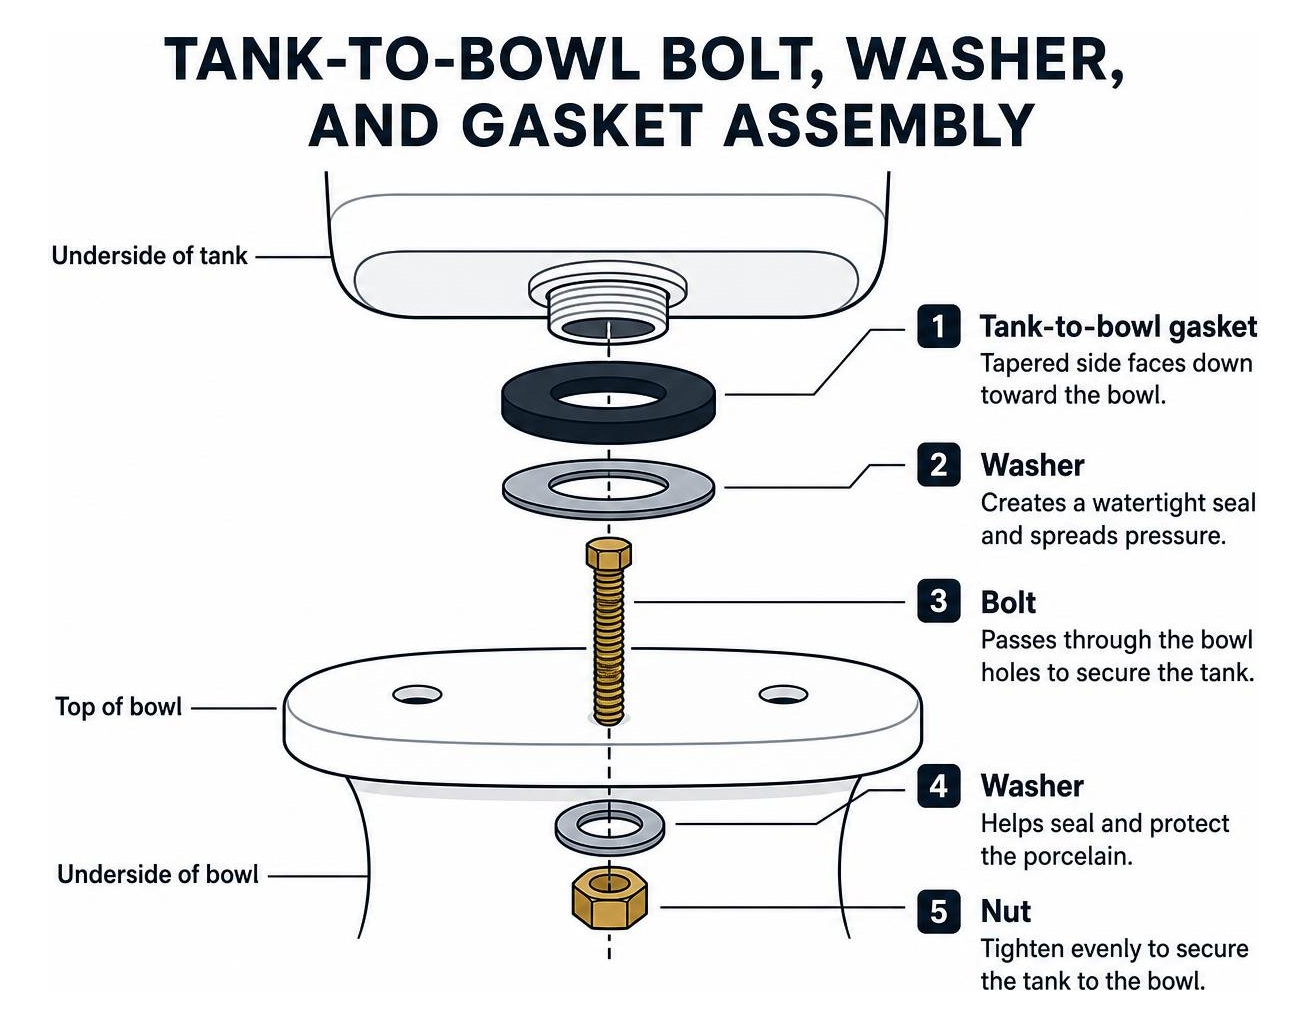
Peel the old, hardened foam or rubber spud gasket off the large threaded plastic flush valve nut on the underside of the tank. Press the new universal beveled gasket firmly over the nut with the tapered side pointing toward the bowl.
Slide new rubber washers onto your solid brass tank bolts, insert them through the holes inside the tank, and secure them against the bottom of the tank using a brass washer and hex nut. This “double-nutting” technique guarantees the bolt holes never leak even if the tank flexes slightly during use.
Step 7: Reattach the Tank and Test for Leaks
- Set the tank back onto the toilet bowl, guiding the bolts through the matching mounting holes.
- Thread a rubber washer, metal washer, and wing nut (or hex nut) onto each bolt under the bowl.
- Tighten the bolts alternating side to side—three turns on the left, three turns on the right—to compress the spud gasket evenly. Never overtighten. Tighten only until the tank rests firmly on the bowl without rocking.
- Reconnect your braided stainless steel water supply line. Hand-tighten the nut plus 1/4 turn with pliers.
- Turn the water shutoff valve slowly counter-clockwise to refill the tank. Observe the tank-to-bowl joint, bolt heads, and supply line connections for active drips.
- Flush the toilet three times and run a final food coloring dye test to verify an airtight, watertight seal.
Preventative Maintenance to Avoid Future Tank Damage
A few simple maintenance habits will extend the life of your toilet components and prevent unexpected bathroom floods:
- Semiannual Visual Inspections: Remove the tank lid twice a year. Check that the water level rests 1 inch below the overflow tube and verify that the flapper remains soft, supple, and free of mineral crust.
- Replace Rubber Parts Every 2 to 3 Years: Rubber components exposed to treated water naturally break down over time. Proactively swapping your flapper and fill valve seal every few years costs only a few dollars and prevents thousands of gallons of wasted water.
- Check Hardware Tension Annually: Give your tank a gentle nudge once a year. If the tank wobbles, tighten the mounting bolts slightly to maintain compression against the spud gasket.
- Keep Corrosive Chemicals Out of the Tank: Drop-in chemical tablets containing bleach or chlorine corrode rubber seals, crack plastic flush valves, and void manufacturer warranties.
When to Call a Licensed Plumber
While most toilet tank repairs make excellent DIY weekend projects, certain plumbing situations require professional equipment and expertise:
- Hairline Porcelain Cracks: If you notice cracks running through the tank wall or mounting bolt holes, the tank is structurally compromised and must be replaced immediately to prevent catastrophic flooding.
- Severely Corroded Bolts: When rusted steel bolts spin in place without loosening, attempting to force them with large tools can crack the porcelain. A plumber can safely cut through the hardware using specialized oscillating blades.
- Persistent Leaks or Damaged Shutoff Valves: If water continues dripping from behind the wall or the shutoff valve refuses to close completely, avoid high-pressure line failures by contacting a professional.
If you are dealing with hidden leaks, seized hardware, or complex fixture failures in Sacramento, Rancho Cordova, or surrounding Northern California communities, reach out to our licensed team for dedicated plumber for leaking toilet support and same-day service.
Frequently Asked Questions About Toilet Tank Repair
Can I use bleach cleaning tablets inside my toilet tank?
No, you should never place drop-in bleach or blue chemical cleaning tablets inside your toilet tank. These concentrated chemicals sit in stagnant water between flushes, attacking flexible rubber flappers, degrading plastic valve stems, and causing bolt gaskets to rot prematurely. Chemical damage from tank tablets will also void nearly all manufacturer warranties. To clean your toilet safely, use liquid bowl cleaners applied directly inside the bowl or install an inline cleaning dispenser that injects cleaner exclusively through the bowl refill tube.
Why does my toilet tank hiss constantly after refilling?
A constant hissing sound indicates that water is still escaping into the bowl or that the fill valve is failing to shut off completely. This typically occurs when tiny grains of mineral sediment become trapped beneath the fill valve diaphragm seal, preventing the float mechanism from fully closing against incoming water pressure. If lowering the float height does not silence the hissing, flush the valve cap or replace the fill valve diaphragm assembly.
How much water and money does a leaking toilet tank waste?
A leaking toilet tank can waste between 200 and 4,000 gallons of treated water per month depending on the severity of the leak. Even a minor silent flapper leak wasting 0.1 gallons per minute adds thousands of gallons to your monthly utility statement. Repairing a running toilet eliminates this waste, protects local water resources, and can reduce your overall water bill by up to 10%.
Conclusion
Fixing a leaking toilet tank is a straightforward, cost-effective DIY skill that protects your home from water damage and lowers your monthly utility expenses. By following a methodical diagnostic approach—using the food coloring test for internal leaks and the paper towel check for external seepage—you can easily swap out worn flappers, install modern fill valves, and rebuild tank-to-bowl seals in under an hour.
If your toilet continues to run or you discover that your toilet repair tank not filling properly due to complex water line issues, our expert team at Go Pro Plumbing is here to help. We proudly provide dependable, same-day residential plumbing services across Rancho Cordova, Sacramento, and Northern California to keep your fixtures running smoothly and efficiently.