
How to Seal and Repair Leaking Under-Sink Drain Pipes
By Brian on September 9, 2026
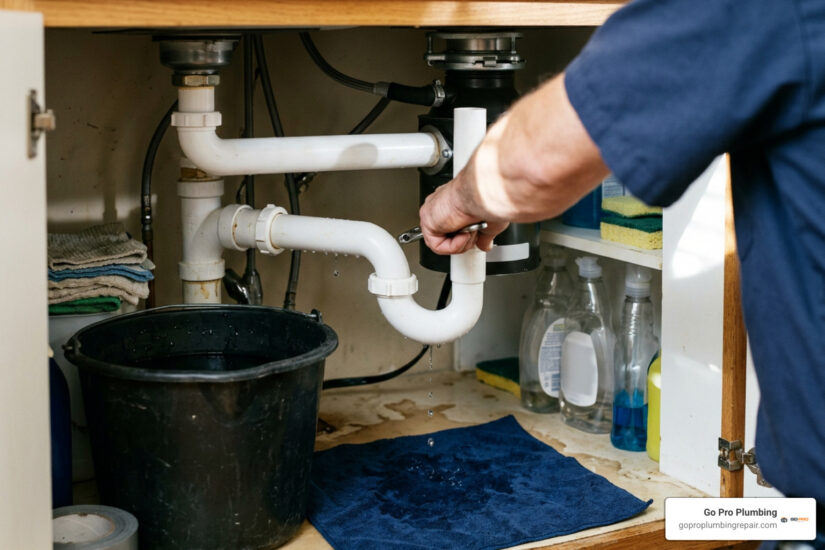
Stop Drain Leaks Under Sink Before They Damage Your Cabinet
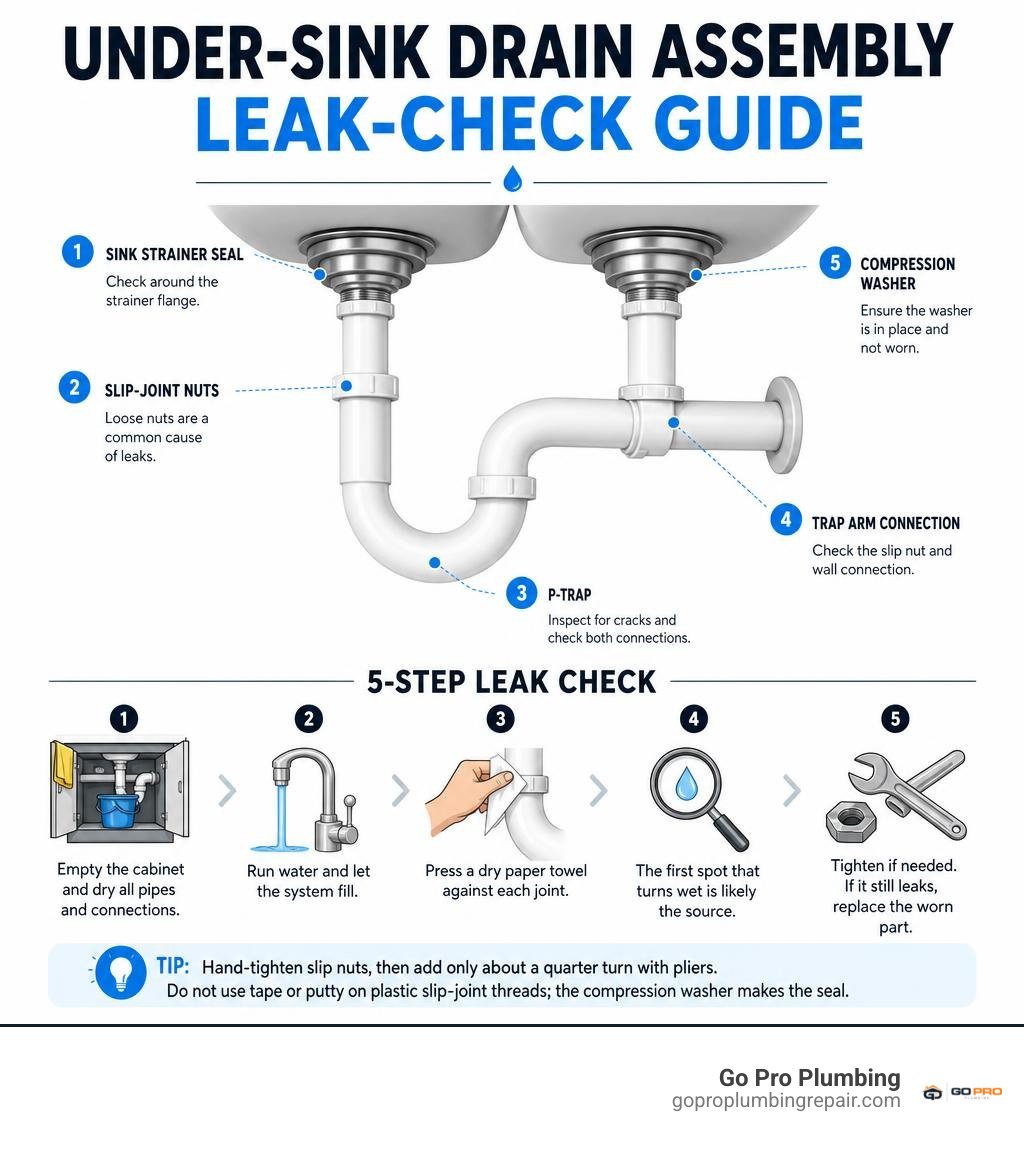
Most drain leaks under sink come from a loose slip-joint nut, a worn compression washer, a cracked P-trap, or a failed sink strainer seal. Start by emptying the cabinet, drying every pipe and connection, then run water while holding a dry paper towel against each joint. The first spot that turns wet is usually the source.
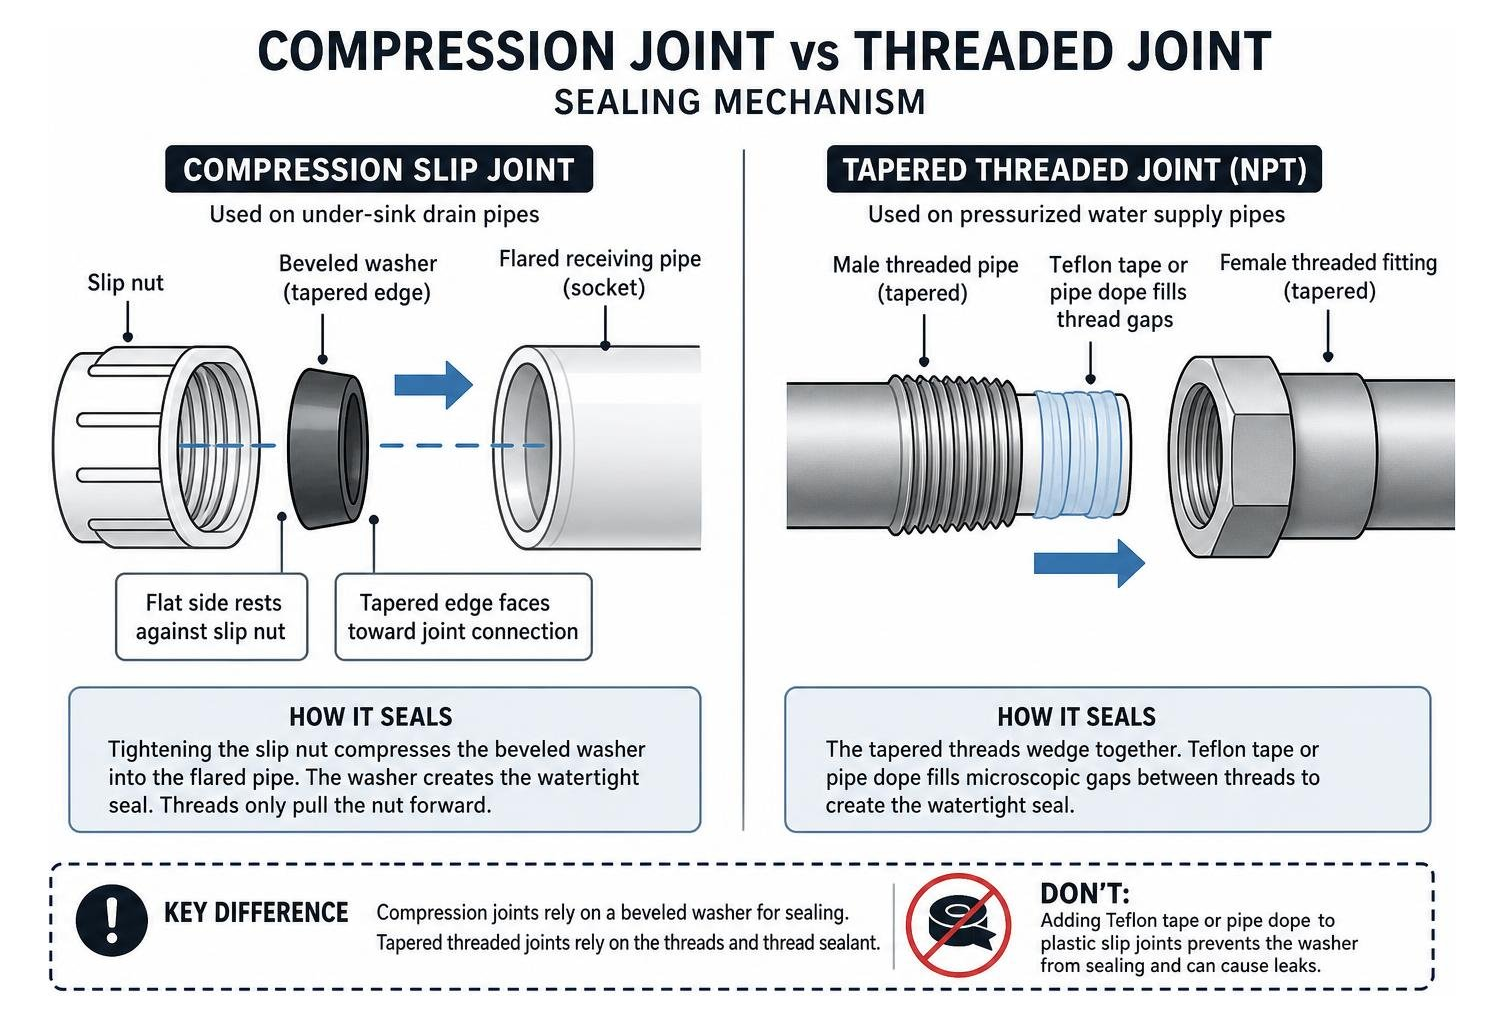
For a leak at a plastic P-trap joint, first hand-tighten the nut and add only about a quarter turn with pliers. If it still drips, replace the washer or the trap section. Do not use Teflon tape or plumber’s putty on plastic slip-joint threads; the compression washer makes the seal.
A small drip deserves quick attention. The EPA reports that household leaks waste more than 1 trillion gallons of water in the U.S. each year, and mold can begin growing after 24 to 48 hours of moisture exposure. This guide explains how to find the leak, make the right repair, and keep the space under your sink dry.
Primary Causes of Drain Leaks Under Sink
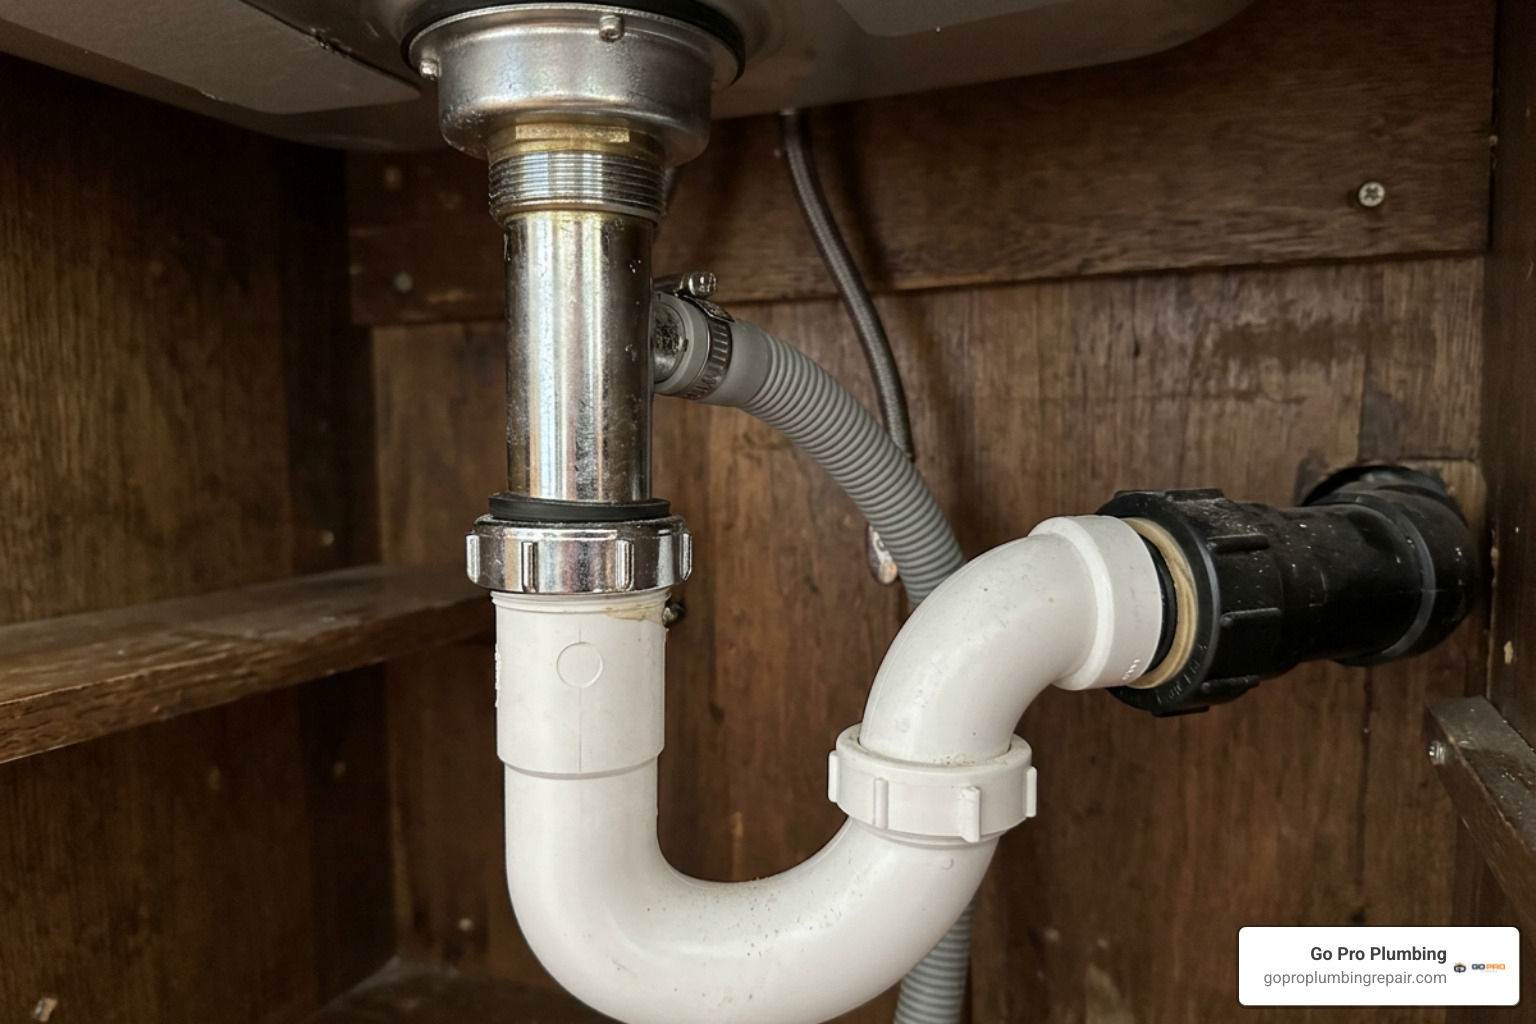
When you discover standing water under your vanity or kitchen counter, the issue generally stems from mechanical joint failure rather than cracked pipe walls. Modern residential drainage systems rely on a sequence of interlocking tubular sections connected by threaded slip nuts, compression washers, and friction gaskets. Over time, physical vibrations from garbage disposals, shifts in the cabinet structure, thermal expansion, or simple age cause these connections to loosen or degrade.
The most frequent culprits include:
- Degraded Slip-Joint Washers: Beveled polyethylene or rubber washers seal the connections between the sink tailpiece, the P-trap bend, and the wall trap arm. As they age, these washers dry out, harden, crack, or flatten, losing their elastic compression seal.
- Loose Slip Nuts: The large threaded nuts holding the drainage components together can loosen due to routine mechanical vibration, temperature swings, or accidental bumps from items stored under the counter.
- Failed Sink Basket Strainer Seals: The junction where the sink basin meets the drain pipe is sealed using a combination of plumber’s putty or silicone on top and a thick rubber gasket secured by a locknut underneath. If the putty dries out or the locknut shifts, water escapes around the flange.
- Misaligned Pipe Geometry: Gravity-fed drainage pipes require precise linear alignment. If the tailpiece enters the P-trap at an angle, the internal washer pinches unevenly, leaving an open channel for seepage.
- Cracked Plastic Nuts or Traps: Over-tightening plastic fittings during previous installations puts structural stress on the threads, leading to hairline fractures that open under water pressure.
- Drainage Blockages: While gravity pulls water down, stubborn clogs generate backpressure. When water backs up, searching for clogged kitchen sink solutions is essential to prevent joints from being overwhelmed by standing water weight.
Understanding whether you are dealing with a drainage leak or a pressurized supply line leak helps target your repair efforts immediately:
| Feature | Drain Pipe Leak | Pressurized Water Supply Leak |
|---|---|---|
| Leak Timing | Only drips when water runs down the drain | Drips or sprays continuously, 24/7 |
| Water Pressure | Low (gravity-fed flow) | High (typically 40 to 60+ PSI) |
| Primary Failure Point | Slip nuts, washers, strainer flange | Shut-off valves, braided hose fittings |
| Repair Mechanism | Compression washers, mechanical reseating | Tightening packing nuts, replacing lines |
| Material Types | PVC, ABS, polypropylene, thin brass | Braided stainless steel, copper, PEX |
Identifying Drain Leaks Under Sink with the Paper Towel Test
Water travels along the path of least resistance. A drop originating at the top of the sink tailpiece can travel down the outside curve of your P-trap and drip off the lowest point, misleading you into thinking the trap itself is broken.
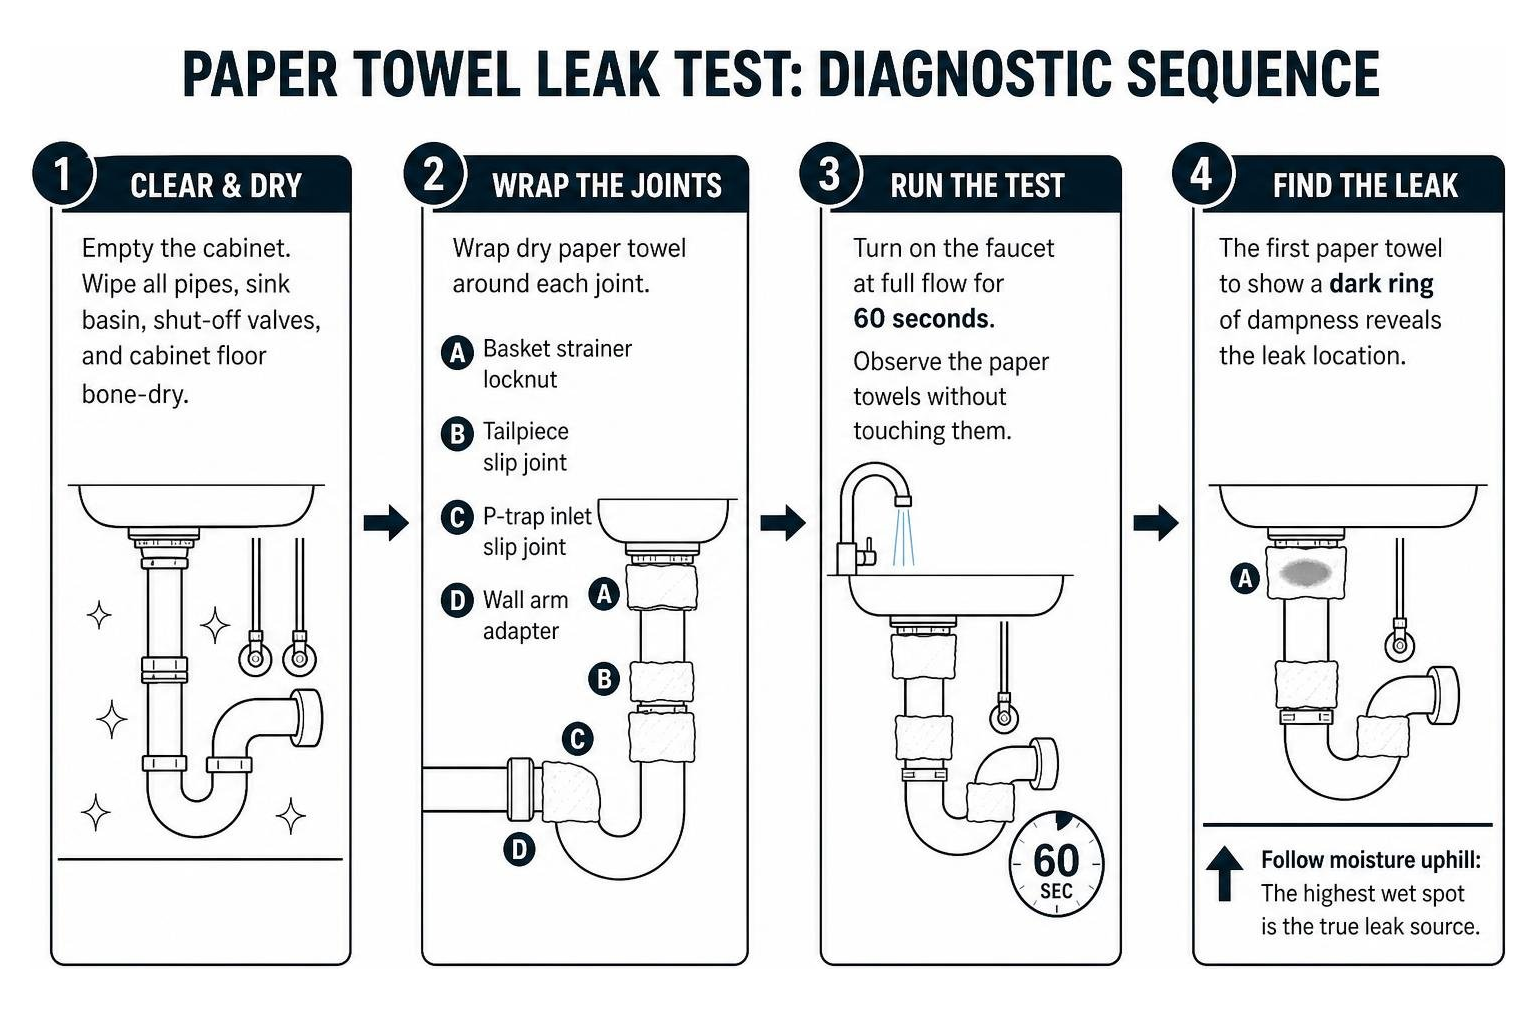
To pinpoint the exact origin, we recommend using the “Dry-Start Method”:
- Clear and Dry: Completely empty your cabinet. Take a microfiber cloth and wipe down every inch of the pipes, the bottom of the sink basin, the shut-off valves, and the cabinet floor until completely bone-dry.
- Wrap the Joints: Wrap individual sheets of dry paper towel around each separate joint: one around the basket strainer locknut, one around the tailpiece slip joint, one around the P-trap inlet, and one around the wall arm adapter.
- Perform the Faucet Run Test: Turn on the faucet at full flow for 60 seconds. Observe the paper towels without touching them. The first paper towel that shows a dark ring of dampness reveals the leak location. For a comprehensive walkthrough on isolating these tricky drips, check out How to Fix a Drain Drip at the Connection.
- Follow Moisture Uphill: Always trace dampness upward to the highest wet spot. Water cannot climb upward against gravity on the outside of a pipe; the highest point of moisture is your true leak source.
Why Drain Leaks Under Sink Happen Only When Draining a Full Basin
A common diagnostic mystery occurs when a sink does not leak while the faucet is running freely, but suddenly leaves a puddle when a full basin of wash water is drained.
This issue is caused by hydrostatic head pressure and drainage velocity. When you fill a sink basin, the accumulated volume of water exerts significant downward weight directly onto the sink basket strainer assembly. A full 5 to 10 gallons of water creates enough localized pressure to force water past dried-out plumber’s putty or hairline fractures in the strainer flange.
Furthermore, when the sink stopper is pulled, the sudden rush of water fills the entire diameter of the drain pipe, creating elevated flow volume and turbulent backpressure that exploits marginal seals in the upper slip joints. If a leak only presents during a drain dump, your inspection should focus directly on the basket strainer assembly and the uppermost slip nut.
Essential Tools and Materials for Under-Sink Pipe Repair
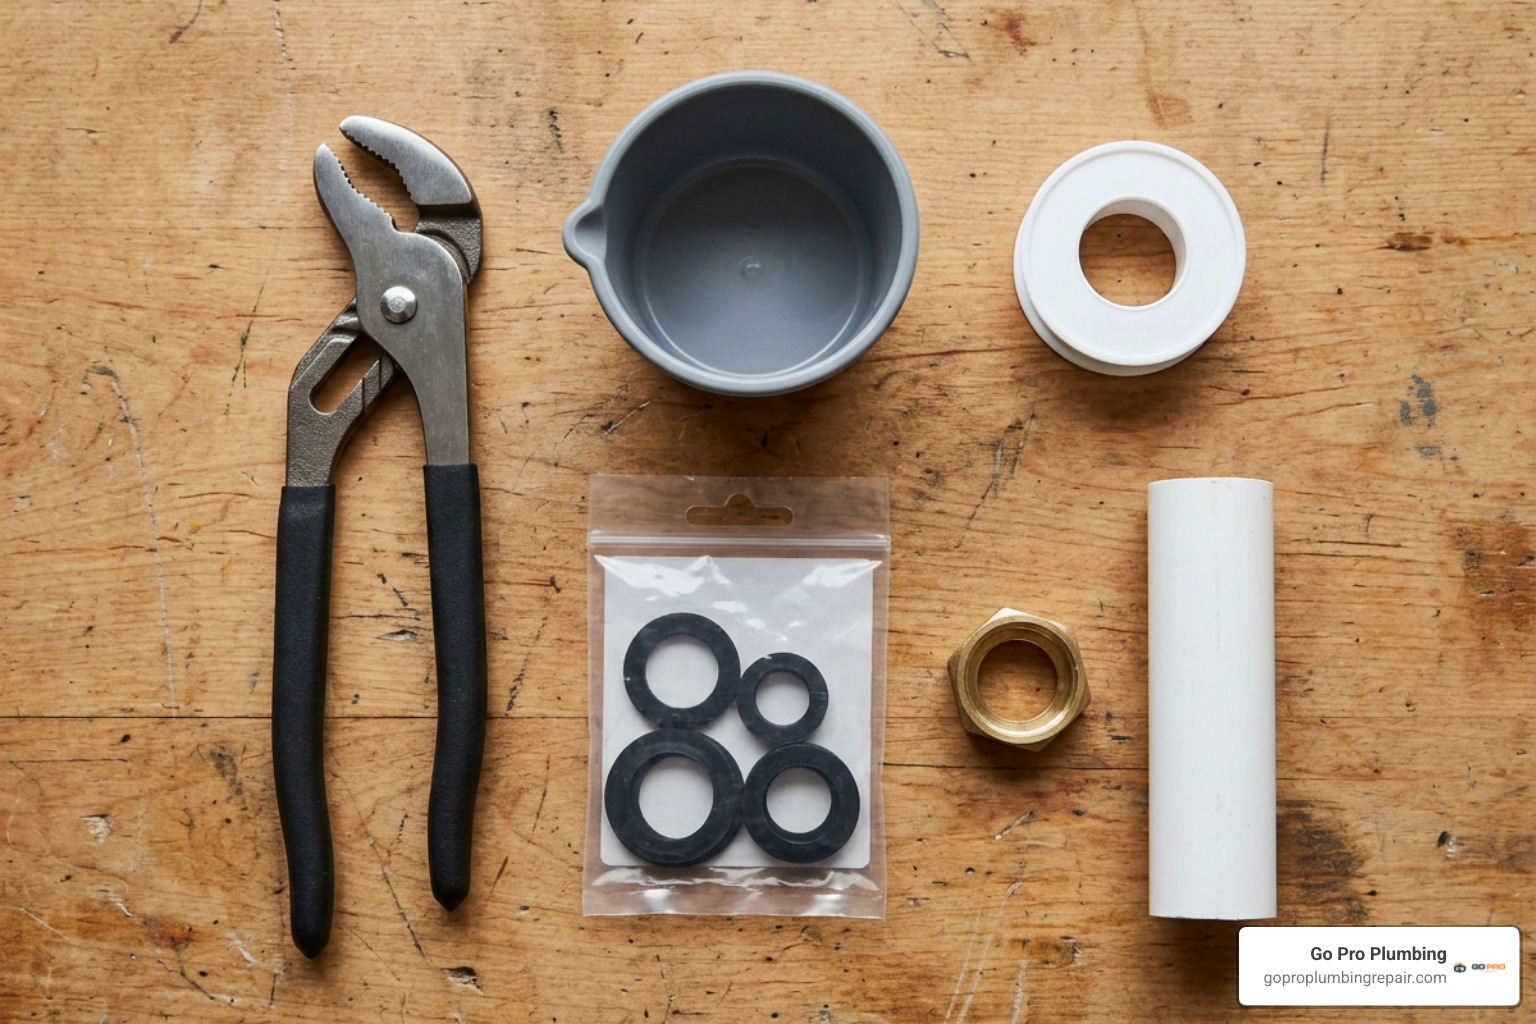
Repairing an under-sink drain assembly requires basic hand tools and inexpensive replacement parts. Because modern under-sink systems are made from PVC or polypropylene, finesse is far more effective than brute force.
Essential Plumbing Toolkit
- Tongue-and-Groove Pliers (Channel Locks): Ideal for loosening stubborn, calcified slip nuts or gripping large strainer locknuts. Avoid heavy cast-iron pipe wrenches, which easily crush thin plastic tubing.
- Catch Bucket or Shallow Pan: Essential for collecting the standing water trapped inside the P-trap curve when the assembly is disassembled.
- Microfiber Cleaning Cloths & Scrub Sponge: Used to clean old grime, hair, soap scum, and mineral deposits off male pipe threads before reassembly.
- Flashlight or Headlamp: Provides targeted visibility into dark under-cabinet corners.
Required Replacement Materials
- Beveled Compression Washers (Polyethylene or Rubber): Sized for your specific drain diameter. Standard kitchen sinks use 1-1/2 inch pipes and washers, while bathroom lavatory drains use 1-1/4 inch assemblies.
- Slip-Joint Friction Rings: Small brass or plastic washers placed between the nut and the rubber washer to prevent the nut from twisting the gasket as it tightens.
- Plumber’s Putty or 100% Silicone Sealant: For resealing the upper basket strainer flange to the sink basin (use silicone on porous natural stone like granite or cultured marble).
- Replacement P-Trap Kit: Inexpensive ($5 to $15) polypropylene kits containing a new J-bend, trap arm, nuts, and washers.
Before starting disassembly, it is good practice to clean out sink drain residue so you are working with clean components free of hair and grease accumulation.
Step-by-Step Guide to Fixing Leaky P-Traps and Slip Joints
The P-trap maintains a small reservoir of water that acts as a physical barrier, preventing foul sewer gases from entering your living space. Most P-trap leaks occur at the slip-joint connections holding this curved section in place.
Follow these steps to restore a watertight seal:
Step 1: Position the Catch Bucket and Disassemble
Slide your shallow bucket directly beneath the curved J-bend of the P-trap. Loosen the slip nut at the top of the P-trap (connecting to the vertical tailpiece) and the slip nut at the back (connecting to the horizontal wall arm) by turning them counterclockwise. If they are tight, use tongue-and-groove pliers for the initial break, then unscrew them by hand. Carefully lower the trap and dump the standing water into your bucket.
Step 2: Clean and Inspect All Components
Wipe down all pipe ends, interior rims, and exterior threads using a damp rag. Inspect the plastic slip nuts for vertical hairline cracks. A cracked nut may feel snug initially, but will pop open or spin freely under load. If the threads on the pipes show mineral encrustation or calcium buildup, scrub them clean so the new nut can thread smoothly.
Step 3: Install the New Compression Washer
Slide the slip nut onto the pipe first, with the threads facing toward the joint opening. Next, slide the new beveled compression washer onto the pipe.
Critical Alignment Rule: The tapered (pointed/beveled) edge of the compression washer must always face toward the joint connection (into the flared receiving pipe), while the flat back of the washer rests against the slip nut.
Step 4: Realign and Hand-Tighten
Bring the P-trap components together. Ensure the pipes slide inside one another straight and true without lateral tension. If the pipes meet at an angle, the washer will pinch, causing leaks. Thread the slip nut onto the male threads by hand. Turning it by hand first prevents cross-threading, which strips plastic fittings.
Step 5: Apply the Quarter-Turn Rule
Tighten the slip nut as firmly as you can using bare hand strength. Once hand-tight, grip the nut with tongue-and-groove pliers and rotate it exactly one-quarter turn (90 degrees) past hand-tight. This creates optimal compression on the beveled washer without crushing or warping it.
After securing the drain, run the faucet at full volume for 60 to 90 seconds while checking with a dry paper towel. If you are also experiencing drips from your fixture above, exploring faucet and sink repair techniques will ensure both your supply and drainage lines remain completely dry.
Debunking the Teflon Tape and Putty Myth on Plastic Slip Joints
A common misconception among homeowners is that wrapping Teflon thread-sealant tape (PTFE tape) or spreading pipe dope across plastic slip-joint threads will stop a drain leak.
In reality, thread tape on plastic drainage connections often causes leaks rather than preventing them.
Plumbing joints fall into two distinct engineering categories:
- Tapered Thread Joints (NPT): Used on iron or copper pressurized pipe fittings, where the threads themselves form the mechanical water barrier. These require Teflon tape or pipe dope to fill microscopic gaps between threads.
- Compression Slip Joints: Used on under-sink tubular drainage pipes. Here, the threads serve solely to pull the nut forward and compress the internal beveled washer against the pipe wall. The threads do not hold back water.
Adding Teflon tape to plastic slip-joint threads adds artificial thickness. This extra bulk prevents the nut from threading down completely, stopping the washer from seating tightly against the joint shoulder. Furthermore, over-tightening a taped plastic nut frequently splits the nut along its seam. To learn more about common mistakes to avoid during under-sink maintenance, review the insights in How to Repair a Leaky Pipe Under the Sink.
Resealing a Leaking Sink Basket Strainer Assembly
If water is dripping directly from the large nut immediately underneath the sink basin, the basket strainer assembly must be resealed.
- Loosen the Tailpiece and Locknut: Disconnect the top of the P-trap from the drain tailpiece. Use large channel-lock pliers or a spud wrench to loosen the large, flat metal locknut securing the strainer body to the sink underside.
- Remove Old Putty and Gaskets: Push the strainer basket up through the sink drain hole. Scrape away all dried, brittle plumber’s putty from the upper sink basin rim using a plastic putty knife. Remove the degraded rubber gasket and cardboard friction washer from underneath.
- Apply Fresh Putty: Roll a golf-ball-sized piece of plumber’s putty between your hands until it forms a uniform, pencil-thick rope about 1/2-inch in diameter. Lay this rope in a complete circle underneath the top lip of the clean strainer basket flange. (Note: If your sink is granite, quartz, or marble, use a silicone-based sealant instead to prevent oil stains).
- Seat and Tighten: Press the strainer basket firmly down into the sink drain opening. From underneath the cabinet, slide on the new thick rubber washer, followed by the cardboard/fiber friction washer (which prevents the turning locknut from bunching the rubber gasket).
- Torque the Locknut: Thread the metal locknut onto the strainer body and tighten it firmly. As the nut pulls the assembly down, excess plumber’s putty will squeeze out around the top rim inside the sink basin. Wipe away this excess putty with your finger and clean the basin surface.
Cabinet Protection and Long-Term Leak Prevention
Water damage under a sink develops quickly. Hidden moisture inside dark, enclosed cabinetry can cause wood fibers to delaminate and rot, with structural repairs averaging $3,000 to $5,000 for remediation and carpentry. Because hazardous mold colonies develop within 24 to 48 hours of exposure to moisture, proactive protection is critical.
To protect your cabinetry from accidental drips and minor plumbing failures:
- Install a Sacrificial Silicone Cabinet Mat: Place a heavy-duty, waterproof silicone under-sink tray with raised outer lips across your cabinet floor. These flexible trays can hold up to 2 to 3 gallons of water, keeping standing drips off your baseboard.
- Caulk Cabinet Seams: Run a bead of 100% silicone sealant along the perimeter seams where your cabinet floor meets the side and back walls to stop water from seeping into subflooring.
- Place Smart Leak Detection Sensors: Install battery-powered smart moisture sensors on the cabinet floor directly beneath the P-trap and supply valves. These units emit an audible alarm and send instant smartphone notifications the second moisture bridges their sensor contacts.
- Dry Water-Damaged Wood Immediately: If a leak has occurred, empty the cabinet and position a high-velocity fan blowing directly into the opening for 24 to 48 hours. Treat any stained wood surfaces with an anti-microbial borate-based solution to inhibit fungal spores.
- Maintain Clear Drainage: Routine maintenance keeps pipes flowing freely. Scheduling professional drain cleaning ensures your lines stay clear of grease and debris, preventing backpressure from challenging your under-sink seals.
When to Call a Professional for Under-Sink Repairs
While swapping out a plastic slip-joint washer is an accessible DIY project, certain under-sink plumbing complications require licensed professional expertise.
DIY repairs typically cost between $5 and $15 for parts and take roughly 15 to 30 minutes. If a professional handles a straightforward P-trap rebuild, expect standard labor and part rates. However, a professional should be called immediately if you encounter any of the following warning signs:
- Corroded Metal Drain Stub-Outs: Older homes often feature galvanized steel or thin-walled chrome-plated brass drain pipes entering the wall. When corroded from the inside out, these pipes can crumble or snap off flush with the wall fitting when turned with a wrench.
- In-Wall Drain Pipe Leaks: If water drips down the interior of your drywall or appears along baseboards adjacent to the sink, the leak is located inside the wall framing rather than at the exposed trap.
- Frozen or Dripping Angle-Stop Shut-Off Valves: If the emergency water shut-off valve under the sink fails to close or drips from its stem when touched, you risk severe pressurized flooding that requires a main water shutoff.
- Soft, Spongy Subflooring: If the cabinet floor or underlying subfloor shows structural sag, professional inspection is necessary to verify structural integrity and prevent mold spread.
When unexpected pipe failures occur, having access to an emergency plumber near me provides immediate peace of mind and protects your home from extensive water damage.
Frequently Asked Questions About Under-Sink Drain Leaks
Can I use duct tape or silicone sealant as a temporary fix for a leaking drain?
No. Duct tape, electrical tape, and smeared exterior silicone sealants are ineffective for plumbing repairs. The adhesive on duct tape softens and fails rapidly when exposed to constant moisture, while surface silicone cannot adhere properly to wet, greasy plastic surfaces under drainage flow. The only reliable way to stop a leak is to replace the faulty mechanical gasket or properly reseat the slip-joint connection.
What is the correct way to tighten plastic slip nuts without cracking them?
The gold standard for plastic slip joints is the hand-tight plus quarter-turn method. First, align the pipe sections completely straight so the nut threads easily without resistance or cross-threading. Screw the slip nut down using your fingers until it is completely hand-tight. Then, place a pair of tongue-and-groove pliers over the nut and turn it exactly one-quarter turn (90 degrees). Avoid using heavy wrenches or turning past this point, as excessive torque will split plastic nuts or crush the internal washer.
How often should under-sink washers and drain components be replaced?
Polyethylene and rubber compression washers naturally degrade, dry out, and lose elasticity over time. We recommend inspecting under-sink plumbing every 6 months and replacing washers every 5 to 10 years, or whenever the drainage assembly is taken apart for cleaning. Flexible braided water supply lines should also be replaced every 5 to 10 years to prevent sudden bursting.
Conclusion
A leaking under-sink drain pipe can escalate from a minor nuisance into costly cabinet rot and mold damage if left unaddressed. By accurately isolating the leak source with the dry-start paper towel method, understanding the proper orientation of beveled compression washers, and avoiding common mistakes like using Teflon tape on plastic slip joints, you can maintain a clean, dry, and reliable plumbing system.
At Go Pro Plumbing, we take pride in delivering exceptional customer service and dependable same-day plumbing solutions throughout Sacramento, Rancho Cordova, and Northern California. Whether you need assistance rebuilding complex kitchen drainage lines, clearing stubborn mainline blockages, or requiring professional water line repair, our team is here to help. Contact us today to restore your home’s plumbing to peak performance!