
The Ultimate Guide to Kitchen Sink Faucet Connections and Hardware
By Brian on July 31, 2026
Why Homeowners Choose to Install a New Kitchen Sink Faucet Themselves
Ready to install a new kitchen sink faucet? Here’s the short answer most people need:
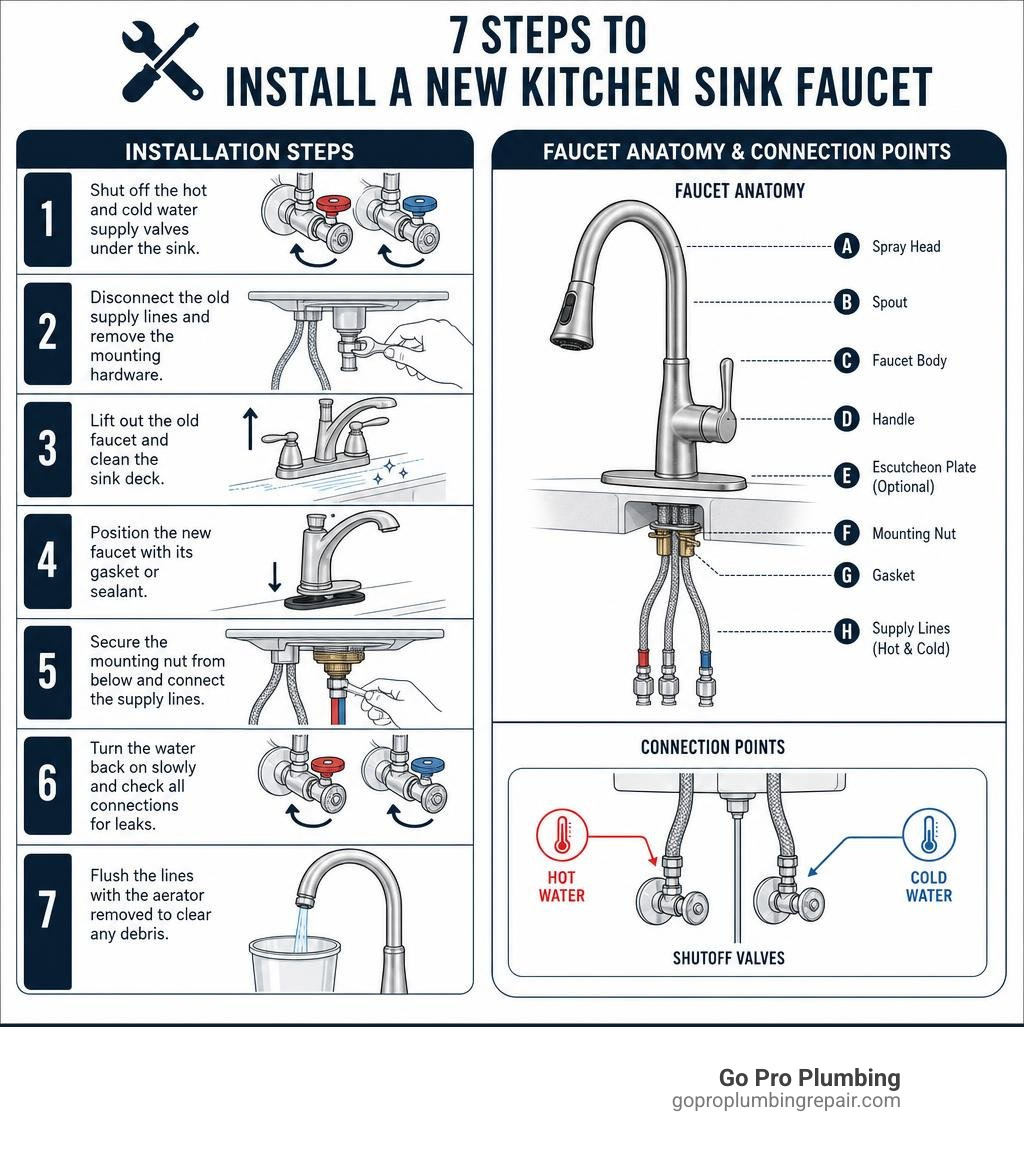
How to install a new kitchen sink faucet (quick overview):
- Shut off the hot and cold water supply valves under the sink
- Disconnect the old supply lines and remove the mounting hardware
- Lift out the old faucet and clean the sink deck
- Position the new faucet with its gasket or sealant
- Secure the mounting nut from below and connect the supply lines
- Turn the water back on slowly and check all connections for leaks
- Flush the lines with the aerator removed to clear any debris
Most homeowners with no plumbing experience can finish this job in under an hour. A quality faucet costs between $80 and $250, and the total DIY project typically runs $100–$150 including supplies.
A leaky or outdated faucet is more than just an eyesore. It wastes water, drives up utility bills, and can quietly cause damage under the sink. The good news? Replacing a kitchen faucet is one of the most beginner-friendly plumbing upgrades you can tackle at home — no license, no special permits, and no major tools beyond a basin wrench and an adjustable wrench.
In this guide, Go Pro Plumbing walks you through everything — from picking the right faucet for your sink’s hole configuration, to removing the old unit, making solid connections, and testing your work like a pro.
Install new kitchen sink faucet further reading:
Preparation, Tools, and Hardware Selection
Before you dive headfirst under your cabinet, a little preparation goes a long way. You don’t want to be stuck with your water shut off, half-sprawled inside a cabinet, only to realize your brand-new faucet doesn’t fit your sink deck.
Selecting the right hardware and understanding what you are working with is the true secret to a painless installation. For a complete look at the different types of fixtures available on the market, check out our Complete Kitchen Sink Faucet Guide.

When choosing your new hardware, you’ll need to decide whether to tackle this as a weekend DIY project or hand it off to a professional. To help you weigh your options, we’ve broken down the key differences in cost, time, and difficulty below:
| Factor | DIY Installation | Professional Installation |
|---|---|---|
| Estimated Cost | $50 – $500 (Faucet only) | $200 – $800 (Includes labor & materials) |
| Time Investment | 1 – 2 hours (Beginners may take up to 4) | 30 minutes – 1 hour |
| Tools Required | Must purchase or borrow basic plumbing tools | Included in service |
| Risk Level | Moderate (Potential for minor leaks if sealed incorrectly) | Extremely Low (Backed by professional guarantees) |
If you want to review the standard manufacturer-approved process for major brands before buying, you can also look over the How to Install a Kitchen Faucet | Delta Faucet guide.
Understanding Sink Hole Configurations
The number of holes in your kitchen sink deck dictates what kind of faucet you can install. Most standard kitchen sinks feature anywhere from one to four holes.
- Single-Hole Sinks: These are designed for modern, streamlined single-handle faucets. All of the supply lines and mounting hardware pass through this single opening.
- Three-Hole Sinks: Traditionally used for “center-set” or “widespread” faucets where the hot and cold handles are separate from the central spout. The standard distance between the outer holes is typically an 8-inch spread.
- Four-Hole Sinks: These feature the standard three holes for the faucet assembly, plus an extra hole on the far right for accessories like a side sprayer, soap dispenser, or water filtration tap.
The Deck Plate (Escutcheon) Solution: What if you fall in love with a sleek, single-handle faucet but your current sink has three holes? Don’t panic! Most single-handle faucets come packaged with an optional deck plate (also called an escutcheon). This metal plate sits at the base of the faucet and is wide enough to cover the unused outer holes, giving your sink a seamless, clean finish.
Conversely, you cannot easily install a widespread, three-hole faucet into a single-hole countertop without physically drilling new holes—a risky move if you have granite, quartz, or cast iron. For more on matching your hardware perfectly to your sink, refer to our Sink Faucet Replacement Guide.
Essential Tools and Materials
Having the correct tools on hand makes the difference between a quick, satisfying upgrade and a frustrating afternoon of “plumbing yoga.” Gather these items before you start:
- Basin Wrench: This is the absolute star of the show. A basin wrench has a long handle and a pivoting, spring-loaded jaw designed specifically to reach up into the narrow, dark cavity behind the sink bowl to loosen mounting nuts. It turns a 45-minute struggle into a 2-minute breeze.
- Adjustable Wrenches (Two are ideal): You will use these to disconnect and connect water supply lines. Using two wrenches allows you to hold the shutoff valve steady with one while turning the connection nut with the other, preventing the copper pipes inside your wall from twisting or breaking.
- Braided Stainless Steel Supply Lines: Never reuse your old supply lines! Over time, the internal rubber gaskets degrade, making them highly prone to bursting when reconnected. Investing $8 to $15 in a fresh pair of braided stainless steel lines is cheap insurance against catastrophic water damage.
- Plumber’s Tape (Teflon Tape): Wrap this clockwise around the male threads of your shutoff valves to ensure a watertight seal.
- Plumber’s Putty or Silicone Sealant: Some faucets come with a pre-installed rubber gasket on the base. If yours does not, you will need plumber’s putty or a high-quality silicone sealant to create a waterproof barrier between the faucet body and the sink deck.
- Bucket and Old Towels: To catch the residual water trapped inside the old supply lines when you disconnect them.
- Flashlight or Headlamp: Working under a sink cabinet is notoriously dark. A headlamp keeps both of your hands free.
- Safety Glasses: To protect your eyes from falling rust, mineral scale, or debris while you are working flat on your back looking upward.
For a detailed breakdown of tools and safety prep, you can also cross-reference the How to Replace a Sink Faucet: Step-by-Step Guide or review the classic How to Replace a Kitchen Faucet | Family Handyman checklist.
Step-by-Step Guide to Remove and Install New Kitchen Sink Faucet
Now that your workspace is prepped and your tools are ready, it’s time to get to work. Remember to clear out all the cleaning supplies, trash cans, and slide-out organizers from beneath your sink.
We highly recommend placing a comfortable pillow or a folded towel on the edge of the cabinet frame to protect your back and neck while you work.
If you’d like to see how this process compares to other fixtures, take a look at our guide on Installing Faucet in Kitchen Sink or read through the quick-start How to Install a Kitchen Faucet: Replace It Yourself in 7 Steps tutorial.
Removing the Old Kitchen Faucet
Removing a crusty, corroded old faucet is usually the most challenging part of this project. Mineral deposits from hard water can essentially “weld” metal nuts together over time. Follow these steps to get the old unit out safely:
- Shut Off the Water Supply: Locate the hot and cold water shutoff valves (angle stops) under your sink. Turn them clockwise until they stop completely. If they are stuck or won’t budge, do not force them—you could snap the valve. In older homes with seized gate valves, you may need to temporarily shut off your home’s main water supply.
- Relieve Pressure: Turn the kitchen faucet handles to the “on” position. Let any residual water drain out. If water continues to flow steadily after a minute, your shutoff valves are failing and will need to be replaced.
- Set Up Your Catch Basin: Place a small bucket or shallow pan directly under the supply lines. Keep a few old towels nearby.
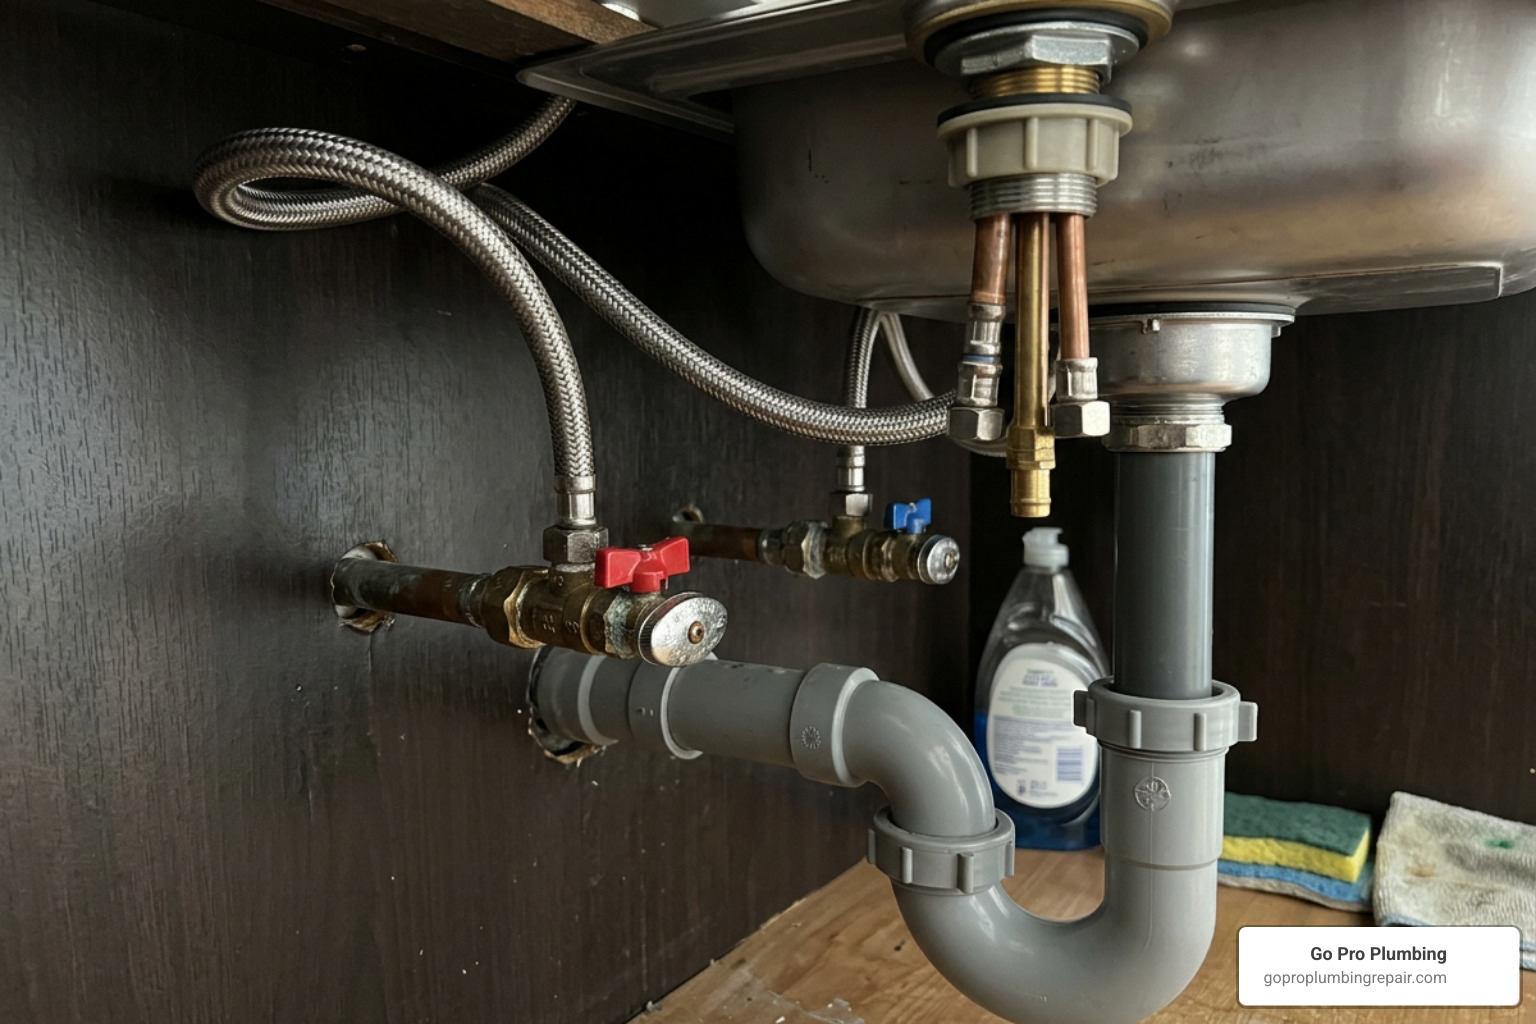
- Disconnect the Supply Lines: Use an adjustable wrench to loosen the nuts connecting the supply lines to the shutoff valves. Remember to brace the valve body with a second wrench to prevent it from spinning and cracking the pipe inside the wall.
- Remove the Mounting Hardware: Crawl under the sink with your flashlight and basin wrench. Locate the mounting nuts holding the faucet stem to the underside of the sink deck. Fit the jaw of the basin wrench around the nut and turn counterclockwise to loosen. If the nuts are rusted solid, spray them with a penetrating oil (like WD-40) and let it sit for 15 minutes before trying again.
- Lift Out the Faucet: Once all the mounting hardware is removed, carefully pull the old faucet straight up and out from the top of the sink.
- Clean the Sink Deck: You will likely find a ring of dark grime, old plumber’s putty, and mineral buildup where the old faucet sat. Use a plastic putty knife (to avoid scratching your sink) and a non-abrasive sponge to clean the area thoroughly. The new faucet must sit on a clean, flat surface to seal properly.
For general tips on handling older plumbing systems during a swap, see our resource on Kitchen Sink Mixer Tap Installation.
Step-by-Step Instructions to Install New Kitchen Sink Faucet
With the sink deck clean and dry, you are ready to install your shiny new hardware. Always read the manufacturer’s specific instructions, but most standard models follow this sequence:
- Apply the Base Seal: If your faucet has a plastic or rubber gasket on the bottom, place it over the mounting holes. This gasket replaces the need for plumber’s putty. If your faucet does not have a gasket, apply a 1/4-inch bead of plumber’s putty or silicone sealant around the bottom edge of the faucet base.
- Feed the Lines: Guide the hot and cold water supply lines, along with the central pull-down sprayer hose (if applicable), down through the center hole of your sink deck.
- Position the Faucet: Situate the faucet body so it faces forward. If you are installing an asymmetrical design, make sure any branding logos are positioned correctly (usually facing away from the user or centered toward the back).
- Secure the Mounting Hardware from Below: From under the sink, slide the metal washer and mounting bracket over the faucet shank. Thread the mounting nut onto the shank by hand first to prevent cross-threading. Once hand-tight, use your basin wrench or the specialty tool provided by the manufacturer to tighten it. Tip: Tighten it snugly, but do not over-tighten, especially on stainless steel or composite sinks, as this can warp the deck or crack the fixture.
- Install the Sprayer Hose Counterweight: If your faucet has a pull-down spray wand, connect the hose to the faucet outlet pipe (often using a simple quick-connect clip). Attach the heavy counterweight to the sprayer hose. Position it a few inches up from the bottom of the loop so the hose retracts smoothly without catching on other pipes under the sink.
- Connect the Supply Lines: Apply 3 to 4 wraps of Teflon tape clockwise around the male threads of your shutoff valves. Thread the female nuts of your new braided stainless steel supply lines onto the valves. Hand-tighten first, then use your adjustable wrench to tighten them an additional 1/4 to 1/2 turn.
- Flush the System: This is a crucial step that many DIYers skip! Unscrew the aerator from the tip of your new faucet spout. Turn on the hot and cold water shutoff valves slowly. Run the faucet wide open for one full minute. This flushes out any manufacturing debris, solder flux, or loose mineral scale that could otherwise clog the delicate internal cartridge of your new faucet.
- Reinstall the Aerator: Turn off the faucet and screw the clean aerator back onto the spout.
For more detailed brand-specific walkthroughs, you can also consult the official Step-by-Step Faucet Guide | Moen or check out the How to Install a Kitchen or Bathroom Faucet | True Value Hardware resource page.
Troubleshooting, Common Mistakes, and Maintenance
Even with careful planning, minor issues can pop up during or after installation. Knowing how to troubleshoot these problems quickly will save you from unnecessary stress.
If you find yourself dealing with an annoying drip right out of the gate, check out our guide on How to Silence the Drip: Repairing Your Kitchen Faucets Leaky Spout.
Common Mistakes to Avoid When You Install New Kitchen Sink Faucet
Most post-installation callbacks we receive at Go Pro Plumbing are due to a handful of simple, avoidable mistakes. Keep these in mind to ensure your installation goes smoothly:
- Over-Tightening Connections: It is tempting to crank down on every nut as hard as you can to prevent leaks. However, over-tightening rubber gaskets can pinch, split, or deform them, which actually causes leaks. Snug plus a quarter-turn with a wrench is usually all that is needed.
- Reusing Old Supply Lines: We cannot stress this enough. Old lines have taken a set over years of constant water pressure. When you bend and twist them to connect to a new faucet, the internal rubber can crack and fail. Always buy fresh lines.
- Forgetting the Gasket or Putty: Skipping the seal at the base of the faucet allows water splashed on the countertop to leak directly down into your cabinet, slowly rotting your wooden floorboards.
- Cross-Threading Plastic Nuts: Many modern faucets use plastic mounting nuts. If you feel resistance when spinning the nut onto the shank, stop! Back it off and start over. Forcing a cross-threaded nut will ruin the plastic threads and prevent a secure mount.
For professional support with persistent issues, check out our Faucet and Sink Repair page.
Maintenance Tips to Extend Faucet Lifespan
A mid-to-high quality kitchen faucet should easily last 15 to 20 years with proper care. Use these maintenance tips to keep yours working like new:
- Clean the Aerator Regularly: If you notice your water pressure suddenly dropping, unscrew the aerator at the tip of the spout. Soak it in white vinegar for an hour to dissolve calcium buildup, rinse it thoroughly, and reinstall it.
- Check Shutoff Valves Annually: Water shutoff valves that sit undisturbed for years can seize up. Once or twice a year, turn them off and back on again to keep the internal mechanisms moving freely.
- Avoid Harsh Chemical Cleaners: Strong abrasive cleaners, industrial solvents, or steel wool can permanently strip or scratch beautiful finishes like matte black, brushed gold, or oil-rubbed bronze. Stick to mild dish soap, warm water, and a soft microfiber cloth.
- Address Cartridge Wear Early: If your single-handle faucet starts to drip from the spout or leak around the handle base, the internal ceramic disc cartridge likely needs to be replaced. Replacing a cartridge is a simple 10-minute job that saves you from replacing the entire faucet.
For long-term care guidelines, review our Faucet Sink Installation resource.
Frequently Asked Questions About Faucet Installation
Still have questions about your upcoming plumbing project? Here are answers to some of the most common questions we hear from homeowners in Sacramento and Rancho Cordova.
For comprehensive professional assistance, you can always visit our Professional Faucet and Sink Services | Go Pro Plumbing page.
How long does it typically take a professional to install a kitchen faucet?
A professional plumber can typically complete a standard kitchen faucet installation in 30 minutes to an hour.
For a homeowner tackling the project for the first time, it usually takes about 1 to 2 hours. The vast majority of that time is spent clearing out the cabinet, squeezing into tight spaces, and removing the old, corroded hardware. Once the old faucet is out, installing the new one is incredibly fast.
If you are also installing a new sink basin at the same time, expect the project to take a bit longer. You can read more about full sink projects in the Kitchen Sink Installation: A Step-by-Step Guide – This Old House guide.
How much does it cost to install a kitchen sink faucet?
If you choose the DIY route, your total cost will range from $100 to $150 (assuming a mid-range faucet and basic supplies like new braided lines and Teflon tape).
Hiring a professional plumber typically costs between $200 and $800, which includes the labor rate, removal and haul-away of your old fixture, new supply lines, and a professional labor guarantee.
For more details on residential pricing and project planning, you can consult the [2026] How To Install a Kitchen Faucet – The Home Depot cost estimator.
When should you call a professional plumber instead of doing it yourself?
While installing a kitchen faucet is a highly achievable DIY project, there are a few scenarios where it makes sense to call in the professionals:
- Seized or Leaking Shutoff Valves: If your shutoff valves under the sink are rusted solid, leaking, or won’t shut off the water completely, you will need a plumber to replace them.
- Corroded Pipe Connections: If your home has older galvanized iron or copper pipes that show signs of heavy corrosion, attempting to twist off connections yourself can crack the main water lines inside your walls.
- Countertop Modifications: If your new faucet requires drilling extra holes through thick granite, quartz, or solid stone countertops, it is highly recommended to hire an expert with specialized diamond-tipped tools to avoid cracking your expensive counters.
- Complex Smart Faucets: High-end touchless or voice-activated smart faucets often require mounting power control boxes, routing extra wiring, and positioning motion sensors, which can be overwhelming for a beginner.
Conclusion
Upgrading your kitchen faucet is one of the most cost-effective and visually impactful home improvement projects you can complete. By taking the time to match your sink’s hole configuration, gathering the right tools (especially that lifesaver basin wrench!), and replacing your supply lines, you can easily complete a professional-grade installation on your own.
However, we know that working under a sink in cramped spaces isn’t everyone’s idea of a fun weekend. If you run into stubborn, corroded plumbing, leaking valves, or simply want the peace of mind that comes with a guaranteed, leak-free installation, we are here to help.
At Go Pro Plumbing, we proudly serve homeowners throughout Northern California—including Sacramento and Rancho Cordova. We are dedicated to delivering outstanding customer service and offer same-day service to get your kitchen back up and running in no time.
Schedule professional faucet and sink installation services with Go Pro Plumbing today!