
How to install a water softener without breaking a sweat
By Brian on July 28, 2026
Hard Water Is Quietly Damaging Your Home Right Now
Water softener installation is one of the most impactful upgrades you can make to protect your home’s plumbing, appliances, and water quality. Here’s what you need to know upfront:
Quick-start overview:
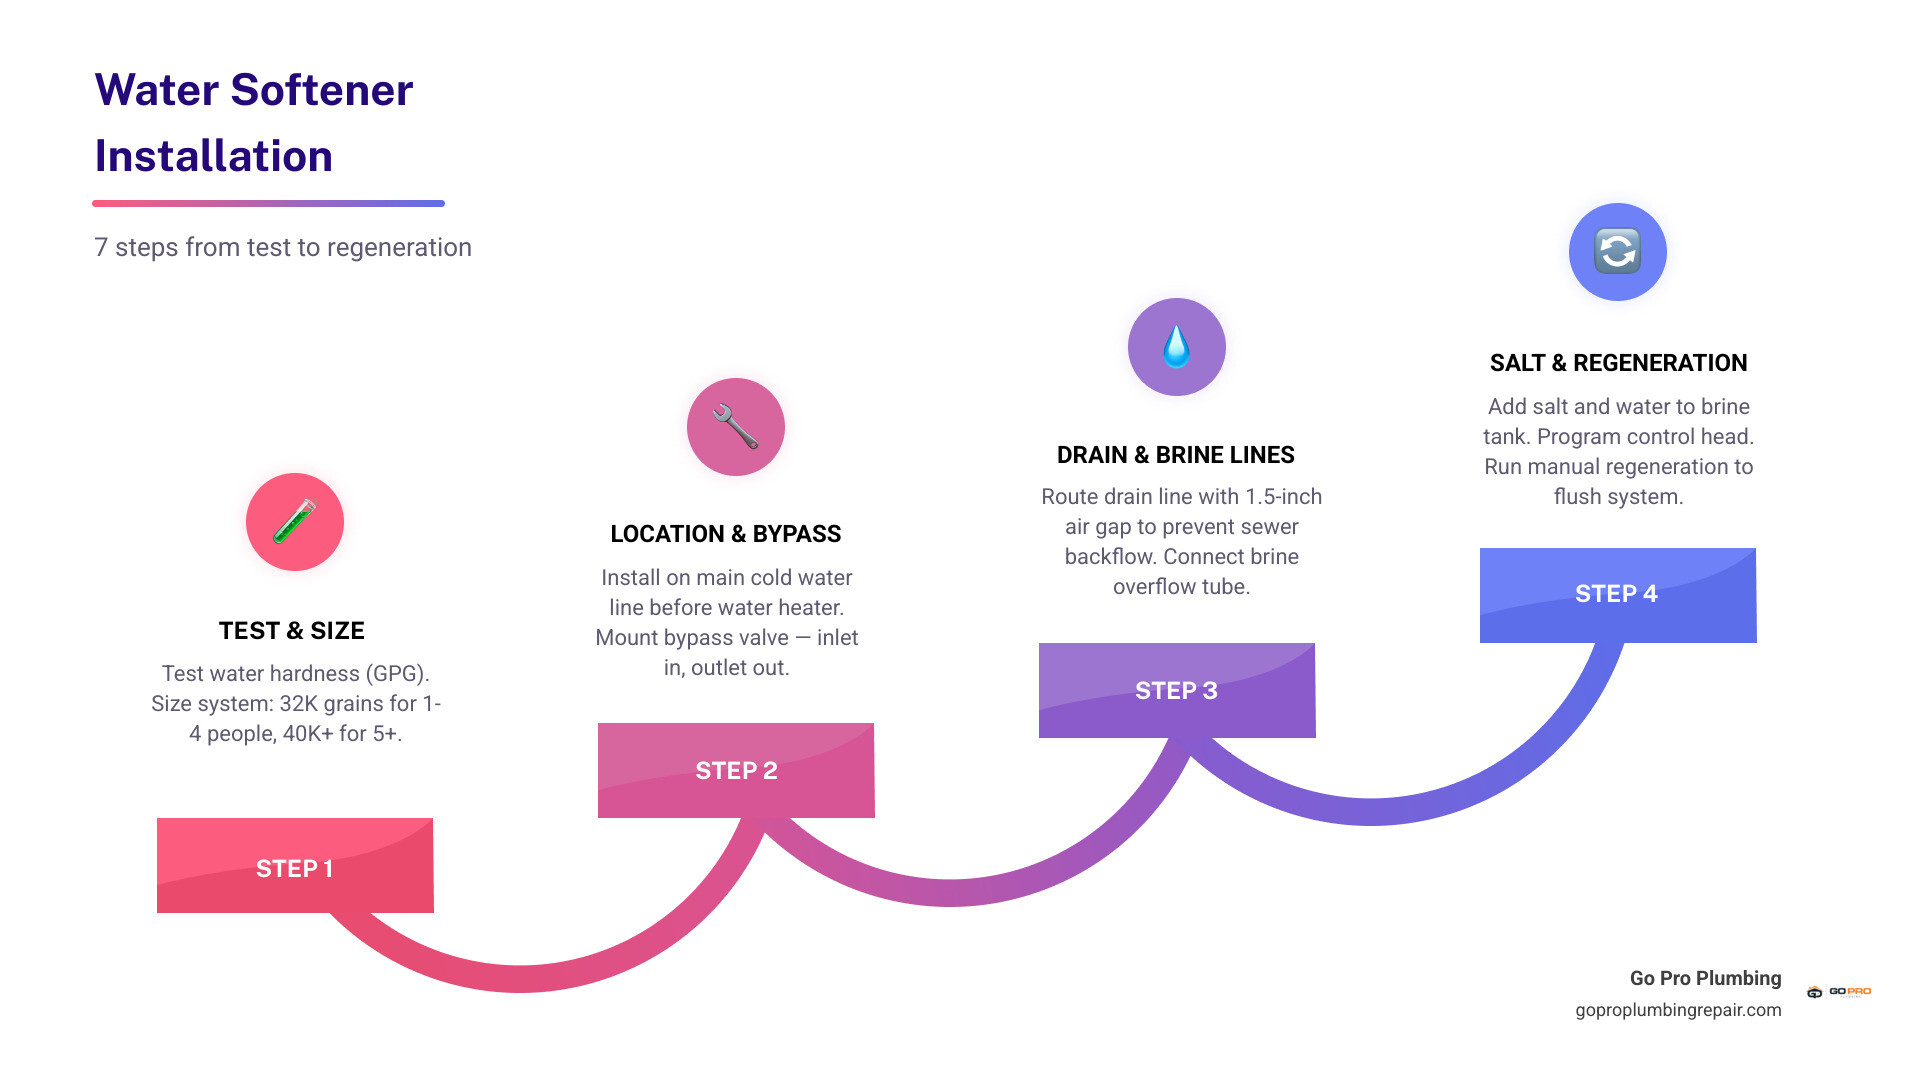
- Test your water — confirm hardness in grains per gallon (GPG)
- Size your system — 32,000 grains for 1–4 people; 40,000+ grains for 5 or more
- Pick a location — on the main cold water line, before the water heater
- Install the bypass valve and connect plumbing — inlet in, outlet out
- Route the drain line — maintain a 1.5-inch air gap
- Add salt and water to the brine tank, then program the control head
- Run a manual regeneration cycle to flush and prime the system
Total time: 2–4 hours for a new install. A straight replacement can take under an hour.
About 85% of municipal water in the United States is at least moderately hard. That means minerals like calcium and magnesium are constantly moving through your pipes, coating your water heater, clogging your fixtures, and leaving that chalky white crust on your shower door.
A water softener fixes this through ion exchange — swapping those hard minerals for a small amount of sodium as water passes through a resin tank. The result is cleaner pipes, longer-lasting appliances, and noticeably softer water.
The good news? For a homeowner comfortable with basic plumbing, this is a manageable weekend project. For everyone else, a licensed plumber can typically wrap it up in just a few hours.
This guide walks you through the full process — from planning and sizing to startup and maintenance — so you can make the right call for your home.
Simple guide to water softener installation:
Planning Your Water Softener Installation
Before you run out to buy a system or start cutting into your home’s pipes, a successful water softener installation requires some careful planning. You cannot simply guess what system you need; you have to understand the specific water chemistry of your household.
Water hardness is measured in grains per gallon (GPG) or parts per million (PPM). To put it in perspective, the United States Geological Survey (USGS) classifies water with more than 180 mg/L (roughly 10.5 GPG) as very hard. In many areas of Northern California, including Sacramento and Rancho Cordova, municipal water comes from a mix of surface water and deep groundwater wells. This groundwater can carry significant mineral loads, leaving behind that stubborn white crust on your plumbing fixtures and causing your skin to feel dry and itchy.
To get started, you must test your water. You can purchase an inexpensive, widely available water testing kit from a local home improvement store, or you can check your local municipal water quality report. A professional water test is even better, taking under 30 minutes to give you a highly accurate reading of both your GPG hardness and other contaminants like iron. Knowing your baseline is the most critical first step, as outlined in this manufacturer guidance on Before you start.
Sizing Your System for Water Softener Installation
Sizing a water softener is not about the physical dimensions of the tank; it is about its grain capacity. This number represents how many grains of hardness minerals the system can remove before it must run a regeneration cycle to clean and recharge its resin beads.
To calculate the correct size for your home, use this simple formula:
- Determine daily water usage: The average person uses about 75 gallons of water per day. Multiply the number of people in your home by 75. For a family of four, that is 300 gallons per day.
- Calculate daily hardness grains: Multiply your daily water usage by your water’s GPG hardness. If your test shows 10 GPG, a family of four needs to remove 3,000 grains of hardness per day (300 gallons x 10 GPG).
- Account for iron: If your water contains iron, it makes the system work harder. Add 4 to 5 GPG of hardness to your calculation for every 1 PPM of iron detected in your water.
- Select a capacity: You want a system that only needs to regenerate every 5 to 7 days. For our example family needing 3,000 grains of capacity per day, a system needs to handle at least 15,000 to 21,000 grains weekly. We generally recommend oversizing your system by 20% to 30%. This allows the unit to regenerate less frequently, which saves water, conserves salt, and extends the overall lifespan of the resin.
For a household of 3 to 4 people, a 32,000-grain water softener is typically the sweet spot. Larger households of 5 to 7 people will generally require a 42,000-grain system. If you want to explore how softeners interact with other filtration setups, check out our More info on water filtration systems to see how a whole-home system fits together.
Choosing the Best Location for Water Softener Installation
Where should your new water softener live? Choosing the right spot is about both plumbing logic and protecting your investment.
Your water softener must be installed on the main cold water supply line before it splits into the cold and hot water lines. Crucially, it must be installed upstream of your water heater. This ensures that only soft water enters your water heater, protecting it from scale buildup and extending its lifespan. Additionally, placing the softener before the water heater prevents hot water from accidentally backing up into the softener, which would quickly melt and destroy the delicate plastic components inside the control valve.
Here are the key location requirements for your installation:
- Proximity to the main line: It must be close to where the main water line enters your home (usually in a garage, basement, or utility room).
- Level surface: The system must sit on a flat, solid surface. Never place shims directly under the salt storage tank; the immense weight of the tank when filled with water and salt can cause the plastic to crack at the shim point.
- Drain access: You need a suitable drain nearby—such as a floor drain, a laundry standpipe, or a utility sink—to handle the wastewater discharged during the regeneration cycle. The drain must be within 30 feet of the unit, and the drain line cannot be elevated more than 8 feet above the floor.
- Electrical outlet: A standard, continuous 110V or 120V grounded electrical outlet must be within 6 feet to power the digital controller.
- Climate protection: Water softeners are not frost-proof. Exposure to freezing temperatures will crack the resin tank and void your warranty. In our Northern California climate, installing the system in a garage is highly common, but if your garage is unconditioned and prone to winter drafts, you should insulate the pipes and use a tank wrap insulation kit.
For a detailed look at how to map out your space and prepare your home’s main line, check out this guide on How to Install a Water Softener in Your Home.
Step-by-Step DIY Water Softener Installation Guide
Now that you have selected your location, tested your water, and purchased the correctly sized system, it is time to get your hands dirty.
Before you cut any pipes, locate your home’s main water shutoff valve (usually found outside near the street curb or where the main line enters the house). Ensure you also turn off your water heater to prevent it from running dry or dry-firing its heating elements while the water supply is interrupted.
Tools and Materials Needed
To complete a clean, leak-free installation, gather these tools and materials before you begin:
- Pipe cutter (or a hacksaw for copper/PVC, or PEX tubing cutter)
- PEX tubing or copper pipes (matching your home’s existing line diameter, which is typically 3/4-inch or 1-inch)
- SharkBite push-to-connect fittings (highly recommended for DIYers as they require no soldering or special crimping tools)
- Flexible stainless steel braided connector hoses (24-inch hoses make future maintenance much easier than hard-piping)
- Silicone grease (for lubricating O-rings)
- Teflon tape (for threaded plumbing connections)
- 1/2-inch vinyl drain tubing and hose clamps
- Metal grounding clamp and jumper wire
Preparing and Cutting the Pipes
Start by shutting off the main water supply valve. Open the highest and lowest faucets in your home to drain the water lines completely. Keep a bucket and some dry rags nearby; when you cut into the pipe, there will always be some residual water waiting to spill out.
If your home has metal pipes (like copper), you must install a metal grounding clamp and a jumper wire across the section you are about to cut. Metal pipes are often used to ground your home’s electrical system, and cutting them without a grounding jumper can create an electrical arc or cause a severe shock.
Mark the section of the main cold water pipe that you need to remove. This is typically a 6-to-8-inch section after your main shutoff valve and pressure regulator, but before the line splits to feed the water heater or outdoor hose bibs. Use your pipe cutter to make clean, straight cuts. A straight, square cut is essential if you are using push-to-connect fittings to ensure a perfect seal. If you want to brush up on pipe handling, you can review our water heater installation tips 2026.
Connecting the Bypass Valve and Plumbing Lines
The bypass valve is arguably the most important fitting on your water softener. It acts like a road detour, allowing water to flow directly to your home while bypassing the water softener during maintenance or lawn watering.
Apply a thin layer of the manufacturer-provided silicone grease to the bypass valve’s O-rings, then slide it into the softener’s control head, securing it with the provided clips.
When connecting your plumbing lines, pay close attention to the arrows stamped on the bypass valve:
- The IN port must connect to the incoming hard water line from your water meter.
- The OUT port must connect to the outgoing line that distributes water to your home and water heater.
Use flexible, stainless steel braided hoses to connect your cut pipes to the bypass valve. If you are working with copper pipes and choose to solder (sweat) your fittings, never solder pipes while they are directly connected to the plastic bypass valve or adapters. The intense heat from your soldering torch will quickly melt the plastic and ruin the seals. Always complete your soldering on short copper stubs first, let them cool completely, and then connect them to the plastic components. For a complete visual walkthrough of this connection process, refer to How to Install a Water Softener: A Full DIY Walkthrough.
Routing the Drain and Brine Overflow Lines
Your water softener needs to discharge wastewater during its regeneration cycle, which means you must run drain lines. A typical water softener has two separate drain connections:
- The valve drain line: This carries the high-pressure backwash water from the control head.
- The brine tank overflow line: This is a gravity-fed line that acts as a safety backup in case the brine tank overfills.
Run a 1/2-inch flexible vinyl drain tube from the control head’s drain fitting to your designated drain. Secure it tightly with a hose clamp.
Crucial Plumbing Code Requirement: You must never insert the drain tube directly into a drain pipe or sewer line. Doing so creates a direct cross-contamination risk, where sewer gases and raw sewage could be siphoned back into your drinking water system. You must maintain a physical air gap of at least 1.5 to 2 inches between the end of your drain line and the lip of the drain receptacle (such as a standpipe or utility sink).
For the brine tank overflow, connect a separate vinyl tube to the overflow elbow on the side of the salt tank and route it to your floor drain. Because this line relies strictly on gravity, it must slope continuously downhill with no upward kinks. Never join the valve drain line and the brine overflow line together into a single tube; if the drain line backs up, it will pump wastewater directly into your salt tank. You can read more about securing these lines safely in this How to Install a Water Softener: Step-by-Step Guide.
System Startup and Sanitization
With your plumbing lines connected and your drain lines safely secured, you are ready to bring the system online:
- Pressurize slowly: Ensure the bypass valve is in the “bypass” position. Slowly turn on your home’s main water valve. Then, gradually open the bypass valve about a quarter turn to allow water to fill the resin tank slowly, purging trapped air out through a nearby cold water faucet. Once the air stops sputtering and the water runs smoothly, open the bypass valve completely into the “service” position.
- Check for leaks: Take a dry paper towel and wipe down every joint, fitting, and clip. A slow, weeping leak is easiest to spot on a dry paper towel.
- Add water and salt: Pour about 3 gallons of clean water into the bottom of the brine tank. Then, fill the tank at least half-full with high-purity water softener salt (solar salt crystals or evaporated pellets are highly recommended; avoid cheap rock salt, which contains dirt and impurities that will clog your system).
- Sanitize the system: To ensure your brand-new system is completely sterile, pour 3 ounces (about 6 tablespoons) of standard household liquid bleach directly into the brine well (the plastic cylinder inside the salt tank).
- Program the controller: Plug the system into your electrical outlet. Program the digital control head with the current time, your calculated GPG water hardness, and your household size.
- Run a manual regeneration: Initiate a manual recharge or regeneration cycle. This cycle takes about 80 to 90 minutes. It will draw the bleach through the resin tank to sanitize it, flush out any manufacturing dust, and prime the system for daily use. Once completed, run a downstream cold water faucet for about 20 minutes to clear any remaining chlorine scent.
For a deeper look at programming settings and the first-use sequence, check out the Water Softener Installation Guide – DIY 2026.
DIY vs. Professional Installation: Costs and Considerations
Is water softener installation truly a do-it-yourself project, or should you call in a licensed professional? While intermediate DIYers can successfully complete this project over a weekend, there are several factors to weigh before making your decision.
| Consideration | DIY Installation | Professional Installation |
|---|---|---|
| Upfront Cost | Low ($50–$100 for basic plumbing supplies) | Moderate ($200–$600 in labor costs) |
| Time Commitment | 3 to 6 hours of work | 1 to 2 hours (completed quickly) |
| Warranty Protection | Risks voiding manufacturer warranty if mistakes are made | Keeps manufacturer warranties fully intact |
| Plumbing Codes | DIYers often miss local code requirements (like air gaps) | Guaranteed compliance with local building codes |
| Risk of Damage | High risk of water damage or leaks if joints fail | Covered by company insurance and service guarantees |
Cost Breakdown of Water Softener Setup
Understanding the financial breakdown of your installation helps you budget effectively. On average, a quality residential water softener unit costs between $400 and $1,500, depending on the grain capacity and advanced features (such as Wi-Fi smart monitoring or iron reduction capabilities).
If you choose the DIY route, your additional costs will be minimal—typically $50 to $100 for PEX tubing, SharkBite fittings, drain lines, and salt.
If you hire a professional plumber, the labor rates in Northern California typically run between $200 and $600 for a standard installation. While this adds to the initial cost, it ensures the job is done correctly, saves you a trip to the hardware store, and protects your home from costly water damage. Additionally, if your home does not have existing plumbing loops or an active electrical outlet near your main water line, a professional plumber can easily run those custom lines for you.
Common Mistakes to Avoid
If you do decide to tackle this project yourself, keep these common installation errors in mind so you can avoid them:
- Installing the bypass valve backward: Always double-check the “IN” and “OUT” arrows. Installing it backward means hard water will flow through your system in reverse, which will ruin the resin and fail to soften your water.
- Overtightening plastic fittings: Plastic threads are easy to strip or crack. Hand-tighten your plastic connections, then add no more than a quarter-turn with a wrench.
- Omitting the drain line air gap: Shoving the drain hose directly into a sewer pipe is a major health hazard and a violation of plumbing codes. Always maintain a physical air gap to prevent backflow contamination.
- Exposing the system to freezing temperatures: Never install a water softener outdoors in an area exposed to direct winter freezes. If installed in an unheated garage, ensure the pipes and tanks are well-insulated.
Frequently Asked Questions About Water Softeners
Do I need a permit to install a water softener?
Permit requirements are determined by your local municipality’s building department. In many Northern California jurisdictions, including Sacramento County and Rancho Cordova, a simple like-for-like replacement of an existing water softener does not require a permit. However, a brand-new installation that requires cutting into your main water line and modifying your home’s plumbing systems often requires a basic plumbing permit. This ensures that your drain connections meet local codes, preventing cross-contamination with the public sewer system.
How long does a typical installation take?
If you are replacing an old water softener with a new model of a similar size, a professional plumber can usually complete the job in under an hour. For a brand-new installation where new plumbing lines, bypass loops, and drain runs must be configured, the process typically takes a professional plumber 1 to 2 hours. If you choose to do it yourself, expect to spend between 3 and 6 hours planning, cutting, connecting, and testing your work.
How do I maintain my water softener after installation?
Water softeners are incredibly low-maintenance, but they do require some routine attention to keep running efficiently:
- Check salt levels monthly: Keep your brine tank at least a quarter-full of salt. A typical family of four uses about 40 to 80 pounds of salt per month.
- Break up salt bridges: Occasionally, a hard crust called a “salt bridge” can form in your brine tank, creating an empty pocket beneath the surface that prevents the salt from dissolving in the water. Use a broom handle to gently push down and break up any hard crusts.
- Clean the resin tank: Use a specialized resin cleaner once or twice a year to remove iron and mineral buildup from the resin beads.
- Inspect your plumbing: Periodically check your bypass valve and drain lines for leaks. If you want to keep your entire home’s water system in peak condition, you can also check out our water heater maintenance complete guide to protect all your water-using appliances.
Conclusion
Installing a water softener is a highly effective way to protect your home’s plumbing, prevent scale buildup, and enjoy cleaner, softer water every day. Whether you choose to take on the challenge of a DIY installation or prefer the peace of mind that comes with professional help, getting your system set up correctly is the key to long-term success.
At Go Pro Plumbing, we are committed to providing outstanding customer service and reliable, same-day plumbing solutions throughout Sacramento, Rancho Cordova, and Northern California. If cutting into your main water line makes you feel uneasy, or if you want to ensure your system is installed in perfect compliance with local plumbing codes, let us handle the heavy lifting. Contact us today to schedule your professional water softener installation and start enjoying the benefits of conditioned water without the stress! Learn more about our complete services in our plumber Rancho Cordova complete guide.