
How to Fix a Toilet Tank Chain That Won’t Flush Properly
By Brian on September 16, 2026

Fixing a Toilet Tank Chain That Will Not Flush Properly
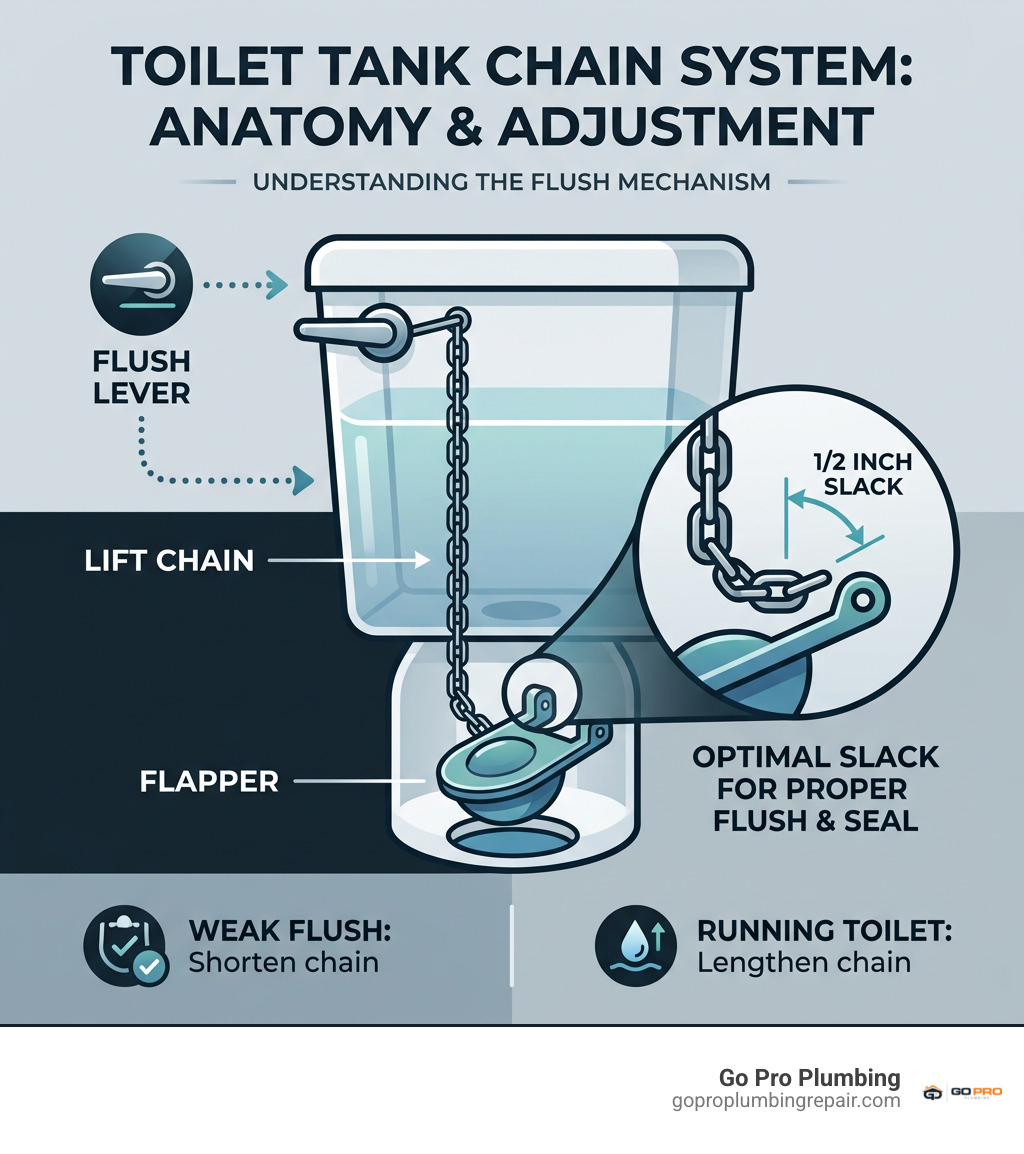
For fixing chain in toilet tank problems, remove the tank lid and check the lift chain between the flush lever and flapper. Reattach it if it has slipped off, shorten it if it tangles or gives a weak flush, and add length if it holds the flapper slightly open. When the flapper is closed, the chain should have about 1/2 inch of slack so it can lift fully but still seal after flushing.
A bad chain adjustment can cause a toilet to not flush, flush weakly, or keep running after every use. The good news: this is usually a quick repair. A new lift chain costs very little, and many adjustments only require needle-nose pliers.
This guide explains how to spot a chain that is too long, too short, broken, tangled, or disconnected – plus when the real problem is a worn flapper rather than the chain.
Diagnosing Common Lift Chain Problems
Inside your toilet tank, the lift chain serves as the mechanical bridge between your external flush handle and the rubber flapper valve resting over the drain hole. When you press the handle down, the flush lever arm rises, pulling the lift chain upward. This action unseats the flapper, allowing stored water to rush into the bowl. Once the tank empties, the flapper falls back into position, sealing the drain so the fill valve can replenish the water supply.
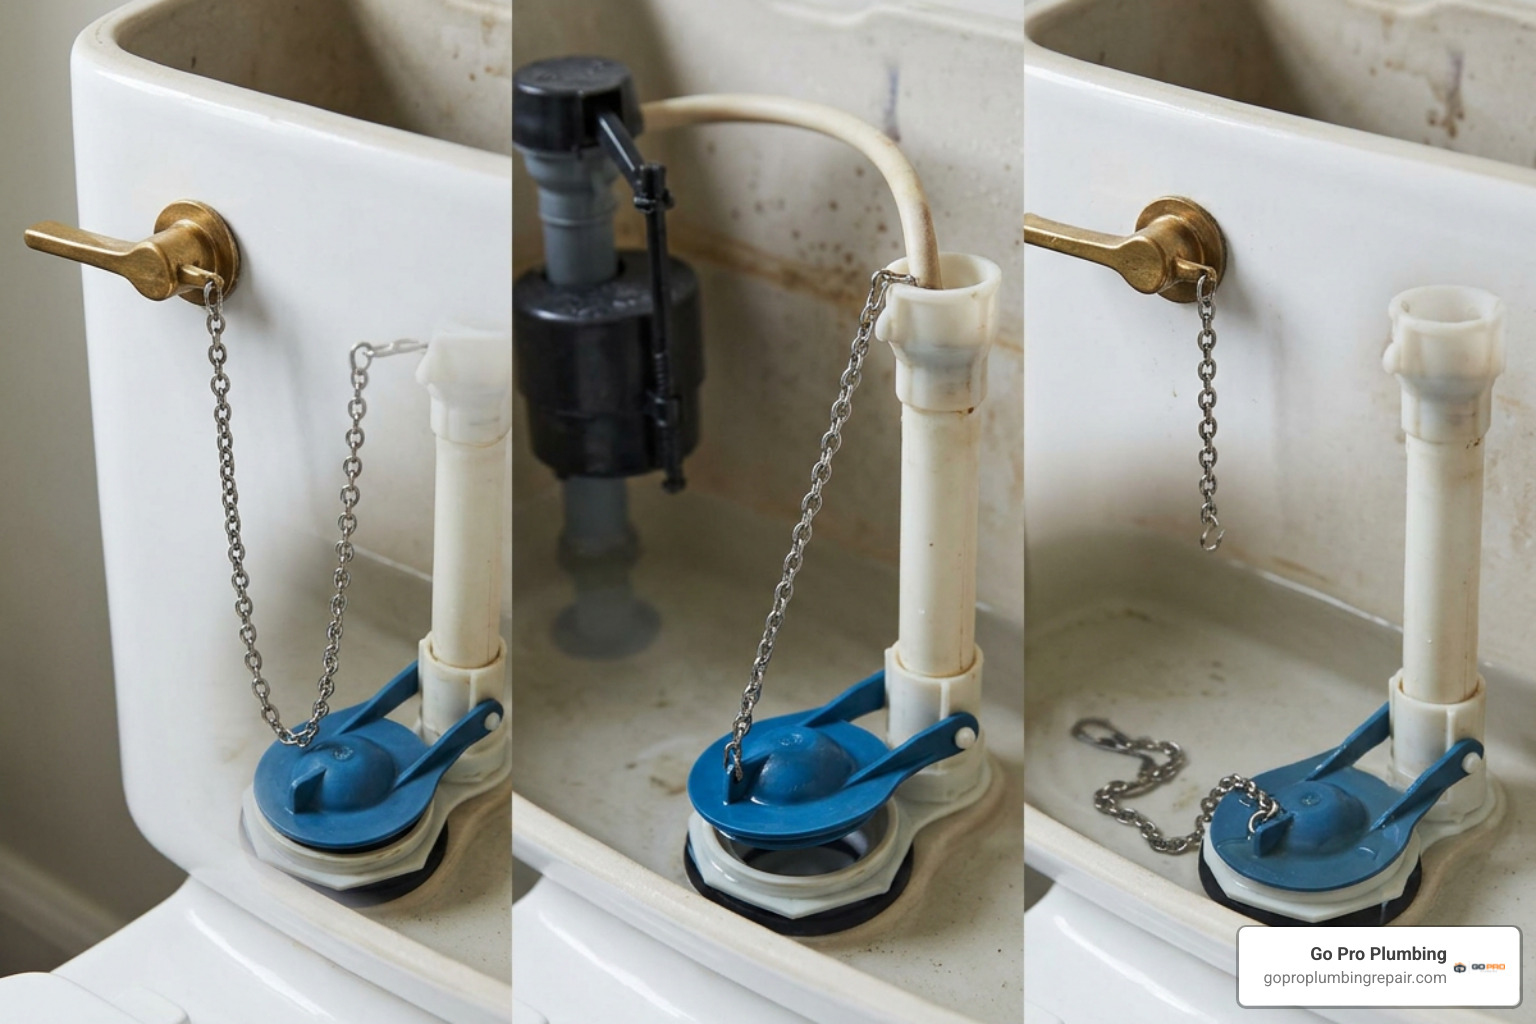
When this tiny linkage fails, the entire flushing cycle breaks down. A damaged or poorly adjusted chain leads directly to flapper seal failure, continuous water loss, or incomplete flushes. A leaking toilet can waste hundreds of gallons of water per day, driving up utility bills and causing frustrating “phantom flushing,” where the tank randomly refills itself every few minutes.
Correctly setting your chain tension can reduce leak risks by up to 30%. Routine visual inspections help you catch small issues before they lead to an emergency running toilet repair.
Recognizing a Broken, Slack, or Tight Chain
Diagnosing the exact issue requires looking inside the tank while operating the handle. The symptoms of a tight chain differ significantly from those of a loose or detached chain.
| Chain Condition | Primary Symptoms | Impact on Flush Mechanism | What You See in the Tank |
|---|---|---|---|
| Too Tight (No Slack) | Constant hissing, water running continuously, phantom flushing | Holds the flapper slightly elevated, preventing a watertight seal over the flush valve | The chain is completely taut; the flapper edge does not sit flush against the drain seat |
| Too Loose (Excess Slack) | Weak flush, need to hold the handle down, partial bowl clearing | Does not lift the flapper high enough to catch the water flow and float open | Several inches of chain sag; excess links puddle on the bottom or catch under the flapper |
| Broken / Disconnected | Handle moves freely with zero resistance; toilet not flushing at all | Flush lever lifts without engaging the flapper | The chain has detached from the lever arm or snapped at a corroded link |
| Tangled / Snagged | Intermittent running water or sudden failure to flush | Chain wraps around the overflow pipe or flapper hinge | Chain caught on the overflow tube, keeping the flapper tilted open |
Tools and Materials for Fixing Chain in Toilet Tank Mechanics
Before you begin repairing the lift mechanism, gather a few basic items. Most chain adjustments require no specialized plumbing gear, but having the right tools nearby makes the job quick and mess-free.
- Needle-nose pliers: Essential for opening, closing, and crimping S-hooks, clevis clips, and individual chain links.
- Wire cutters or heavy-duty snips: Used to cut away excess links so loose chain tails don’t snag underneath the flapper.
- Replacement stainless steel lift chain kit: A new lift chain costs under two dollars and usually includes fresh S-hooks and flapper attachment clips.
- Flashlight or headlamp: Improves visibility inside the dimly lit tank interior.
- Clean towel or rag: For wiping down wet components and giving you a secure grip on slick plastic pieces.
- Complete repair kit (optional): If other tank components show signs of severe wear, a comprehensive toilet repair kit provides a matching flapper, chain, and flush lever. You can also follow standard repair procedures outlined in the iFixit guide on flapper chain replacement.
Step-by-Step Guide to Fixing Chain in Toilet Tank
Repairing or adjusting your chain takes less than fifteen minutes from start to finish. Follow these detailed steps to restore full flushing power and eliminate leaks.
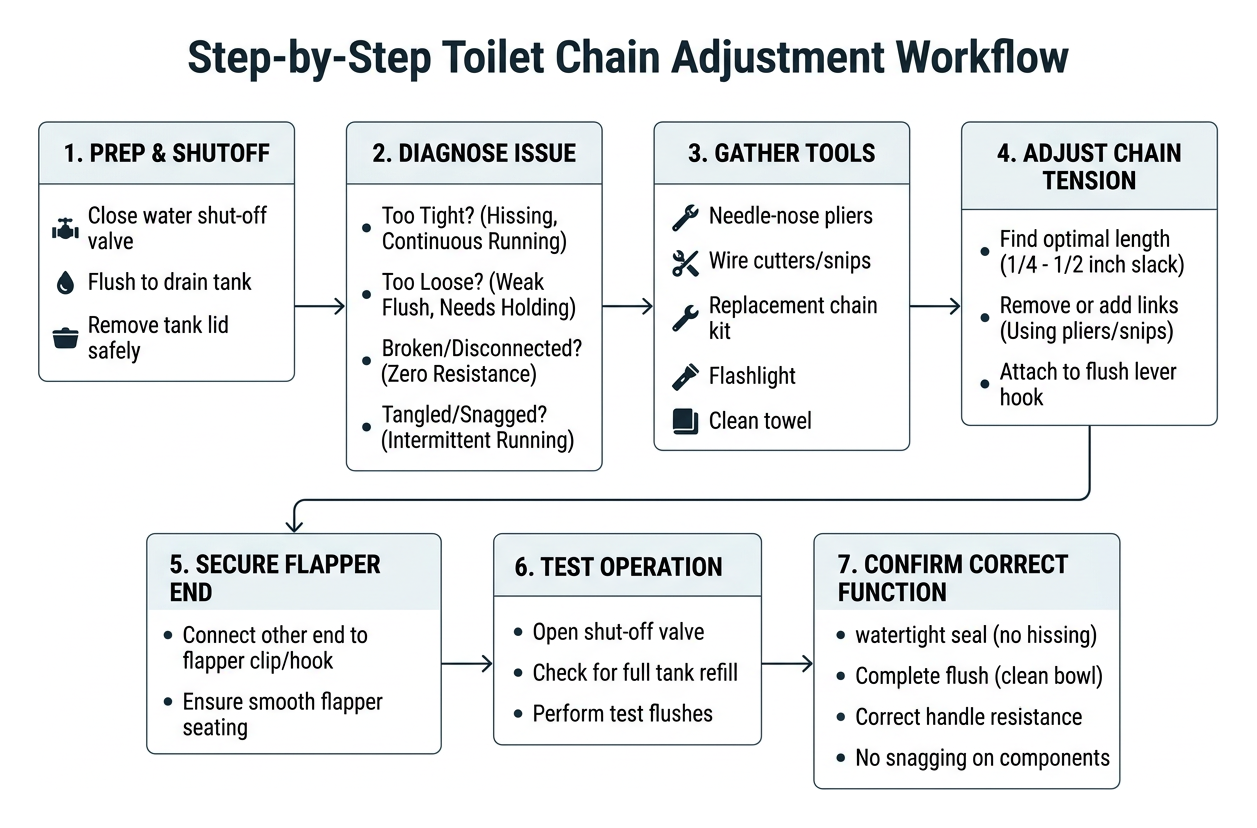
Step 1: Prep and Water Shutoff
- Locate the Shut-Off Valve: Find the oval shut-off valve behind the toilet near the baseboard. Turn it clockwise until it stops. This prevents the tank from refilling while your hands are inside.
- Drain the Tank: Press and hold the flush handle to drain the bulk of the water into the bowl.
- Remove the Tank Lid: Carefully lift the heavy porcelain lid straight up and place it on a flat, secure surface cushioned by a towel to prevent chipping or cracking.
- Inspect the Flush Lever Arm: Check that the plastic or metal lever arm attached to the handle moves up and down freely. If the arm wobbles excessively, learn how to fix a toilet handle when it won’t flush right by tightening its reverse-threaded mounting nut.
Step 2: Detaching and Fixing Chain in Toilet Tank Connection Points
- Disconnect the Old Chain: Unclip the S-hook from the flush lever arm. If the chain is broken or corroded, unhook it from the small connection ring on the top of the rubber flapper.
- Inspect the Attachment Points: Examine the rubber loop on the flapper and the holes on the flush lever arm. Clear away any mineral buildup, rust, or slime.
- Attach the New Chain to the Flapper: Fasten the bottom clip of your new stainless steel chain securely to the flapper eyelet. Use your needle-nose pliers to squeeze the clip closed so it cannot vibrate loose during flushes.
- Select the Right Lever Arm Hole: Most flush levers feature two to four adjustment holes. Hook the top S-hook into the hole positioned directly above the flapper eyelet. A straight, vertical pull minimizes sideways drag and prevents the chain from catching on the overflow tube, as demonstrated in the Ace Hardware video guide on toilet chain adjustment.
Step 3: Setting the Proper 0.5-Inch Slack
- Apply the 0.5-Inch Rule: With the flapper sitting flat and fully seated over the drain, adjust the chain so there is roughly 1/2 inch (about 1.27 cm) of slack. A good test: lightly push the middle of the chain sideways. It should move approximately half an inch before moving the flapper.
- Crimp the S-Hook: Once the correct link is hooked onto the lever arm, use needle-nose pliers to pinch the S-hook closed around the arm hole.
- Trim Excess Links: If you have more than 1 to 2 inches of extra chain dangling past the hook, use wire cutters to trim it off. Leave exactly two safety links beyond the connection point. Removing excess chain prevents the loose end from sweeping underneath the rubber seal and causing persistent leaks.
- Turn on the Water and Test: Open the shut-off valve counterclockwise. Let the tank fill completely, then flush the toilet three times. Watch the flapper open fully to a vertical angle and drop cleanly into a watertight seal.
Temporary Household Fixes vs. Flapper Replacement
A toilet chain can snap at the most inconvenient times, such as late at night or during a busy weekend. When you cannot get to a hardware store immediately, everyday household items can serve as temporary bridges.
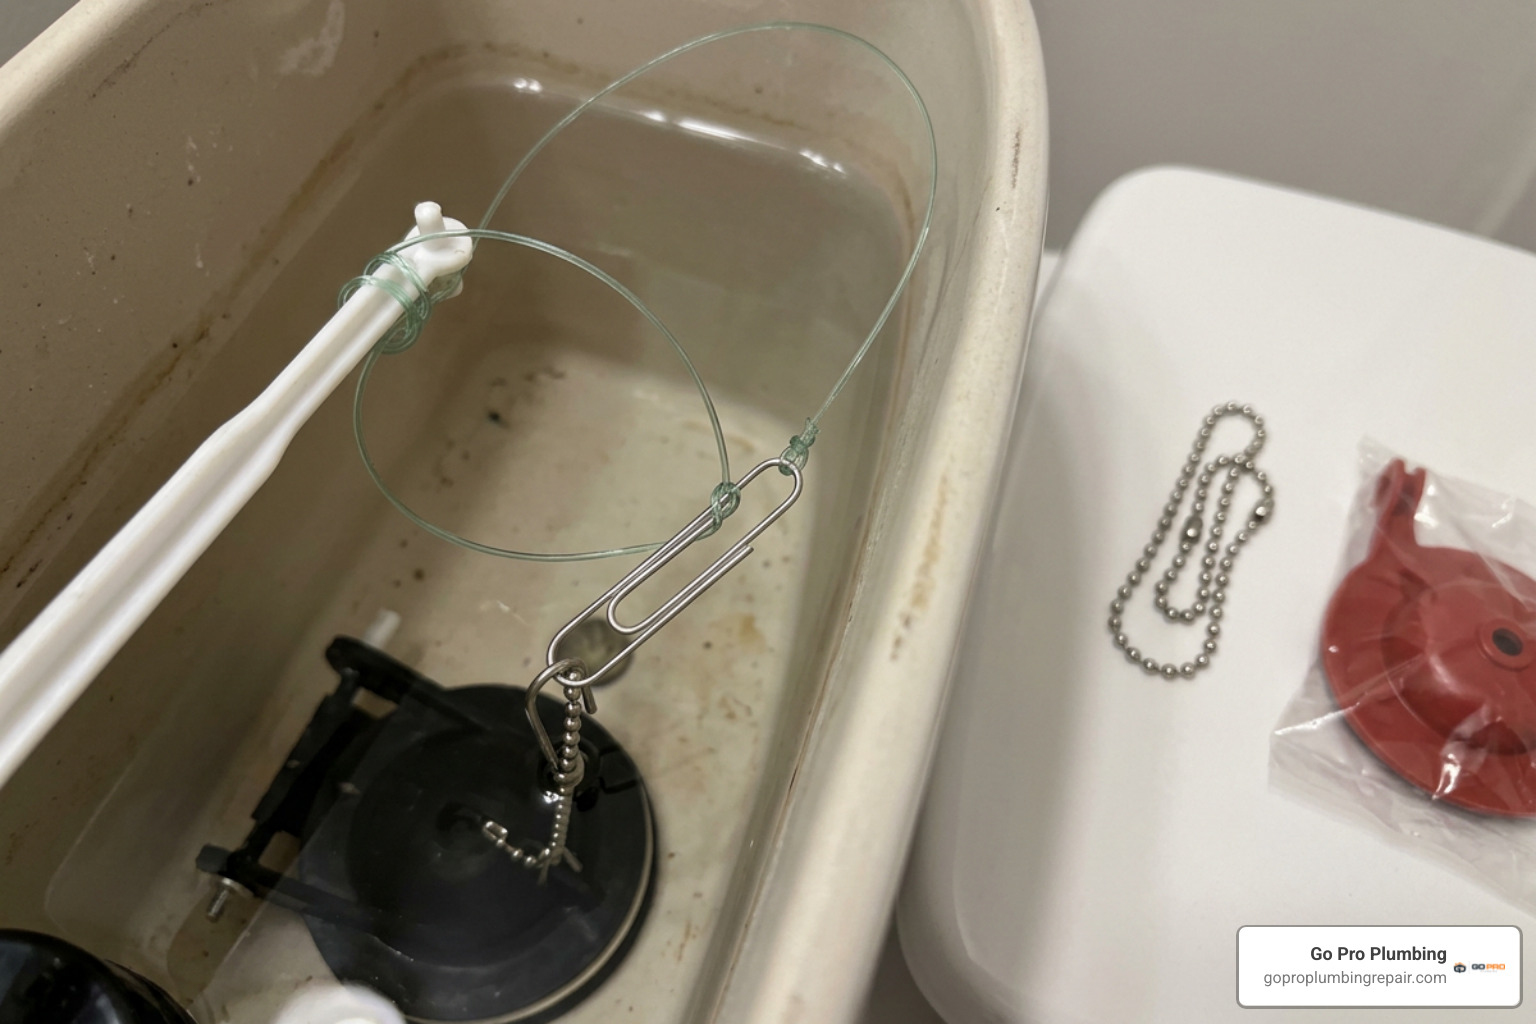
Quick Household Alternatives for Broken Chains
- Plastic-Coated Paperclips: Bend a sturdy paperclip into an “S” shape to reconnect the broken sections or bridge the gap between the lever and flapper. Plastic-coated paperclips resist water corrosion slightly better than raw steel clips, which will rust within days.
- Heavy Nylon Fishing Line: Fishing line is impervious to water, will not rust, and possesses immense tensile strength. Tie one end securely through the flapper eyelet and the other through the lever arm, making sure to leave 1/2 inch of slack.
- Small Zip Ties: Interlink two or three small plastic zip ties to create a durable, non-corroding temporary chain. Cut the tails flush so they do not catch on internal tank fittings.
- Beaded Lamp Pull Chains or Keychains: Extra metal pull chains from household lamps or ceiling fans can substitute cleanly for standard toilet lift chains until a proper replacement is installed.
Note: While these household hacks restore basic function, they are temporary measures. Metal paperclips, safety pins, and twist ties corrode rapidly in standing water, potentially dropping rust particles into the flush valve seat. Replace temporary fixes with a genuine stainless steel lift chain as soon as possible.
When to Replace the Toilet Flapper
Sometimes adjusting or replacing the chain does not stop water from trickling into the bowl. In many cases, the issue lies with the flapper itself rather than the chain tension.
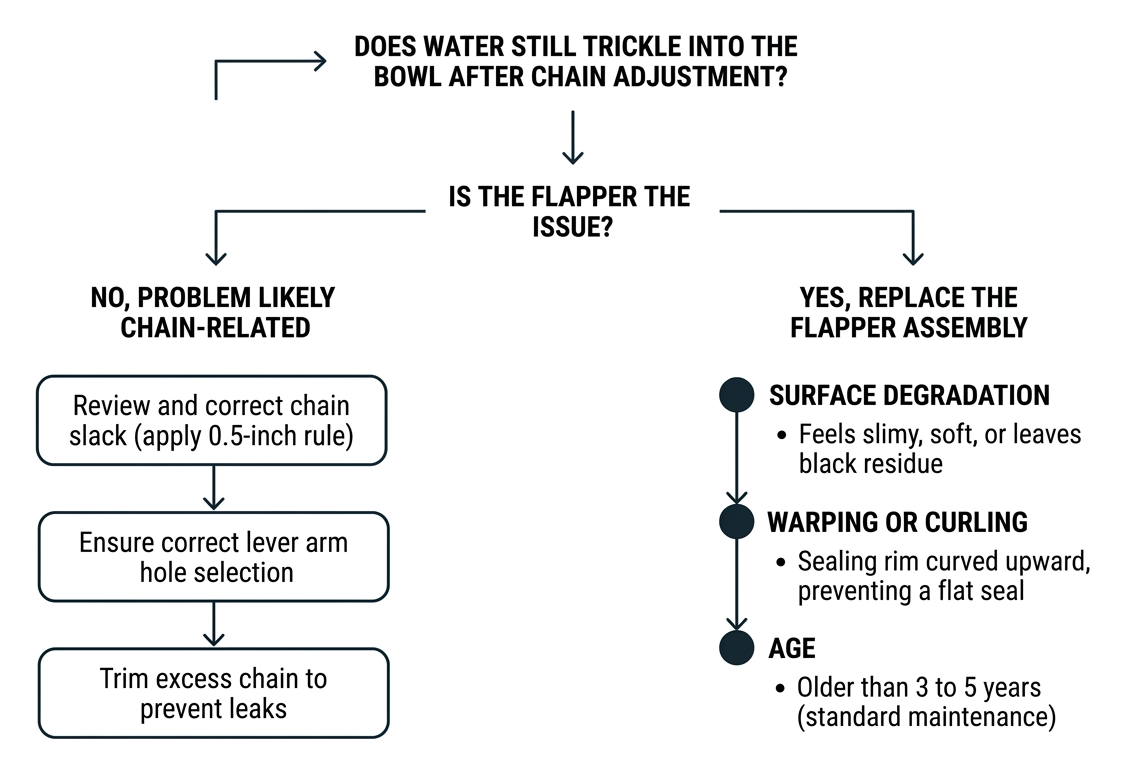
Rubber flappers endure constant water submersion and chemical exposure. You should replace the entire flapper assembly if you notice:
- Surface Degradation: The rubber feels slimy, soft, or leaves black residue on your fingers when touched.
- Warping or Curling: The sealing rim has curved upward, preventing a flat seal over the drain.
- Age: Most flappers have a working lifespan of 3 to 5 years. If yours is older, replacing it is standard maintenance.
- Chemical Blistering: Drop-in bleach or chemical cleaning tablets accelerate rubber breakdown, causing premature warping and brittleness.
A flapper replacement costs about three to five dollars and takes three minutes. If water keeps trickling past the seal after setting proper chain slack, check our guide on how to fix a toilet flapper seal that just won’t quit.
Preventing Chain Tangling, Snags, and Premature Wear
To avoid recurring chain malfunctions and keep your toilet running quietly, implement these simple preventative maintenance habits:
- Install a Guide Tube for Persistent Tangles: If your chain constantly snags on the overflow tube, slide a short 2-inch piece of flexible plastic tubing (such as a clean drinking straw or clear vinyl tube) over the middle section of the chain. This keeps the chain dropping straight down without twisting.
- Select Kink-Free Chain Materials: Invest in a beaded or kink-free stainless steel chain rather than zinc-coated links. Beaded designs distribute pulling forces evenly and eliminate knotting.
- Tighten the Flush Lever Mounting Nut: A loose flush handle creates sideways lever movement, pulling the chain at an awkward angle and causing it to slip off. Toilet handle mounting nuts have left-handed reverse threads—turn the nut counterclockwise inside the tank to tighten it.
- Conduct Monthly Quick Checks: Once a month, remove the tank lid, flush the toilet, and verify that the chain moves freely without rubbing against the fill valve float or the overflow pipe.
- Dissolve Mineral Scale with Vinegar: In areas with hard water, calcium deposits can stiffen chain links and flapper hinges. Soaking the chain and flapper in white vinegar during routine bathroom deep cleans keeps the components supple and free-moving.
Frequently Asked Questions About Fixing Toilet Chains
How much slack should a toilet tank chain have for optimal flushing?
A toilet chain should have approximately 1/2 inch of slack when the handle is at rest and the flapper is fully seated over the drain. This allows the rubber seal to shut tightly without tension, while ensuring that pressing the flush handle immediately lifts the flapper high enough to trigger a complete flush.
Why does my toilet chain keep falling off the flush lever?
The chain usually detaches because the top S-hook has bent open, allowing the link to slip through the lever hole during rapid flushes. It can also occur if there is excessive slack, allowing the chain to whip around inside the tank. Reattach the hook to the lever arm and gently squeeze the opening shut with needle-nose pliers.
What household items can I use as a temporary replacement for a broken chain?
You can use heavy nylon fishing line, plastic zip ties, a beaded pull chain from an old lamp, or a plastic-coated paperclip bent into an S-shape. These provide a reliable emergency fix until you can install a permanent stainless steel replacement chain.
Conclusion
Fixing a loose, tight, or broken toilet tank chain is one of the easiest and most cost-effective DIY plumbing repairs you can perform. By establishing the proper 1/2-inch slack, trimming excess links, and keeping the lift path straight, you can stop water waste, silence phantom flushes, and ensure reliable performance with every handle press.
If you have adjusted the chain, replaced the flapper, and your tank still fails to fill or run correctly, the underlying problem may involve a failed fill valve or deeper plumbing issue. Explore our detailed guide on toilet repair for tank not filling to diagnose complex internal valve failures.
When toilet troubles persist or you simply prefer a professional touch, Go Pro Plumbing is ready to help. We proudly provide fast, dependable, and same-day plumbing services throughout Sacramento, CA, Rancho Cordova, CA, and across Northern California. Contact us today to restore your home’s plumbing system to perfect working order.