
Why Is Your Toilet Rocking? How to Repair a Damaged Flange
By Brian on September 3, 2026
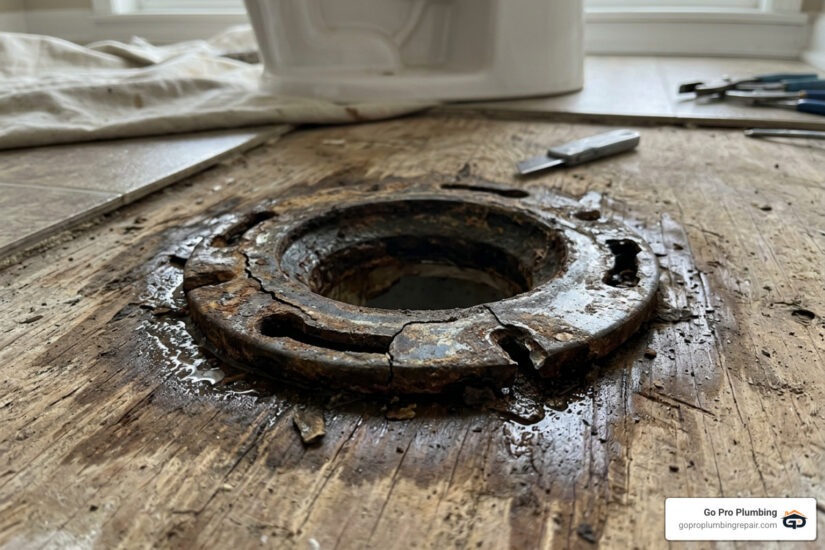
Fix a Broken Toilet Flange Before It Damages the Floor
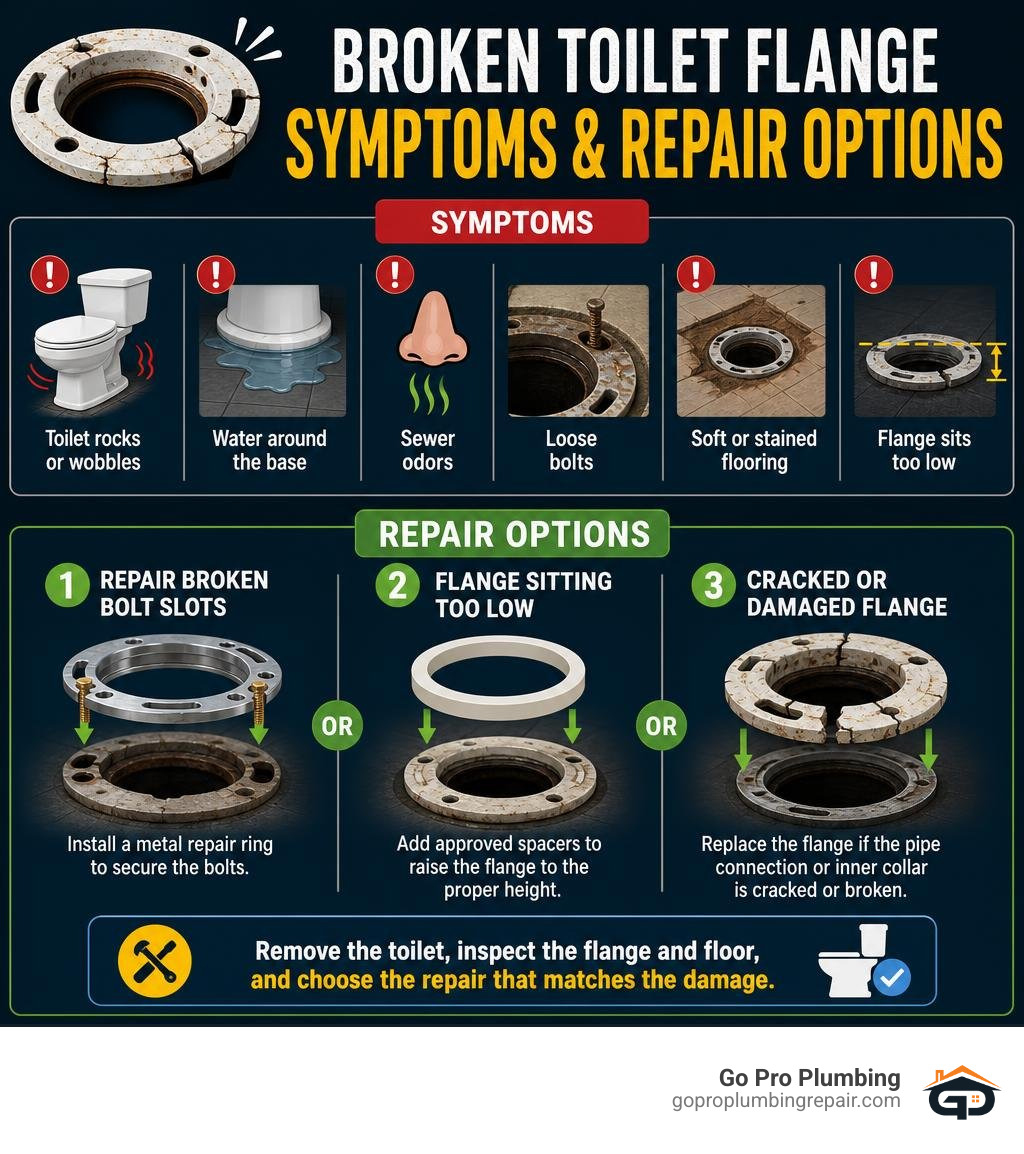
A rocking toilet often means the flange beneath it is cracked, loose, corroded, or sitting too low. To fix a broken toilet flange, remove the toilet, inspect the flange and surrounding floor, then choose the repair that matches the damage: install a metal repair ring for broken bolt slots, add approved spacers for a low flange, or replace the flange if its pipe connection or inner collar is cracked.
Do not keep tightening the toilet bolts to stop a wobble. That can crack the porcelain or crush an already failing wax seal. Water around the base, sewer odors, loose bolts, and soft or stained flooring are all signs the problem needs attention.
The toilet flange, also called a closet flange, anchors the toilet to the floor and connects it to the drainpipe. When it fails, the toilet can shift every time someone sits down. That movement can break the seal and allow hidden leaks that damage the subfloor.
Fix a broken toilet flange terms you need:
What Is a Toilet Flange and Why Does It Fail?
A toilet flange (historically termed a closet flange) is the unsung mechanical anchor of your entire bathroom. It is a circular fitting mounted directly to the subfloor that serves two vital functions: it mechanically fastens your heavy porcelain toilet to the flooring structure via two closet bolts, and it creates an airtight, watertight passage linking the toilet horn to the building’s drainage waste pipe (DWV). A malleable wax ring or rubber seal sits between the bottom of the toilet and this flange, ensuring wastewater flows directly down the drain without escaping onto your subfloor.
Flanges fail for several reasons. Everyday shifting and house settling put mechanical shear stress on the mounting slots. Over-tightening closet bolts during initial installation can crack rigid plastic collars. In older homes, moisture and corrosive sewer gases degrade cast iron and galvanized metals, while unanchored subfloors allow the entire fitting to flex until it snaps. When wastewater escapes past the broken joint, learning how to fix a leaking toilet pipe becomes critical before floor rot spreads.
Recognizing the Warning Signs of Flange Damage
Because the toilet flange hides underneath the porcelain base, homeowners usually notice the downstream symptoms of flange failure before seeing the cracked fitting itself:
- Toilet Wobbling or Rocking: The fixture shifts or tilts when you sit down because one or both closet bolts have lost their anchor in the flange slot.
- Water Pooling Around the Base: Water seeps out across bathroom tiles after flushing, indicating the compressed seal has ruptured due to movement.
- Persistent Sewer Gas Odors: A foul, rotten-egg or sulfur smell lingers in the bathroom because the airtight seal between the drain stack and the room is broken.
- Corroded, Spinning, or Loose Bolts: The hold-down nuts spin freely or pull straight out of the floor because the metal or plastic flange channel has snapped.
- Soft, Discolored Flooring: The vinyl, laminate, or subfloor surrounding the toilet base feels spongy or shows dark staining from long-term sub-surface moisture.
Assessing the Flange: Repair vs. Full Replacement
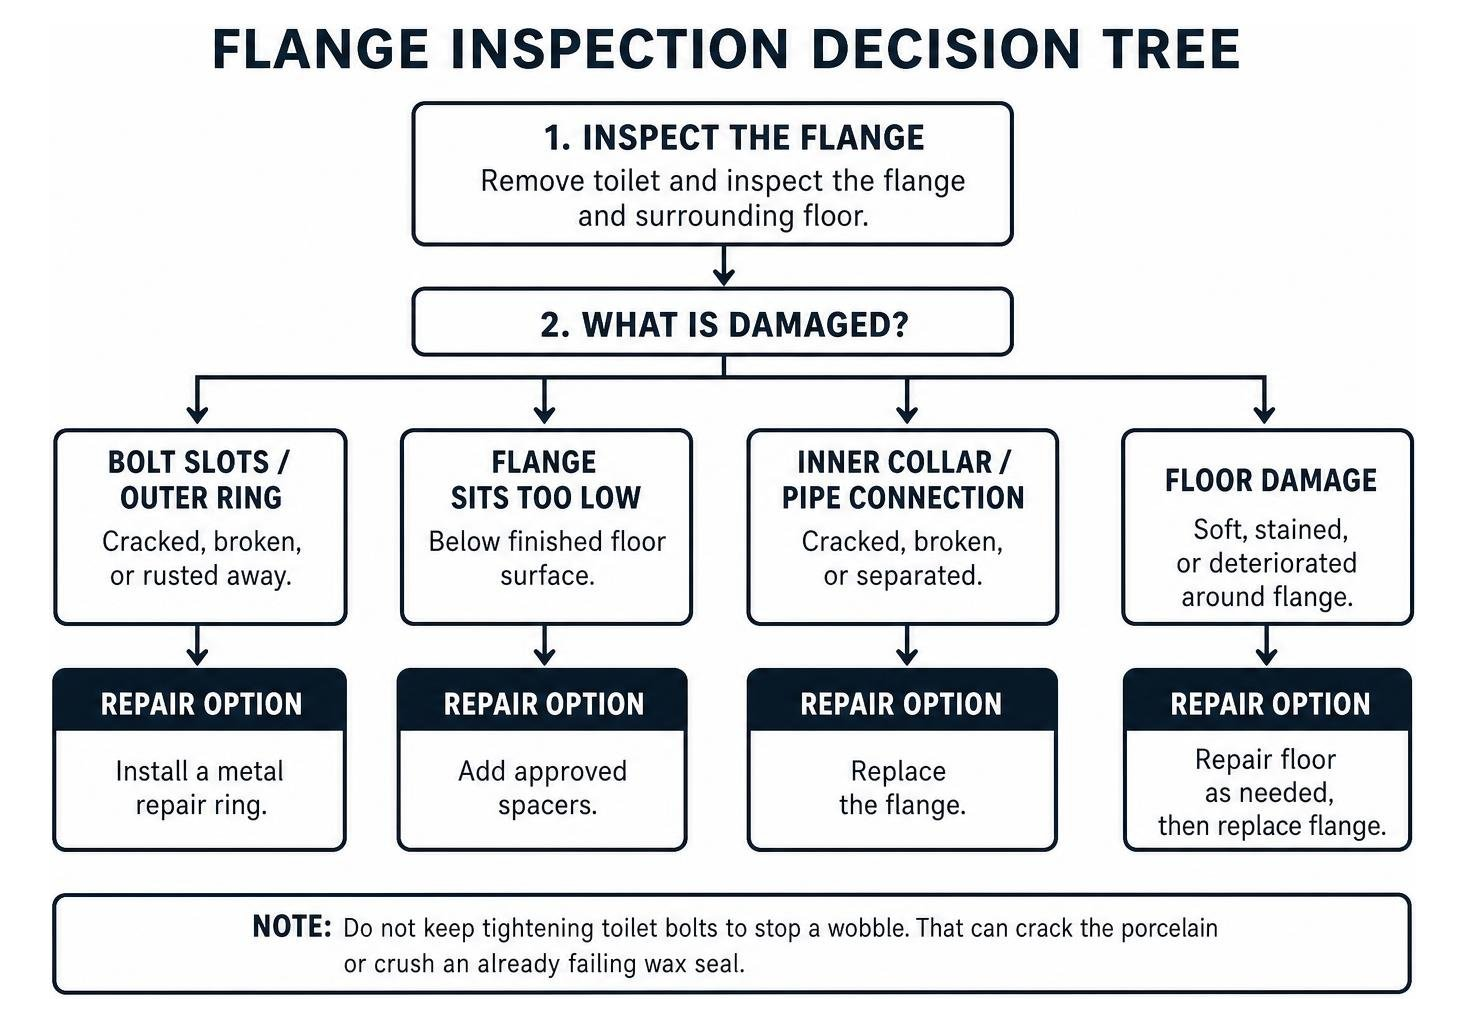
Once you lift the toilet, a thorough visual inspection will determine whether a straightforward retrofit or a comprehensive replacement is required. Professional plumbers assess the damage based on structural integrity, as highlighted in trade resources on evaluating toilet flange failures.
- Outer Ring / Bolt Slot Damage: If the outer rim or T-bolt slots are cracked, broken, or rusted away, but the inner pipe hub and vertical drain line are completely intact, the flange can be repaired with a retrofit metal repair ring.
- Inner Hub or Drain Neck Cracks: If a crack penetrates through the inner vertical throat or hub of the fitting where it joins the drain pipe, water will bypass the seal. A retrofit ring will not stop leaks here; the entire flange unit must be replaced.
- Pipe Stack Compromise: If the vertical drain pipe beneath the floor is fractured, cracked, or severely misaligned, no top-mount repair will suffice. The damaged section of pipe must be cut out and rebuilt.
Choosing the Right Hardware: Repair Rings, Spacers, and Replacements
Modern plumbing hardware provides specialized solutions for almost every flange problem, allowing homeowners and pros to make robust repairs without tearing up finished subflooring.
| Hardware Type | Best For | Typical Material | Key Advantages |
|---|---|---|---|
| Stainless Steel Split Ring | Broken plastic bolt slots with intact pipe hub | 304 Stainless Steel | Two-piece design slips under existing lip; non-corrosive |
| Spanner / Gapper Flange | Single broken bolt channel | Galvanized or Stainless Steel | Quick patch for one side; bridges damaged section |
| Flange Spacer Kit | Flange recessed below finished floor height | PVC / ABS | Stackable in 1/8″ to 1/2″ increments; restores compression |
| Push-Fit / Mechanical Expansion Flange | Heavily damaged PVC, ABS, or Cast Iron pipes | PVC with rubber gasket & hex bolts | Slides inside drain pipe; seals with friction/compression |
| Solvent-Weld Replacement Flange | Complete rebuild of PVC or ABS pipe | PVC or ABS with metal ring | Permanent, solvent-cemented factory connection |
When to Use Metal Repair Rings vs. Plastic Replacements
All-plastic PVC or ABS replacement flanges are inexpensive, but their bolt channels remain vulnerable to cracking under high torque or structural movement. When completing a repair, we strongly recommend upgrading to heavy-gauge 304 stainless steel or durable brass repair rings.
Stainless steel provides immense mechanical strength, preventing closet bolts from ripping free under tension. Furthermore, bathroom subfloors are humid environments exposed to condensation and cleaning chemicals; 304-grade stainless steel resists rust and structural degradation far better than standard painted or galvanized metals. For more context on choosing between material assemblies, consult Bob Vila’s guide to toilet flange replacement options.
Specialized Options: Split Rings, Clamshells, and Gappers
- Two-Piece Split Rings: Designed with interlocking halves that slide directly beneath the remaining lip of a cracked PVC or ABS flange. Once bolted into the subfloor, they sandwich the old fitting and provide fresh, heavy-duty bolt channels.
- Clamshell Rings: Hinged metal rings that wrap around an existing pipe neck, providing 360-degree support when an original plastic collar has completely broken off.
- Metal Gapper Brackets: Half-moon or curved metal repair brackets designed to reinforce a single broken slot without requiring disassembly of the opposite, undamaged side.
Step-by-Step Guide: How to Fix a Broken Toilet Flange
Before beginning your toilet flange repair, prepare the work area to protect against sewer gases and water damage.
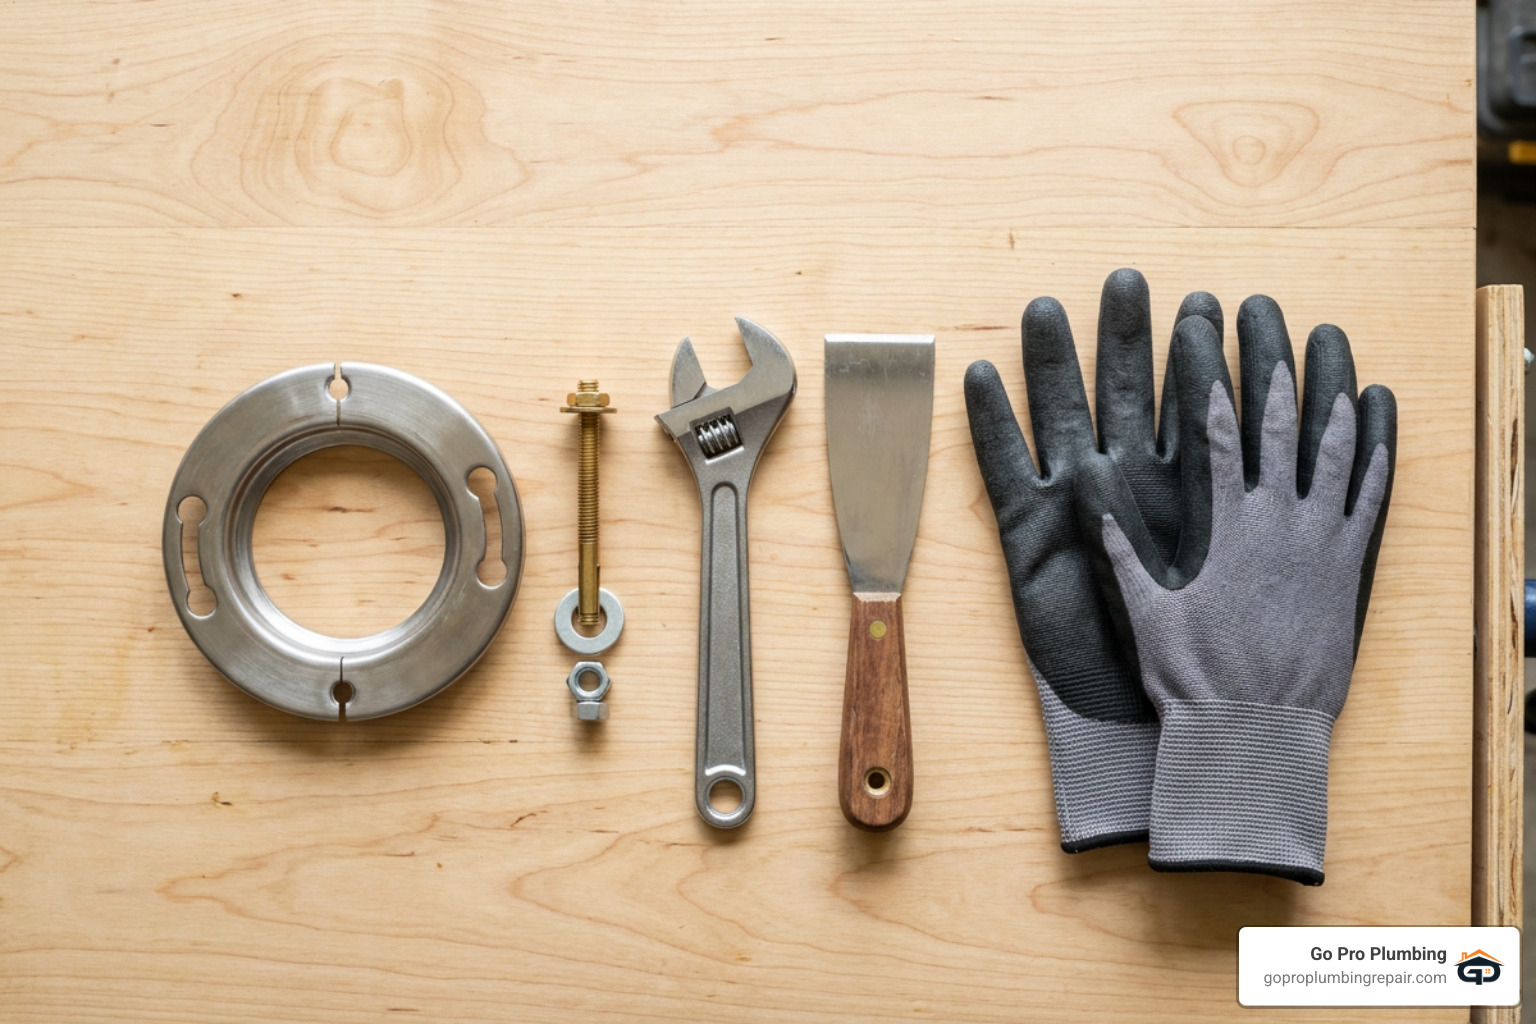
Tools and Materials Checklist
- Adjustable wrench and ratchet set
- Putty knife or stiff scraper
- 304 stainless steel repair ring or replacement flange
- Solid brass closet bolts (5/16″ x 2-1/4″) and washers
- New wax ring with plastic horn (or rubber seal)
- 100% silicone sealant
- Multi-surface subfloor screws (stainless steel)
- Cordless drill, masonry bits (for tile/concrete), and driver bits
- Disposable rag or tethered sponge (for drain plug)
- Bucket, sponge, rubber gloves, and safety glasses
Preparation and Teardown
- Shut Off the Water Supply: Turn the angle stop valve behind the toilet clockwise until fully closed.
- Drain the Fixture: Flush the toilet and hold down the handle to empty the tank. Use a sponge or small cup to remove any remaining water from both the tank and the toilet bowl trap.
- Disconnect Water Line: Unthread the flexible water supply line from the base of the toilet fill valve.
- Remove Closet Bolt Nuts: Pry off the decorative plastic caps and remove the nuts using an adjustable wrench. If the bolts spin freely or are rusted solid, cut them just below the nut using a mini hacksaw.
- Lift and Set Aside: Carefully lift the toilet straight up (toilets weigh 70–120 lbs; ask for a helper if needed) and set it aside onto an old blanket or cardboard.
- Block Hazardous Sewer Gas: Immediately stuff an old rag tied to a string into the open drain pipe. This prevents noxious, toxic sewer gases from entering your home and keeps dropped tools or debris from falling down the waste line.
- Scrape Old Wax: Use a putty knife to thoroughly scrape away old wax and debris from the flange surface and subfloor, wiping the area clean with disposable towels.
How to Fix a Broken Toilet Flange with a Stainless Steel Repair Ring
This zero-demolition repair works best when the bolt slots are cracked but the main pipe body is solid.
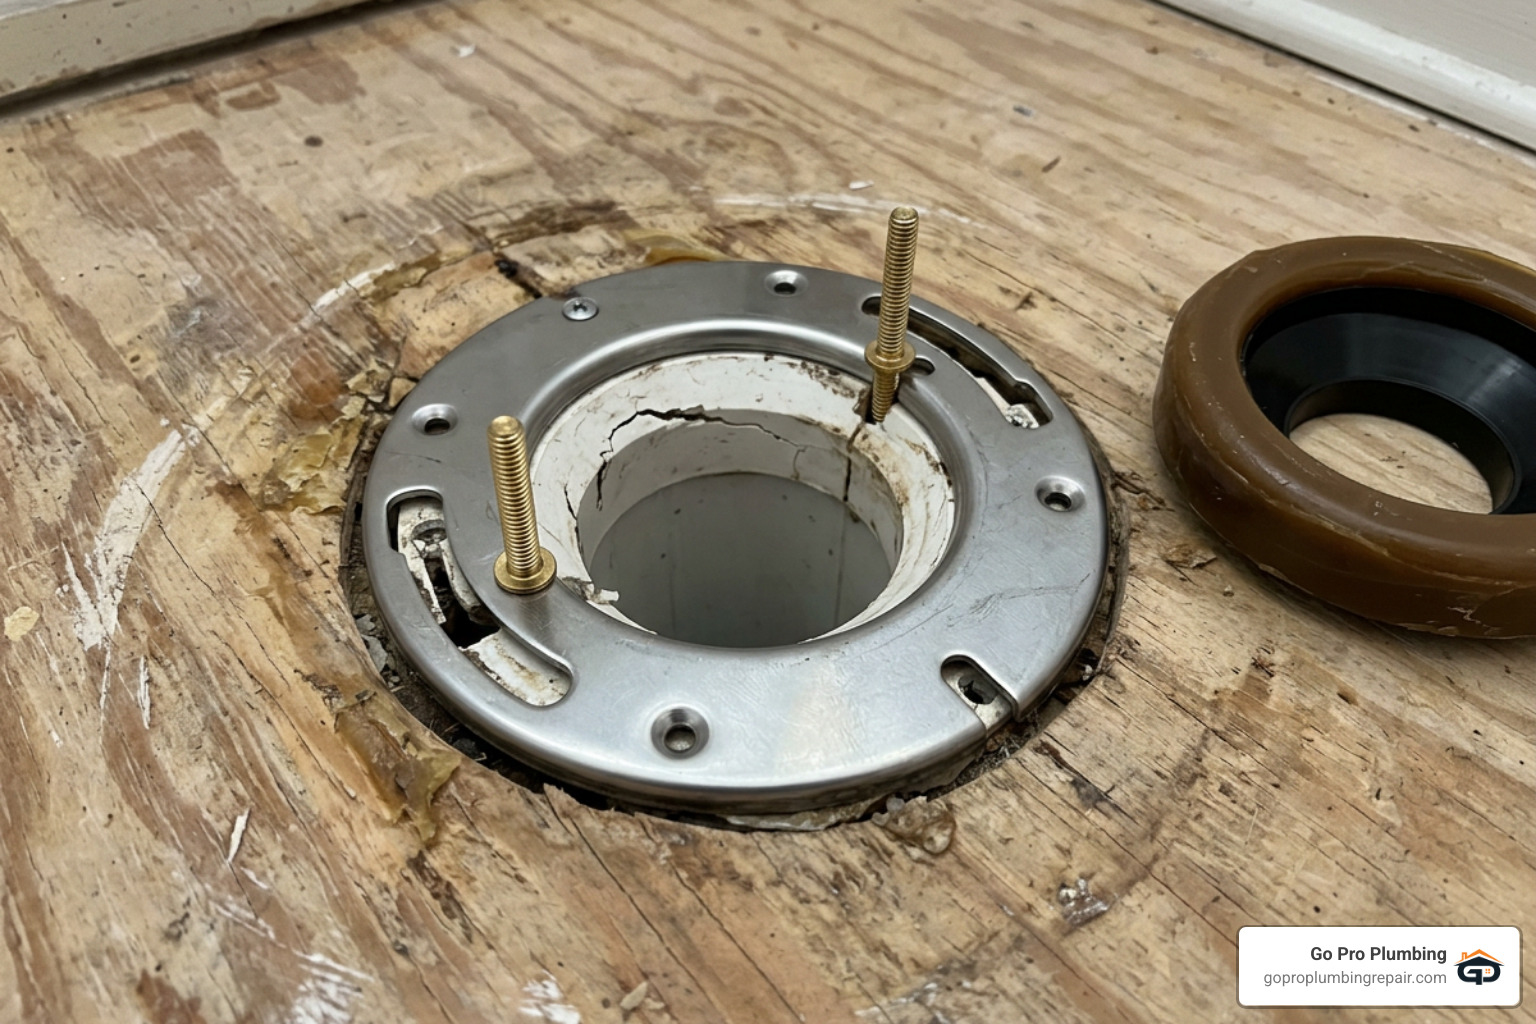
- Clean and Clear: Ensure the remaining flange lip is free of wax and jagged plastic burrs. Trim sharp plastic edges with a utility knife or multi-tool if necessary.
- Position the Repair Ring: Slide the two-piece stainless steel split ring underneath or directly over the existing flange rim. Align the elongated bolt slots at the 3 o’clock and 9 o’clock positions parallel to the back wall.
- Apply Silicone Base: Lift the ring slightly and apply a liberal bead of 100% silicone sealant between the old flange and the new repair ring to cushion the joint and eliminate voids.
- Anchor to the Subfloor: Pre-drill pilot holes through the ring’s mounting holes. Fasten the ring securely into the wooden subfloor (or into concrete using masonry anchors) using at least four to six corrosion-resistant stainless steel screws. Do not rely solely on the old plastic; anchoring directly to the subfloor gives the ring its mechanical holding power.
- Install New Closet Bolts: Slide new solid brass T-bolts into the repair ring channels and lock them upright using plastic retainer washers.
How to Fix a Broken Toilet Flange Made of Glued PVC or ABS
If the inner collar or hub is fractured, full replacement of the glued plastic fitting is required.
- Cut the Internal Collar: Using an internal pipe cutter attached to a cordless drill, make a clean, horizontal cut inside the pipe below the damaged flange collar. Alternatively, carefully score the old flange hub vertically in multiple sections with a mini hacksaw blade, then pry the fragments away with a flathead screwdriver and hammer, taking care not to gouge the main pipe wall.
- Clean and Dry-Fit: Clean out all plastic shavings and burrs. Dry-fit an internal push-fit replacement flange or a solvent-weld replacement flange to ensure it sits flat on the finished floor.
- Solvent-Weld (For Traditional PVC/ABS): Apply approved purple primer to the pipe and fitting socket (for PVC), followed by heavy-duty solvent cement. Push the new flange into place with a quarter-turn, instantly aligning the bolt slots at 3 and 9 o’clock. Hold firmly for 30 seconds.
- Push-Fit Alternative: If using a gasketed push-fit flange, lubricate the rubber O-rings with soapy water or plumber’s grease, press it straight down inside the 3-inch or 4-inch pipe, and anchor the top stainless steel ring directly to the subfloor with screws.
How to Repair Corroded Cast Iron Flanges Using Mechanical Expansion
Older cast iron systems rarely require open-flame lead melting thanks to modern mechanical expansion fittings, as demonstrated in expert techniques to repair a cast-iron toilet flange.
- Chisel Away the Broken Collar: Wear eye protection and use a cold chisel and hammer to break out the remaining corroded cast-iron lip. Remove all rusted metal fragments.
- Clean the Cast Pipe Interior: Use a wire brush and vacuum to scour rust scale from the inside walls of the cast iron drain pipe.
- Insert the Expansion Flange: Slide a mechanical expansion replacement flange (such as a Twist-N-Set) inside the cast iron pipe opening. Ensure the top flange rests flat against the floor.
- Tighten Hex Bolts: Tighten the internal hex-head screws evenly in an alternating pattern using a ratchet. As the screws turn, they pull up an internal tapered plate that compresses a thick rubber gasket outward against the cast iron pipe walls, forming a gas-tight and watertight mechanical seal.
- Secure to Floor: Drive heavy-duty wood screws or masonry anchors through the outer collar into the subfloor.
How to Correct Low Flanges and Uneven Subfloors
A common issue during bathroom renovations is installing new, thicker ceramic tile or luxury vinyl planks over existing subflooring. This leaves the toilet flange sitting recessed below the finished floor level.
A toilet flange should rest directly on top of the finished floor, or sit roughly 1/4 inch above it. If a flange sits recessed below finished floor height, standard wax rings will not compress adequately, leading to immediate leaks.
Never double-stack standard wax rings to make up for height deficits. Under compression, stacked wax easily squishes sideways into the drain path, causing recurring blockages and premature seal failure.
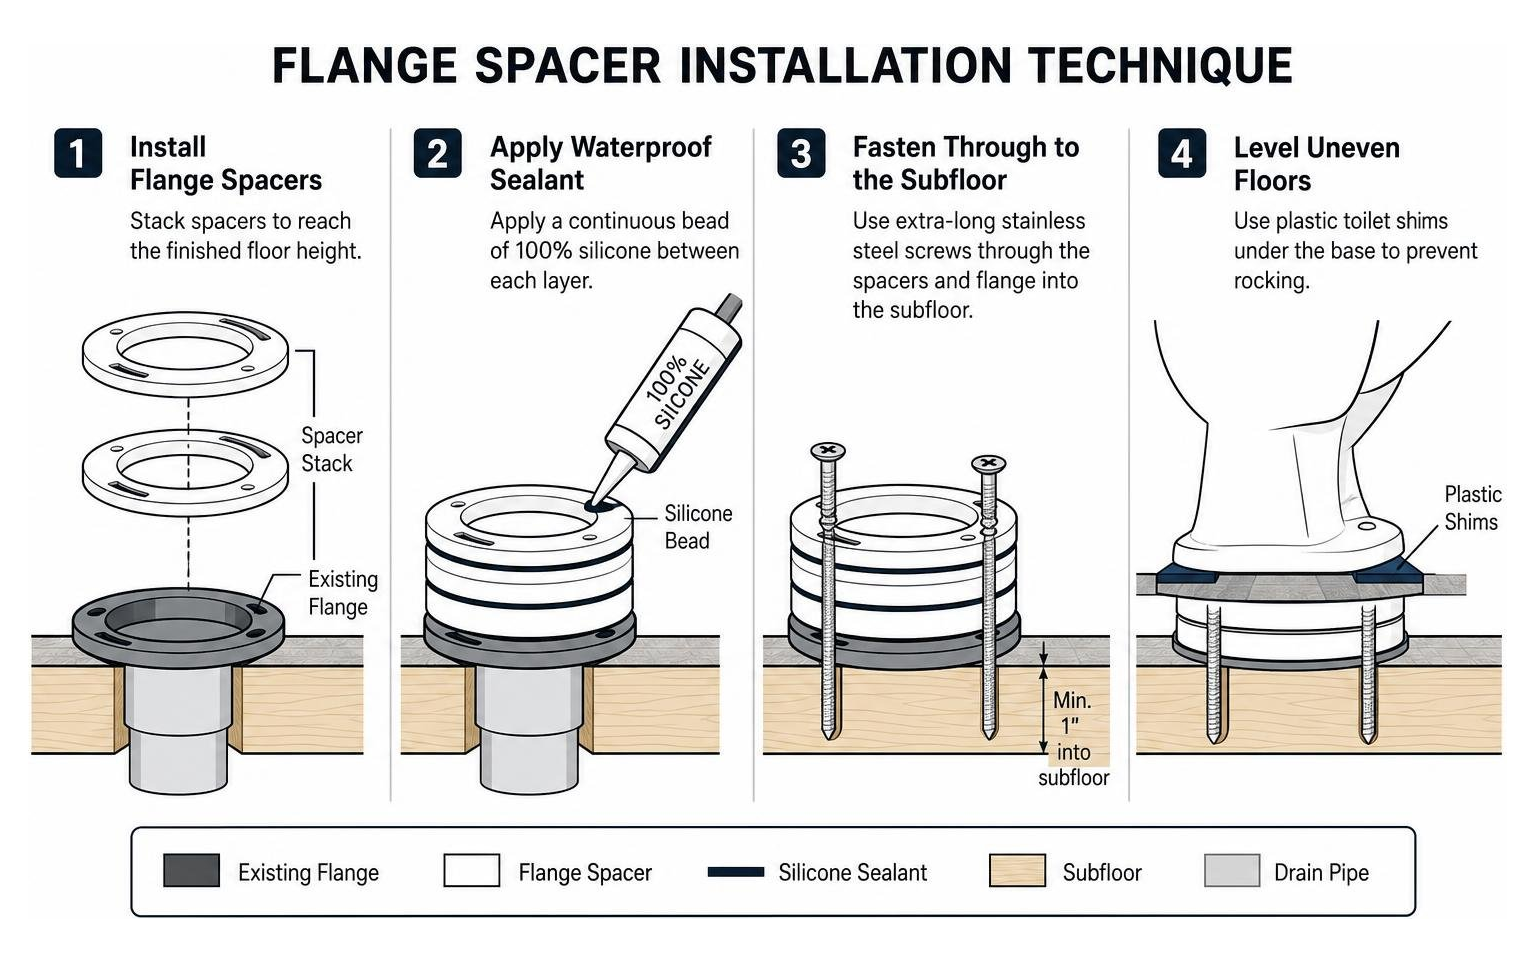
- Install Flange Spacers: Purchase stackable PVC/ABS flange spacer rings (available in 1/8-inch, 1/4-inch, and 1/2-inch thicknesses).
- Apply Waterproof Sealant: Apply a continuous, generous bead of 100% silicone sealant between the existing flange and each spacer layer to ensure a watertight bond between stacked rings.
- Fasten Through to the Subfloor: Use extra-long stainless steel screws that drive completely through the spacer stack, through the old flange, and at least 1 inch deep into the solid subfloor below.
- Level Uneven Floors: If your bathroom tile is slightly uneven, have plastic toilet shims ready. Shimming the porcelain base prevents rocking that could break your newly adjusted flange. For further diagnostics on fixture stability, review our guide on how to repair a toilet.
Reseating the Toilet and Verifying a Watertight Seal
With the flange repaired, reinforced, and properly set to floor height, you can reinstall your toilet fixture.
- Remove Drain Rag: Take the rag or sponge out of the drain pipe! (Forgetting this step is a classic DIY mistake that results in immediate, messy overflows).
- Install Closet Bolts and Wax Ring: Slide new solid brass closet bolts into the side slots, securing them upright with plastic retainers. Place a fresh wax ring with an integrated plastic horn directly onto the center of the flange, horn pointing downward into the drain.
- Lower the Toilet Vertically: Align the toilet base mounting holes directly over the closet bolts. Lower the fixture straight down. Do not twist or rock the bowl back and forth, as this will tear the wax and ruin the seal.
- Compress the Seal: Press down firmly using your body weight centered over the toilet bowl until the base rests flat and stable on the finished floor.
- Tighten Nuts Alternately: Place plastic washers and metal washers over the bolts. Hand-tighten the nuts, then use an adjustable wrench to snug them down, alternating side-to-side half a turn at a time.
- Crucial Warning: Snug is sufficient. Over-tightening will instantly crack the fragile porcelain base.
- Reconnect and Test: Reattach the flexible water supply line and slowly open the shut-off valve. Let the tank fill completely and flush the toilet 4 to 5 times while closely inspecting the floor perimeter with a dry paper towel for any moisture.
- Caulk the Base: Apply a neat bead of silicone or tub-and-tile caulk around the front and sides of the toilet base to prevent mop water from seeping underneath, leaving a 1-to-2-inch uncaulked gap at the rear base. This open weep hole ensures that if an internal leak ever occurs in the future, water will emerge immediately onto the floor rather than remaining trapped unseen beneath the bowl.
Frequently Asked Questions About Toilet Flange Repairs
Can I fix a broken toilet flange without removing the toilet?
No. The closet flange sits entirely beneath the porcelain toilet base. You must disconnect the water supply, unbolt the fixture, and lift the toilet off the floor to inspect the subfloor, clear old wax, and securely anchor repair rings or replacement fittings.
Can epoxy or JB Weld permanently repair a cracked flange?
Epoxy or plastic weld compounds are not reliable permanent solutions for cracked closet bolt channels. When you tighten a toilet to the floor, closet bolts exert constant vertical tension and shear stress. Rigid chemical adhesives lack the structural tensile strength needed to hold this load and will eventually fracture under everyday use. Epoxy should only be used as a short-term temporary patch while waiting for proper mechanical hardware.
What should I do if the drain pipe below the subfloor is cracked?
If the vertical waste stack beneath the floor is split or cracked, surface repairs and top-mount flanges cannot solve the problem. Water and sewer gas will escape into your joists and ceiling below. This repair requires cutting out the compromised pipe section from below or opening the subfloor to rebuild the DWV stack. In these scenarios, scheduling professional toilet repair services ensures the drainage line complies with Uniform Plumbing Code standards.
Conclusion
A rocking toilet is more than a minor annoyance; it is an active threat to your bathroom’s structural subflooring. By identifying the root cause, selecting the appropriate 304 stainless steel repair ring or stackable spacer kit, and properly securing the hardware directly to the subfloor, you can permanently eliminate toilet wobble and protect your home from costly water damage.
If you encounter severely rotted subfloors, fractured cast iron waste stacks, or simply prefer to have the job completed by licensed professionals, Go Pro Plumbing is here to help. Serving Rancho Cordova, Sacramento, and communities across Northern California, our experienced team provides prompt, dependable same-day service and outstanding customer care. Contact us today to schedule your expert toilet plumbing services and restore your bathroom fixtures with complete peace of mind.